Sunday, August 23, 2015

Bee Forage. 8.23.15

Buckwheat in bloom.  8.23.5

Honebee on buckwheat flower.  8.23.15
 Buckwheat is in full bloom.  I planted the buckwheat seeds 7.21.15 to 7.23.15.  They started blooming, barely, one week ago.  So it takes about 3 weeks to begin blooming, and 4 weeks to be in full bloom.

Yesterday I did not see bees foraging the buckwheat.  Today they are foraging in force.


I replanted some bare patches where I must not have spread the seeds evenly, today.  I also planted buckwheat seed among the cornstalks, where I harvested that last of the sweetcorn today.

Other bee forage:

Very active on Chinese Chive, compact version.
Autumn Joy - type Sedum starting to bloom and activity is growing.
Active on  the remaining borage and oregano.
Honeybee on Buckwheat Flower.  8.23.15
Honeybees on Sedum flowers.  8.23.15

Honeybees Foraging Sedum Flowers.  8.23.15

Cluster of Autum Joy - Type Sedum, Starting to Bloom.  8.23.15
The sedum flowers are just beginning to open.  Sedum is a bee favorite - they will be foraging with many bees per flower cluster, until the plant is finished blooming.

I'm impressed with how long the oregano blooms and is foraged.  It looks almost done, but the bees appear to seek out every last flower.  When they are done, I want to save seeds for starting a much larger patch next year.
Honeybee on Oregano.  8.23.15

Saturday, August 22, 2015

Late Summer Kitchen Garden. Starting Seeds. Barrels. 8.26.15


Barrel #1.  Asian Greens, Kohlrabi, Bunching Onions.  8.26.15
 This is a progress report on some of the seeds I am starting for later Summer, or early Fall starts, for Fall and early winter benefit.  These are all barrel planters that I either had with something earlier that finished, or had left alone for a year or two and now being called back into service.   If there were weeds, I pulled out the weed plants - easy with soft potting soil, then turned the top layer of soil with a hand-spade, and added a top layer of a few inches of potting soil.  The one with the dead bamboo, was too root bound, so I just added some potting soil on top.
Barrel #3.  Chinese pole beans and last year's garlic.  8.26.15

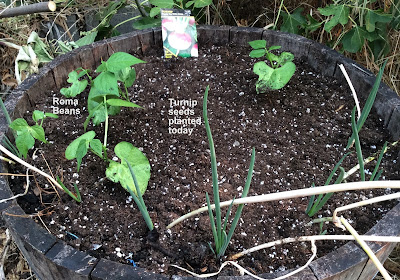
Barrel #4.  Roma beans, Turnips, and a few E.W.O. Scallions.  8.26.15
 I want the beans mostly for seeds.  Seeds take longer than fresh beans, but nothing ventured, nothing gained.

This year is projected for a warmer winter due to the impending el Niño effect.  I speculate that will extend the season.  If not, that's OK too.

Days currently in 90s.  Nights in 50s and 60s.  Seeds are germinating quickly.  The barrels need daily water.  The plants are concentrated in small spaces, so shade the soil and not needing as much care as if in the ground.  I am watering with 1/4 tsp miracle grow in 2 gallons of water.  Basically fertigating.  For some, I occasionally peecycle with 1/2 liter of home-grown fertilizer in 2 gallons.  Not more, because I don't want salt build up.

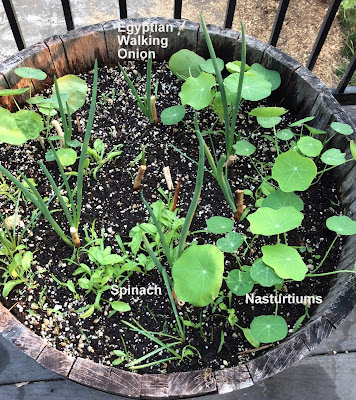
I'm getting excellent, rapid growth for Egyptian walking onionsnasturtiums, and Swiss chard.  Should have some for cooking in 2 or 3 weeks.  Spinach might also be ready in 3 or 4 weeks.  The nasturtiums are for adding leaves too salads.  The E.W. onions are for scallions, and to maintain my crop.  I got about 80% viable from the ones that were in the bed I wanted to renovate, chewed off by rabbits or deer, crowded by wild carrot, and left dry.  E.W. Onions are a damn hardy breed.


As I dig more into the old E.W. bed that I want to renovate, I remove more, clean them up, and plant them in random spots among other plants.  That will give a more extended Fall harvest of scallions, and also some to leave through the winter for Spring harvest and to maintain the clone.


Barrel #6.  Nasturtiums, Spinach, and some E.W.O. Scallions.  8.26.15
Today I planted seeds for Kohlrabi - expect harvest in 60 days, and Turnip - expect harvest in 50 days.  With the hot summer weather, they should get a fast start, then slow down a little as it cools.
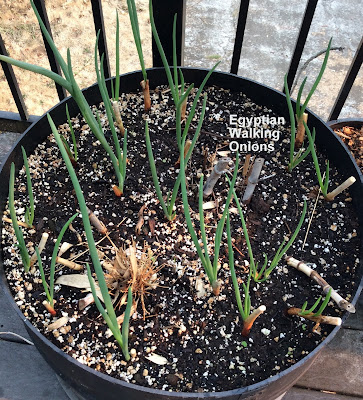
Barrel #7.  Egyptian Walking Onions.  ~3 Weeks,  8.26.15
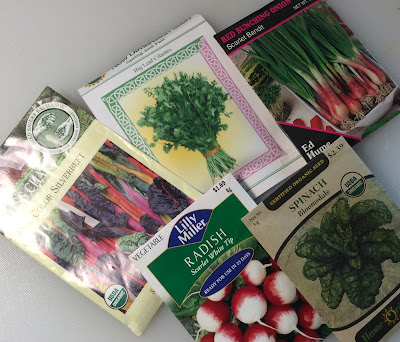
Some of the seeds I am starting.  8.26.15
I also planted an Asian Greens mix that contains equal parts Arugula, Chinese cabbage, Japanese spinach, mustard-mizuna, mustard-green, mustard-Ruby Streaks, and tatsoi. Those were planted about one week ago and now are all germinated.  Cilantro seeds are also included in the barrel gardens, and growing.  The goal with those is to plant a few more each week, for extended harvests.

I planted scarlet bunching onion seeds because I saw them in the store and wanted to try something different.  At the time I didn't know if the E.W. onions would grow.  The scarlet bunching onion seeds are also germinating.

All in all, I think the late summer planting in large containers, has a lot of potential for kitchen gardening.  Easy, more accessible for the older or less vigorous gardeners, and grow more in a very compact space.   Not much bending over at all, very easy to pull out tiny weeds and putter.


Tuesday, August 18, 2015

Saving seeds. Cilantro. 8.18.15

Cilantro Seeds Ready To Collect.  8.18.15
 I left a bunch of cilantro to go to seed.  It's brown and dry, so ready to collect seeds.

I may use some for spice.  Cilantro seeds are the same as coriander.

Saving seeds is very easy.  I used scissors to cut seed bunches, placed them in a bowl.  Then worked them for a couple of minutes with my fingers.  The seeds fall off the stems.  They don't need to have all of the chaff removed.

I'll let them sit a little while, then they go into an envelope to save for next Spring.  I might plant some this late summer.
Partially Cleaned Cilantro Seeds.  8.18.15

Autumn Joy - type Sedum. Propagation. 8.18.15

Sedums are starting to bloom and the bees are already on them.  There were 2 broken pieces.  This may not be a good time for taking cuttings.  If so, nothing lost.   If they take, then there are some more plants.
Sedum First Blooms.  8.18.15

Sedum CUttings.  8.18.15
 Most are "Autumn Joy" type sedums.  I read, many are sold in the US with that name but in reality are unnamed seedlings.  No problem.  They are great in the border and are great bee forage.  The dark red one might be "Munstead Red". 

I cut the broken pieces into shorter lengths.  I took off the bottom leaves.  The cuttings were allowed to dry briefly.  Not long.  It's in the mid 90s today.  Then I filled small containers with organic potting soil and inserted the stem cuttings and leaf cuttings into the medium.  They are watered and now in the shade.

No rooting hormone.   I read this method works earlier in the year.  Sedums are vigorous, so maybe it will work now.

Root primordia had already formed near the base of the green variety, above the break.   That one should grow even if the others don't.

Low growing, trailing sedums don't need special care to grow from cuttings.  I just cut or pull off pieces and insert into soil where I want them to grow.  These bushier types might not be as easy, or they might.

Sedum Cuttings.  8.18.15

Sedum cuttings.  8.18.15

Sunday, August 16, 2015

Sweet Corn Comparison, Ear to Ear. 8.16.15

Sweetcorn.  8.16.15
Until this year, I never attempted to grow sweetcorn here.  This year I planted two varieties.

Today was a good comparison of the two varieties. 

The Trinity plants were much taller, more than 6 foot.  The Early Sunglow plants were only about 3 or 4 foot tall.

Trinity made a much, much larger ear.  With larger kernels.

Flavor-wise, I think the Early Sunglow has a slightly richer, sweet-corn flavor, and the Trinity is sweeter.

They were grown on opposite sides of the yard.  There might have been a soil difference.  I planted the Early Sunglow about 2 weeks earlier than the Trinity.  The Trinity is just beginning to bear.  Early Sunglow is done.  Only a few ears developed on the Early Sunglow plants.  Each and every Trinity plant has an ear.  Some have two.

If I didn't have them here to taste side by side, I would think the Trinity is as good as the Early Sunglow.  Given the big difference in yield, Trinity looks like the more preferred variety by far.   The flavor difference is too subtle to matter.

This difference might just be in my yard, or might be that the soil was not good in the location for Early Sunglow.  It might be worth a try in a different spot next year.

Savoring the Summer. Crookneck Early Golden Summer Squash Chips. 8.16.5

Crookneck Summer Squash and Chips. 8.16.15
Very simple. 
1.  Slice squash into paper thin slices using mandolin.  Do not slice fingers, which would give the squash a nice red tinge but is not considered hygienic.
2.  Spread on food dehydrator plates.
3.  Crush a few cloves of garlic in olive oil to make a paste.  I used a mortar and pestle.
4.  Dab a little garlic paste on each slice.  Try to use minimal amount.
5.  Sprinkle the slices with a minimal dusting of salt an pepper.  Very little, because these slices are very thin and don't need much.
6.  Dry in food dehydrator about a day at 130.

These are crunchy, like potato chips.  Really delicious.  I hate half a squash worth in one sitting.  They do get limp if they sit out very long, so not intended for long term storage.

Bee forage. 8.16.15

Chinese Chive Bee Forage.  8.16.15
 Main bee forage currently is Chinese Chive.  They prefer Chinese chive to all other currently blooming flowers.  These are really pretty.  For the looks and bees, drought and freeze tolerance and sturdiness, this plant is an excellent flower border plant.  They are also delicious as a filling for the world's best Manchurian dumplings.

The borage is also foraged fairly heavily.

Not just honeybees.  Other larger and smaller pollen foraging insects, butterflies, moths, hoverflies, and small bees, forage the chives.

Sedum flowers are not open yet.  Bees find the few flowers that are almost open, and check them to see if they are ready yet.

Oregano is heavily foraged but in decline.  They will probably be done in a week.

Bees are ignoring California poppies.  Not on the marigolds much now, either.
Flower Bed For Bees.  8.16.15

Insects on Chinese Chives.  8.16.15
Despite what I read, the honeybees and other bees, ignored the nasturtiums.

They check penstemon without much enthusiasm. Maybe this cultivar is not tasty.  I don't know the cultivar name.

Parsley fell over and may not bloom.  Only one plant.

A flower border for bees is incredible fun.  The air is alive and active, with bees and other foraging the flowers.  So much more than a sterile, store bought, "designer" "HGTV" border.

Preserving Summer. 8.16.15

Sundried Hollywood Plums.  8.16.15

Sundried and Sun-drying tomatoes.  8.16.15
 There is so much now from the kitchen garden.  Can't eat it all at once.  I give some away.

Dried fruit from home garden is surprisingly good.  The near-black Hollywood plums are tart and sweet and concentrated plum flavor.  Like fresh ones but more intense.  Nothing like a prune, which is a dried European plum.

The home grown sun dried tomatoes are even better than store bought,  And store bought sun dried tomatoes are pretty good.

They don't have to be Roma tomatoes.  Ning taught me we can dry any kind.

With these fruits, we dry a few days in the sunroom.  During the day it is in the 120s there.  I can use a food dehydrator, but the sunroom works as well with no power.

Then they go into food bags into the freezer.

Freezer Jam.  Finally found instant pectin.  The advantage is, instant pectin does not need to be dissolved.  No water needs to be added.  So the jam is just fruit, some sugar, and pectin.
Today's Harvest.  8.16.15
 For grapes, only 1/2 the recipe amount of sugar is needed.  Maybe not even that much.  This was amazingly good:

2 cups washed grapes.   These were Price grape.
1/3 cup sugar.
2 tablespoons instant pectin.

I wash the grapes. Place them in food processor and chop coarsely.

Then combine the sugar and pectin.  Add to food processor and process until well mixed.
Ingredients for Grape Freezer Jam.  8.16.15
 I leave the seeds intact, and don't worry about chopping the skin too finely.    Grape flavor is highly concentrated in the skin.  Grape seeds are a health food and the crunchiness adds fun to the jam, similar to seeds in figs.
Cornbread with Grape Freezer Jam.  8.16.5
Very good on cornbread with butter.  Use unsweetened corn bread.  Or mixed with plain, homemade yogurt.

Ladle jam into jars.   Any small jar will do.  These keep 1 year in freezer or 1 month in fridge.  The uncooked fruit flavor sings with joy.

Hollywood plums also make excellent plum jam.  Same as grapes, but slice the plums flesh off the seeds.   Leave the skin on the slices.  Use 2 cups, same as grape jam.  Add 1 tablespoon lemon juice.  The rest is same as grapes.  It's almost like candy, sweet and sour and full of undiluted flavor, unlike cooked fruit jams with high fructose corn syrup from the grocery store.

In either case, the jam fills 2 8-oz jars.

Daylily Seeds. Progress Report. 8.16.15

Daylily Seeds, Soaked 48 hours  8.16.15
Many of the daylily seeds sank after soaking 2days.  I did have a drop of antibacterial detergent in the water, to act as surfactant and prevent spoiling.

Now they are stratifying in fridge.  Usual, wet paper towel in zipper plastic food bag.  Most internet sources state they need 4 to 6 weeks of stratification, then back to warm moist setting.

Thursday, August 13, 2015

Even More on the Topic of Daylilies. 8.13.15

3-Year-Old Daylily Seeds.  8.11.15

Old Daylily Seeds Float.  8.11.15

Fresh Daylily Seed Pods.  8.11.15
 I got out my seed filing box - an envelope sized file box - to use for saving new seeds.  Discovered some 3-year-old daylily seeds that I collected in 2012.  Some seeds last a year, some last many years.  I don't know about Hemerocallis.
Fresh Daylily Seeds.  8.11.15

Fresh Daylily Seeds Also Float.  8.11.15
One test of seed viability is if they sink.  These floated.

Maybe if I soak them in water for a couple of days, they will rehydrate and sink.  The peach seeds did that.

I found some daylily pods on the variety, "Happy Returns".  The pods do not change to red, or yellow, or brown.  They are green or slightly brown.  When the top starts to split, the seeds are ready.

These are nice shiny black seeds.  Not as wrinkly as the seeds from 2012.  However, a seed I collected one week ago was also wrinkly.

The new seeds floated too.  Since they were fresh, I placed them on damp paper towel, then into a zipper lock back, and into the refrigerator to stratify.  They will need 4 to 6 weeks to stratify, then I can plant them in seed starting soil.

That will be fall.  That's OK, I can grow them under the seed starting light during their first winter.