Wednesday, November 28, 2018

More Mushrooms. This Time, Amanitas. 11.28.18

Mushrooms Under Fir Tree.  11.28.18
 These mushrooms come up every year, under an old fir tree.  The surface of the caps is ofter a darker red.  I don't know if that means it's not the same type of mushroom, or if the cap color changes with season or temperature.  The shape and size, and markings, are just the same as the red cap mushrooms.

I won't eat them.  I do appreciate their presence, and look every day for what other types of mushrooms are growing there.


The chart is from Vintage Printable, which publishes public domain images from very old sources, past their copyrights.
Vintage Chart of Amanitas. 11.28.18

Monday, November 19, 2018

More Leaves, Fruit and Other Young Tree Maintenance. 11.19.18

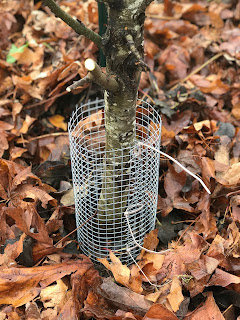
Five-Year Old Apple Tree With Rodent Protection Sleeve.  11.19.18
 While I was spreading leaves for mulch, I noted several trees that were outgrowing their rodent protection sleeves.  When the trunks have expanded to the point where there is risk of the guard girdling the trunk.  In addition, I followed recommendations to have the bottom of the guard partly under the soil surface which for some trees result in roots growing into and through the guard, which is challenging to remove.

In this case (first and second photos), once I cut through one side of the sleeve, it opened easily with no harm to tree, bark, or roots.

Apple Trunk Freed from Hardware Cloth Sleeve.  11.19.18
Removing Rodent Protection Sleeve from 5-Year Old Apple Trunk.  11.19.18
 For the second tree, about the same age, the tree guard also came off very easily.

Now I'm leaving these tree trunks unprotected.  I think they are tougher and more woody, so less likely to have vole damage this winter.  However, I am keeping the leaves raked away from the trunks. 
AdColumnar Apple Tree With Rodent Protection Sleeve.  11.19.18

Columnar Apple Tree With Rodent Protection Sleeve.  11.19.18
Smith Fig Tree Before Pruning.  11.19.18

Smith Fig Tree After Pruning.  11.19.18
The next two photos show the vole guards on trees that i recently transplanted.  These trunks also look fairly woody, so I don't know if the guards are needed.

The last two photos show the Smith fig tree that occupies a spot in the blackberry pen.   This tree is still plus/minus in this climate.  They originate in Southern Louisiana, bayou country.  Here, I lost one Smith fig tree to a freeze that did not kill other fig trees.  The crop took a long time to ripen here, and I lost more to cold weather preventing ripening of the last figs, than I got to eat.  However, of the ones that I did get to eat, the tree proved its reputation as a really good fig.  So I'm keeping it. 

However, this tree takes more space in the blackberry bed than I want.  The lower branches are not productive, and are in the way of maintenance.  So the last photos show what I did, mainly cutting off the lowest branches, and opening up the center for better sunlight.  I cut away branches that impinge on the nearest blackberry plants.  The blackberries are much more productive, whereas the fig is yet to prove itself worth the space and effort.

Saturday, November 17, 2018

Fall Chores. Collecting Tree Leaves for Mulch. Blackberry Maintenance. 11.17.18


 This is a good time to collect tree leaves from around the neighborhood, for mulch and for compost if there are enough leaves.

During 2018, the leaf mulches helped a lot.  They keep the soil more moist, prevent most weeks from growing, cool the soil, and add to humus and nutrients.  Last year's mulch is almost completely degraded, so needs replacing.

I already mulched around many of the fruit trees.  This time, I cleaned up the blackberry bed and mulched that.


This year, I pulled out all of the Cascade Star blackberries.  They didn't produce enough, and they are more trouble, compared to Prime Ark Freedom and Triple Crown.  I also pulled out the Ebony King - way to thorny, not as productive, and the berries are not as good as PAF and TC.

That left Prime Ark Freedom, Ebony King, and two one-year-old Arapaho.  I'm not that impressed with Arapaho, but giving them another chance.  I did move one out of the main blackberry bed, and replaced that with a Prime Ark Freedom that was crowding the other two of that variety.  I also pruned them to about 6 feet tall, pruned out all of this year's floricanes (canes that already bore fruit and are dying off), and pulled the few weeds that are present.

Then I mulched with about 9 inches of loose maple and sweet gum leaves.  Those will flatten to a couple of inches, over the winter.  I repaired the trellises, and that's about all.  Now they are ready for winter and for next year.

Removing Vole Guards. Stanley Plum. 11.17.18

Vole Guard - getting tight.   11.17.18

Plum Trunk, Freed from Vole Guard.  11.17.18

Stanley Plum, about 8 years old.  11.17.18
I planted this plum tree about 8 years ago, and moved it to its current location in 2012.  At that time, I added a hardware cloth sleeve for a vole guard.

This is a good time of the year to go around and see which trees are outgrowing their vole guard sleeves, and remove those sleeves.  As the trees age, the bark is less appetizing and I don't have problems with voles on these more mature trees.

The main problem with these vole guards is if they are partly underground, roots grow through them, making them difficult if not impossible to easily remove.  This tree had some rootstock suckers that grew through the guard, and I had to cut the guard off, leaving a bit, on that side.  I also removed the suckers.

The irony is, I'm not that crazy about Stanley plums.  They don't have the flavor of Asian plums, but are much later which is nice.  This tree also has a couple of other European plum grafts that have not bloomed yet.

I saw other vole guards around the orchard, also in need of removal.  A good project for the coming weeks.

Monday, November 12, 2018

Apple Scion Order for Spring 2019

One of the great things about multigraft trees is, if you do't like a variety, you can remove the limb or graft others onto it, and still be ahead of removing or replacing a whole tree.

I'm not happy about Chehalis, which for me has given large, tasteless apples and not many, despite the branch being very vigorous.   I also have doubts about Akane, which has not produced apples despite other branches on the tree being productive.

So, next Spring I want to cut those two branches short, and graft something different.  I'm choosing mainly disease - resistant, PRI varieties.

PRI stands for "Purdue Rutgers Illinois" apple breeding program.  They interbred exce;lent apple cultivars with a disease resistant crabapple species, Malus floribunda, then crossed other apple cultivars, and tested them extensively.  Most of these are scab resistant, although there is change happening in the scab disease so that is not as sure as it once was.

Regardless, I've grown Priscilla and Pristine, and they were both excellent apples.  The Pristine branch broke, but is still partly connected to the tree.  So I will see if that has some viable scion for grafting in the late winter.  Most, but not all, PRI varieties, have the letters "P", "R", "I" somewhere in their names.  Often consecutively, such as in Priscilla and Pristine. 

Meanwhile, I want to try others.  I chose:

Prima - Early Fall, red disease-resistant apple. 

Goldrush - despite no "PRI" letters, except "r", a PRI variety.  A long keeping golden, disease resistant apple.  Heavy cropping, has Golden Delicious and Rome Beauty in its ancestry. Sweet, very late season, keeps 3 months.

Williams Pride.  Mostly red, disease resistant apple.  Early maturing, tart fruit.

Honeycrisp is also scab resistant.  Most people know Honeycrisp.  I have a tiny tree on ultradwarffing M27 rootstock.  The tree is 3 feet tall and had 5 apples this year.  I want to add that to a more vigorous tree.  I have other grafts of Honeycrisp but jot far enough along to harvest more scion.  I think Honeycrisp is not very vigorous anyway, so needs a more vigorous rootstock. 

For what it's worth, the PRI varieties have all been disease resistant in my garden, and the apples from each of those varieties have been very good to incredible (Pristine).    My Winecrisp tree, also a PRI introduction ("cRIsP" does have PRI in its name) has not borne a crop yet.

Firewood and Wood Ashes. 11.12.18

Rufus keeping warm by the woodstove.  11.12.18
Over the years, we've had many trees fall on our 2-acre property.  Most have been scrubby, especially cascara trees with trunks about 1 foot thick at the base, tapering up the trees' approximately 30 foot height.  I've also collected some trimmed branches with dimensions that fit in to the woodstove.  We use the cut pieces to supplement the house's heat.  The woodstove makes a big difference, keeping the house warm on cold days.

After the wood is burned, I collect the ashes and spread on the yard and garden.  I avoid spreading ashes on areas where acidic soil is preferred, such as near chestnut trees, or near rhododendrons, or where I will plant potatoes next season.  Those plants do not appreciate alkaline conditions or wood ashes.

This is where a soil test is handy.  Our soil was quite low in calcium, then magnesium.  Wood ashes are alkaline, so can buffer an acidic soil.    Their major component is calcium carbonate - so they have an effect similar to lime, although not as strong as lime.  Wood ashes contribute calcium to soil, then potassium and phosphorus, and some magnesium.   Ed Hume recommends spreading ash around trees and shrubs.  I avoid around acid-loving plants, like chestnut trees, rhododendrons, azaleas, or evergreens, as well as where I will grow potatoes next season. Ed Hume recommends 1 gallon of dry wood ashes per square yard of garden, or 1/4 to 1/2 inch on lawns and flower beds.  Farmer's Almanac recommends 20 pounds per 1000 square feet, which would be 2 pounds per 100 square feet, or 1 pound per 50 square feet - a 5 foot by 10 foot bed.  I apply less, figuring I don't want to overdo it.  I just use a dusting on the vegetable beds for next year, and on lawn around fruit and specimen trees.  Less than the recommend 1/4 inch, so I doubt any problem will occur.

My philosophy is that the trees and garden are already goring nicely.  By adding ashes, I'm returning some of the minerals that trees and vegetables have removed from the soil.  That will help growth in future years. Our soil is high in potassium, the next ingredient that is high in wood ashes, so that aspect is not needed.  The magnesium and phosphorus content of ashes is not much, but would be helpful.as well.

Saturday, November 10, 2018

Geranium Storage for the Winter. 11.10.18

These Geraniums Were Allowed to Dry, Then Moved to Garage.  11.10.18

These Geraniums Were Allowed to Driy, Then Moved to Garage.  11.10.18
Geraniums are colorful plants with interesting, colorful, nicely scented leaves, dry tolerant, no insects or animals seem to bother them, and have nice flowers in reds, white, pink colors.  They stay compact, need little care, and do well in containers or in the ground.

Geraniums are not expensive, but there is savings in keeping them over the winter for plants next year.  There are many ways to do that.

These plants don't look like much now, because I let them dry out in anticipation of storing.  It's best if they are dormant.  If taken into storage when they are dry, they will grow lanky, tender, weak stems and leaves during the winter. I've had that happen and they survived and recovered, but I like it better if they are just dormant.

These are container grown plants I like to keep on the deck  It was a hot, dry summer, and I watered them as needed.  That's about all.  The plants are several years old.  Each fall in October, I move them to a spot under the eaves where they don't get rain or water.  I let them dry until the containers are light to pick up.  Then I move them to the attached but unheated garage.  In the Spring, I will clean them up, prune, remove dead leaves, and water them for a new season.
 
Geranium Cuttings in Window Sill.  11.10.18

Nerine Among Geraniums.  11.10.18
 This year, there were also some geraniums in a planter, that could not be moved.  Geranium plants can be dug up, soil shaken from the roots, and stored in a paper bag for the winter.  I've had mixed results from that in the past.  I do have some in the garage now, using that method.

Geraniums can be kept in a bright window, over the winter.  I think it's best to aim for maintenance, rather than vigorous growth, over the winter.   So for the plant I'm keeping inside, I won't water it much.  That plant was an accident.  A branch broke off 2 years ago.. I stuck it into some soil and treated as an established plant.  It grew, and I overwintered it last year and repotted this spring. 

It seems strange that a fairly dry tolerant plant will root in water, but geraniums do will with that method.  It's not the nursery growers' vavorite method.  They say the roots can be week.  If not changed once a week, or every other week, the water can become gunky.  But they grow roots, and can be transferred to houseplant soil, and do just as well as purchased plants.  So I took some cuttings, and will keep them in the kitchen window where I can watch for root growth and change the water every week.
Overwintering Smaller Geranium on Window Sill.  11.10.18

That's more than I need.  However, they are fun plants.  The leaf scents and textures are a big part of the attraction, and they are a nostalgia plant.

If all goes well this winter, I'll move the dried plants outside in early Spring, and also have new plants started too.

Friday, November 09, 2018

Progress Report. Cymbidiums. 11.9.18

This unnamed (NoID) Cymbidium is opening new flowers while maintaining the first. It's looking nicer and nicer. Plus, there are new buds emerging from the base of the plant. I think it will bloom for one or two months. Which makes for a brighter winter.

 I think this is evidence that the summer care really did make a big difference. I did not give such good care in previous years. And it didn't bloom nearly so well. All it took was:

(1)  Adequate room for roots. I repotted this one in a bigger container, and used orchid bark as the growth medium.
(2)  Water once a week during hot weather, with diluted Miracle Grow - not a special orchid fertilizer, just the blue stuff. I used it at 1/4 strength compared to the label instruction. In fall, I changed to the Miracle Bloom Booster, at 1/4 strength.
(3)  If I wasn't up to mixing the fertilizer, I just used water.
(4)  This plant was in full sun, sitting on the edge of a raised bed for less slug problem. Deer didn't bother it.
(5)  When fall came and buds emerged, I brought it into the sunroom, although I think any bright room would do.

I'm sure the choice of cultivar makes a big difference too.  These were unnamed, I bought at Fred Meyer over the years.  The other three plants are behind this one, so there will be a long period of bloom this winter.

NoID Cymbidium. 11.9.18

Wednesday, November 07, 2018

Mushrooms Growing Everywhere in the Yard. 11.7.18

Here are some additional mushrooms.  I don't know what kind of mushrooms these are. They are all over the yard now.

Sunday, November 04, 2018

Fall is the Time to Collect Leaves for Mulch. 11.4.18

Each fall I spread a fresh layer of tree leaves around most of the fruit trees. For the trees in cages, and the young trees, the leaf mulch suppresses weed growth, retains moisture, and enriches soil. As the fruit trees grow and mature, I remove the deer cages and don't spread leaves, since those trees have deeper roots and less need for such intense nurturing. The photo is a pawpaw tree with a nice layer of maple leaves. The main thing to watch for is that leaves may provide habitat for voles, which can and do kill young trees by eating the bark and cambium layer. I provide a sleeve of hardware cloth around the young trunk. That too has its hazards - the sleeve needs to be removed before the tree trunk grows too tight against the mesh.

Emerging Mushrooms. 11/4/18

I view mushrooms as a sign of healthy soil microflora and mycorrhizal populations. With the chill and wet. mushrooms are emerging all over. I don't know the types, and won't be eating any. They are fun to observe.


Some Flowers Still Blooming in Early November. 11.4.18

Bachelor's Buttons

Hybrid Buddlea
 Having some flowers around brightens up the yard work and gardening.  I always include some in my planting.  These continue to bloom, despite increasing chill and wetness.  I planted the bachelor's buttons in mid Summer, the zinnias in late Spring, and the Echinacea was a purchased perennial.  The buddlea has been there for a number of years.
Hybrid Echinacea

Mixed Zinnias

Friday, November 02, 2018

Trachycarpus. Hardy Chusan Palm. 11.2.18

Trachycarpus at about 5 years.  11.2.18

Trachycarpus at about 6 years.  11.2.18
These palms are hardy enough to thrive in my part of the Pacific NW.  They had a set back two winters ago, when there were sustained temperatures down to 9F.  Part of the crown was killed, but enough survived that they came back.  Growth during the first year after that freeze was slow and new leaves were distorted and small.  This year, they are vigorous and handsome.  The tip of the vertical leaf tips is now about 5 feet.

I chose not to fertilize them this year, because I don't want weak tender growth going into the winter.  During this hot dry summer, I did not water them at all.

The 3rd photo is the same species, at 14 years old, in my old yard in Vancouver, WA.  Still going strong.

These go by various names, such as Chusan Palm, Mediterranean Windmill Palm, Chinese Windmill Palm.

Trachycarpus at 14 years old in Vancouver WA.  6.7.14.

Zinnias and Dahlia. 11.2.18

 Dahlias haven't done well for me.  I think there are a couple of reasons.  First, I've bought big box store tubers.  I think they are mishandled and the growing points are not firmly attached to the tubers, so they just die.  Second, deer like eating the plants.  Third, slugs eat them.

Today while cleaning up, I saw this flower in a spot that doesn't get much attention.  I didn't know it was alive.  This dahlia was planted two years ago.  Where there's life, there's hope.

Meanwhile, zinnias continue to bloom.  This plant was among those that I thinned from the original row, and stuck in the vegetable garden because I hate to waste them.  Still looking nice, in November.

Persimmons Are Ripening. Fall Color. 11.2.18

Nikita's Gift Persimmons.  11.2.18

Nikita's Gift Persimmons.  11.2.18
October and November is persimmon season.  We already harvested and ate, all of the Yates American Persimmons, in October, but the rest are just beginning to ripen.

The Nikita's Gift hybrid persimmon tree has lost its leaves, and the orange/red globes are quite beautiful  hanging on the branches.  Most are still hard.  We will start ripening some, soon, indoors.

The Saijo Asian persimmon tree does not have as many this year.  However, the ones that it does have, should be very sweet.  I suspect the smaller crop will be typical for this tree in my yard.


Prairie Star got off to a difficult start in its first two years.  However now it's becoming a handsome young tree.  It's big enough to have flowers either next year or the year after, if climate and the gods of orchards are with us.

Persimmon trees have such beautiful fall color.
Nikita's Gift Hybrid Persimmon Tree.  11.2.18
 I was so enthusiastic about these fruits, I decided to order two additional persimmon trees for future years.  The varieties are Coffee Cake (Nishimura Wase) and Chocolate (Maru)  Both benefit from pollination by the other.  Persimmon benefits from pollination is complicated, but in the case of these varieties, each makes both female and male flowers.
Saijo Asian Persimmon tree.  11.2.18

Yates American Persimmon Tree.  11.2.18

Prairie Star American Persimmon Tree.  11.2.18

Thursday, November 01, 2018

Late Maintenance of New Bearded Iris Beds. 11.1.19

Here is an update on the bearded iris garden. For the most part, bearded irises are left unattended, no maintenance, to fend for themselves.  I've seen many clumps like that around town, and they seem to grow and bloom just fine. In fact, in years gone by, I had many clumps that had about that treatment.

However, they were difficult to grow at first in the Battle Ground  garden.  So last year, I dug up my remaining clumps, and planted them haphazardly along the edge of the woods.  They were in poor soil, full sun, and had essentially no maintenance.  This year, those irises did very well, grew sturdy and strong.  A few bloomed this Spring, but most did not.

So this summer, I developed a renewed interest.  I converted two vegetable garden beds to bearded iris.  This bed has grown sweet corn (last year), and garlic and onions (this year).  It's not the best spot, and deer hang out here.  Deer do not eat bearded iris plant's but they do walk among them, sometimes smashing them or their soil.

I went around the woods edge, digging up many of the clumps that I had deposited there in past years, and replanted them into this new bed.  I also bought a number of iris rhizomes, mainly by mail order.

Here is how the beds look now.  I don't intend to over-nourish them, but I did add crushed eggshells to the soil.  That's the granular-looking white specks.   I have been hoeing weeds, using a shallow stirrup hoe.  So far, of the new plants, one developed crown rot.  I promptly removed that plant, threw it out, and replaced the soil with fresh soil from an annual flower bed.

Over the past week, I cut off all of the leaves from the "rescued" irises.  Those leaves were droopy and had brown streaks or brown spots.  For the newly purchased rhizomes, I have not cut off the leaves yet.  Those leaves look sturdy and green.  I want to give them all the chance I can to photosynthesize.  When they start to discolor, those leaves will also go.

After hoeing, there are seeds in the center of some clumps or adjacent to rhizomes.  Those will need hand pulling.

Not surprising, the last purchased rhizomes don't look like much.  There is minimal top growth.  They may still survive the winter and grow nice plants next year, but for those, flowers next spring seem unlikely.

So far, so good. 
Newly  Purchased Iris Rhizomes, Planted in July and Early August.  11.1.18

"Rescued" Clumps of Bearded Irises, Planted In August And September.  11.1.18

Newly Purchased Bearded Iris Rhizomes, Planted in September.  11.1.18

Another Carnivorous Pitcher Plant. Sarracenia purpurea. Progress Report. 11.1.18

Sarracenia purpurea.  11.1.18
This plant turned out very nice.  I kept it in a dish of water on the deck all summer long, and continue to do so.  It might have dried out once or twice, but never bone dry.  It was in full sun.  On a couple of occasions, I poured miracle gro, 1/4 strength, into the pitchers, but that was all of the feeding it got.  The water used, was rain water from the roof.

Multiple new pitchers grew.  I left the old ones in place, even though they are becoming a bit unsightly, because they still seem functional.  By functional, I mean holding water, catching insects, and photosynthesizing. 

I'm interested to see if this plant will bloom next Spring.  I'm very happy with this plant, and this method of growing it.

Is this Ginkgo Tree Doomed, or Will it Flourish? 11.1.18

Ginkgo Tree Before Clean Up.  11.1.18

Ginkgo Tree After Clean Up.  11.1.18
 This was a very nice ginkgo tree that i grew from seed, one of the three that came from my Dad 20 years ago. It was the last to be moved from container to ground, and the ground was hard poor quality clay.  When we bought the Battleground place, I moved this tree.  I didn't know if it would survive, but it thrived for several years.  Then, for unclear reasons, the entire top died.

I delayed cutting it down entirely, and was surprised by new growth emerging from buds low on the trunk - ground level, to about 18 inches. 

I left it alone last year.  This Spring, I cut back some of the dead branches, and stuck them into the fencing that I encircled the tree with to reduce deer damage.  The most vigorous of the new growth reached about waist level last year - maybe 18 inches of growth, then this year shot up to over 8 feet tall.

Today I removed the protective fence, cut the new growth back to the one, most vigorous, new lead, leaving some tiny shoots at ground level as back-up plan.  The I cut the original trunk to a little above where the new leader emerged from the trunk, sloping the cut away from the branch point for water drainage.

Then I cut off the lowest branches from the new leader, leaving the lowest scaffold branches at about 6 feet high.

I don't know what caused the original die back.  If the white spots on the trunk are indicative of a fungal infection, that does not bode well for this tree.   On the other hand, we are not at two years after the die back, and the new growth was very vigorous and sturdy, so maybe whatever caused the problem is done.  All we can do now is wait and see.

I provided some deer protection for the tender leader.  I know, they say deer don't eat ginkgo branches.  My deer have not read those books and websites, and they do sometimes eat tender ginkgo growth, or might rub antlers on the tempting straight stalk, stripping off the bark, as they do on cypress trees.
Close Up of Original Trunk and New Leader.  11.1.18

Final Appearance of Ginkgo Tree.  11.1.18

Late Fall Apple Tree Care. Pruning and Protection from Voles. 11.1.18

I've started providing some care for the apple tree area.  This is for the dwarf and columnar trees.  One of the transplanted trees was without vole protection.  Voles are the biggest reason these trees don't survive a winter.   These are hardware cloth, helt in a cylinder using zip ties.  I push them slightly into the ground, but no longer try to push them deep.  When I have them under ground level, roots grow between the mesh and it's difficult to clean up.

I pruned the trees to remove branches the almsot touch the ground, and maintain the columnar shape of columnar cultivars.

They have a nice maple leaf mulch now.  About 6 inches thick, which will pack down to a few inches.  That provides excellent moisture retention during the summer, weed prevention all year, and nourished the soil.