Friday, December 23, 2016

Seeds for Kitchen Garden. 12.22.16

 What have I done?
These are the seed order from Baker Creek heirloom and open pollinated seeds.  Rareseeds.com

There are a couple of bonus packets.

I'm not planning to be as experimental this year but there will be a few new varieties.  I'm also adding some annual flowers to the vegetable beds.  In some cases that might translate to "deer food" but it's all a gamble.


 I have a big box of seeds from previous years to go through as well.   I will also go through that.  They are filed in envelopes based on type, such as "carrots" and "squash" etc.

Baker Creek is my first-line go-to source of seeds these days.  After the seed box.

The onions will be first, to start in Jan or Feb.  I wil also have some better storage onions seeds to start then as well, those from Territorial Seeds.  Both companies are family owned.

Thursday, December 22, 2016

Sourdough Bread. Steps 5, 6, 7. Transfer to Pan, Rise, Bake.

Sourdough transferred to bread pan and canning jars.
 I let the initial dough rise in the mixing bowl.  I don't count how many times I fold it in the bowl, about every hour or so.  It could probably be less but I enjoy it too much.

After a few hours, I transfer to glass bread pan.  These old vintage pans are often found for sale at Goodwill, as well as yard sales, for $2 or $3.  I read that the older ones are less likely to break, compared to new ones made from a cheaper formulation.  I tried a new "vintage look" Pyrex bread pan but it did not transfer heat as well and I didn't like the result.
I let this one rise about 5 hours.

 These loaves rose 5 hours.  I don't time carefully.  I worked on the kitchen remodel and did some shopping.  The loaves rose a little more than I usually allow, here about 1 inch above the rim.  You can see bubbles through the glass.

I dust with flour.  I don't know what that does, but the finished loaf looks nice.

Then bake in preheated oven, 425F for 15 min, then reduce heat to 375 for another 15 min.

After baking.  The old Pyrex bread pans show the bottom has browned nicely.

One beautiful sandwich loaf and 2 mini-loaves cooling on the rack.
You can see through the glass, the bottoms of the loaves browned nicely.  The top is also lightly browned and sounds hollow when tapped.  I turn them onto a rack and let cool under a thin cotton towel.

When fully cooled, I transfer into a plastic bread bag.  They can sit overnight without becoming too dry.

This loaf came out awesome.  Crusty crust, chewy texture, sourdough flavor.  I love this bread for toast and for (vege)burgers.  Often I just toast and butter it.  So much better than store bought, that stuff should be called something other than "bread".

I wanted to try making my own starter again before posting this, to make sure it worked.  It did, as described here, and was actually better than the original starter.

Slices of home made sourdough bread

Sourdough, Step 2 and 3. Pre-ferment and Making the dough. 12.22.16

Sourdough starter after overnight pre-ferment

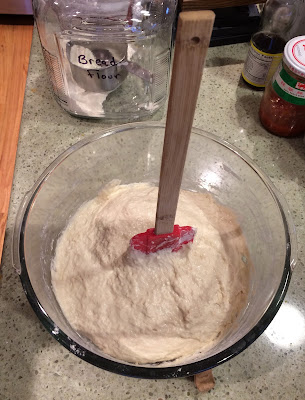
Sourdough dough after mixing in flour.  Sticky but not liquid.
Once I have a starter going, the starter itself is easily maintained in perpetuity.  I keep it in a wide-mouth jar, in the refrigerator.  I use about ¼ cup of this mother culture, each time I make a loaf.  When it's down to about ½ cup volume, I mix in another 1 cup of flour and 1 cup of water, loosely cap the jar, let it sit for ½ day, tighten the cap and return to refrigerator.  The details of timing and amount are not precise, and it doesn't matter.  The culture is resilient and alive, and handles minor variations without objecting.

I start my dough as a pre-fermented starter, the evening before making a loaf.  The timing is not precise.  I usually start the pre-ferment in early evening, when I make supper, but have waited until bedtime without it causing any problems.  It is a very low-input thing to do.

I mix together 1½ cup water and 1½ cup organic, unbleached bread flour.  I use an old Pyrex 4-cup measuring cup as a bowl and cover with plastic wrap.  Nothing else.  I think the organic unbleached bread flour makes a better loaf than the alternative.  Then let it sit overnight.  In the morning, the starter is foamy and bubbly.  There is some separation of water which is normal.  There is some variation from time to time, probably due to kitchen temperature, but that does not matter.  It smells sour, which is good.

The final loaf volume depends on the amount of water in the starter.  I make a standard 8½ inch or 9 inch Pyrex bread pan loaf.  The 1½ cup water translates into a loaf with a little extra that I make as a mini-loaf in a wide mouth glass canning jar.  To leave out that mini-loaf, I would use 1¼ cup water and 1¼ cup flour for the original starter preferment.

In the morning, I use an old mixing bowl.  I add 1½ cup flour and 1½ teaspoon salt.  A lot of recipes call for more salt but that is too much for a healthy amount of dietary sodium.  This amount rises well and also tastes very good.

It takes some muscle to mix in the flour.  I gradually mix in enough so that the spatula will stand upright without falling over, but it is still very sticky.  I don't turn it out onto a board and knead.  This method results in a fully hydrated dough.  Then I let it sit roughly an hour, and use the spatula to fold it several times, turning the bowl by hand and folding from every side.  The consistency by that point is no longer sticky.

Later I'll post as the loaf develops.  Sourdough is the ultimate "slow food".  I think my loaves are delicious, filling, and make bread something to be excited about instead of that mushy cake-like stuff from the store.  Plus, there is no added sugar, so they are healthier.

I often use whole wheat flour for the actual loaf, or add other additives to be described later.  This description is for the basic white sourdough sandwich loaf.

<-------------------------o--------------------->

Sourdoughs are made around the world, from many types of milled wheat and rye flour, and using many methods.  There are diverse types of bacteria and yeast that work together in sourdoughs.  The bacteria and yeasts seem to come from the grain mill, where suitable organisms from the air survive and inoculate the grain and flour, but may also be in the kitchen and the baker's hands.  Once established, a sourdough culture becomes resilient to introduction by other organisms, but may adapt to new regions and circumstances if the starter is taken to a new place.  Discover Magazine The Biology of Sourdough.    and The Sourdough Microflora.  Biodiversity and Metabolic Interactions. 

Probably most important, Josey Baker's website and book.  Baker is the source for enthusiasm, accessible artisanship, and the concept of a fully hydrated dough, which is different and better than what I did in the past.  Even though I make sandwich loaf, and his are hearth style artisan loaf, my bread is better for reading his book and watching his videos.

Wednesday, December 21, 2016

Sourdough Starter. 12.20.16

Sourdough Starter after 2 weeks.

Sourdough Starter after 2 weeeks
 Even though  I've been using a sourdough starter that I started 2 years ago, I decided to see if I could repeat that process now.  The original starter contained grapes from my garden for the wild yeasts that grow on grapes.  That is not necessary at all.

This is a variation on the countless sourdough starter instructions.  The small jar and small volume makes for less waste.

I use organic, unbleached flour and unchlorinated water.  I don't know if either is required.  I suspect bleaching kills natural bacteria in the flour, and being organic is something I prefer.  Chlorine is in water to kill bacteria, too.  I don't know if sourdough bacteria can overcome that, or if you can just use normal tap water.

It's very easy and works nicely, but takes a long time to do it's own thing.

Use a clean small jar.  This is a 1 pint canning jar.  A small jelly jar would be fine.  You want a small head space so the oxygen will be depleted by the bacteria. 

Day 1.  Combine 1 tablespoon of flour and one tablespoon of water.  Mix and screw on the lid.  Let it sit.

Sourdough Starter after 2 weeks.
Day 2.  Add 1 tablespoon of flour and 1 table spoon of water.  Mix and screw on lid.  Let it sit.

Day 3.  Remove about one tablespoon of mixture, then add 1 tablespoon of flour and 1 tablespoon of water.  Mix and screw on lid.  Let it sit.

Day 4-14.   Repeat Day 3.

During the first few days, not much happens.  The flour tends to break down a little and settle with fluid on top.  Then, gradually, bubbles start to form.  Most recipes don't go the full 14 days, but I wanted to be sure.  I did this before at 7 days and the bread did not rise.   This time, at 14 days, the gas production - what makes the bread rise - is robust.  The lid actually bent outward from the gas pressure.  I can apply a new lid.  You can hear a pffft when the lid is unscrewed.  During the first week the aroma was more like spoiled milk - butyric acid.  Now, it's more like yogurt - lactic acid.  I think it's ready to try making a loaf.  I will start the pre-ferment tonight.

You can always buy an established starter.  King Alfred Flour has a good recipe for sourdough starter.  King Alfred also sells a sourdough starter so that this process can be avoided.    Their starter has been maintained for more than 100 years.

Sunday, December 11, 2016

Fedco Scion Order. 12.7.18

Porter Apple.  Source:  USDA pomological.  1905.
I'm not sure if I posted this already.  I've added most of the apple varieties that I want to try, but decided on 3 additional scion from Fedco.  Two are repeats of scion that I grafted last year, which grew but not a lot, and I would like more on another tree (King David and Sweet-16).  Those were on a small Winecrisp tree that I may have grafted too soon, planted that tree bare-root in 2016 and also grafted then, plus a deer chewed off half of the Sweet-16 so it is only about 1 inch of stem now.  I had actually forgotten that I already had King David on another multigraft tree.  It took, but the other branches are more vigorous so I want to give it a better start anyway.  I could wait and take scion from that graft, but if I buy one now, that gets me a head start.  I would also like to add a Winesap (early 1800s), and scion from that has been offered to me from another hobbyist.

At this point, I have about all of the apple cultivars that I can keep track of.  Most of my apple trees are now multigrafts with at least 5 varieties per tree, although a few are individual dwarf trees and a few are just beginning to experience my grafting obsession.  I've learned a lot along the way.  The apple growing goals are:

*Mostly disease resistant varieties.
*Mostly varieties that I can't buy at the grocery store.
*Ripening season from July until late October, with storage apples through most of the winter.
*Many varieties for cross pollination, usually within each multigraft tree.
*A chance to taste the same apple varieties that inspired people and gave pleasure for, sometimes,  hundreds of years, at times when there were no grocery chains, import fruits, and minimal food additives.  To savor living history.  To connect my senses with those of actual and historic ancestors, by experiencing the rare pleasure of what they enjoyed.
*A chance to taste some unique flavors and varieties that are not available otherwise.
*To compare experiences with other gardeners and hobbyists.
*To experience tastes from my own garden and orchard, free from corporate homogenization and factory processing.

Some of the descriptions are really colorful.  I doubt that my own taste buds are that sophisticated.  But maybe - this year's apples gave unexpected and delightful surprises.


King David Apple - Fedco description, Orange-Pippin description.  A cross between Jonathan and either Winesap or Arkansas Black.  Intro 1893.  Diploid, precicious, large apples, some disease resistance.  From Fedco on flavors:  "Pineapple, tangerine, lemon, sweet, sour, tart, sharp, aromatic and spicy all rush around simultaneously."   From Apples of North America, King David is described as vigorous, and is a diploid, and disease resistant, so might be a good addition to the new Gravenstein tree.  Gravenstein needs a pollinator because it is triploid, and needs a vigorous variety because it is also vigorous.

Sweet-16 Apple - Fedco description, Orange-Pippin description.  Descended from Northern Spy crossed with Malinda, developed at University of Minnesota. 1979.  Diploid.  Per Fedco: " Fine-textured crisp flesh contains an astounding unusually complex combination of sweet, nutty and spicy flavors with slight anise essence, sometimes described as cherry, vanilla or even bourbon."  From Apples of North America, Sweet-16 is resistant to apple scab, fireblight, and moderately resistant to other major apple diseases.  Vigorous growing and late blooming.   From Apples of Uncommon Character, "a misty explosion of melon and bubble gum, satisfyingly sweet, passingly tart" also described as flavors like bourbon or cherry life savers.  Apples for the 21st Century, "flavor is very unique and sweet-tart cocktail of flavors."

Opalescent AppleFedco description, Orange-Pippin descriptipon.  Per Fedco:  1899.  " Crisp, sweet, tart, juicy—but most of all it’s supremely flavorful."  From Apples of North America, Opalescent has a creamy yellow flesh, crisp, sweet flavor, vigorous, but does have susceptibility to fireblight.  Good storage apple.


References:
Links, plus:
Apples of North America - by Tom Burford - describes 192 varieties, in addition to additional information about growing apples.  Excellent reading about many apple varieties, especially historic apples.
Apples of Uncommon Character - by Rowan Jacobsen - describes 123 varieties, and recipes.  Also excellent and sometimes poetic reading.
Apples for the 21st Century -by Warren Manhart - Reflects the author's 30 years of experience testing over 140 varieties, with 50 cultivars described in the book.

Saturday, December 03, 2016

Transplanting a 13 year old Liberty Apple Minidwarf Tree. 12.3.16

12.3.16  Liberty Apple Tree on M27 Rootstock.
 Today I moved an approx 13 year old Liberty apple bush from the old place in Vancouver to the Battleground garden.  It's stretching the definition to call this a tree, although it really is a miniaturized apple tree.  This is a graft of Liberty apple scion onto the mini-dwarfing rootstock M27, which produces a shrub-like apple tree that grows around 5 to 7 feet tall.  It's not vigorous at all.  The roots were confined to a volume a little bigger than a 5 gallon bucket.

Despite the small size, we get a nice crop of a few dozen apples from this tree every year.  If I don't thin them, they are small.  Liberty is very disease resistant, and the apples are absolutely delicious.

I have grafted scion from Liberty onto a less limiting understock, but still wanted to keep this tree for more immediate reward.
I dug it, shook off as much old soil and old potting medium that remained after so many years, and re-planted in what was a squash vegetable bed this year.  The new spot does not have competition from a gigantic Kwanza cherry and lawn, that were issues in the old location.   This time I knew the roots should be in the best contact possible with the native soil.  There was virtually no root damage.  I did remove small branches that were touching the ground.
12.3.16  Liberty Apple Tree on M27 Rootstock
As usual, I gave it a hardware cloth collar to hinder vole damage, a good layer of wet leaf mulch, and fencing to hinder deer browsing.

I don't think it will miss a beat.   I'm hoping for a nice crop of  Liberty apples, in 2017.

Thursday, December 01, 2016

Fig Tree to Move

Petite negri fig, 15 years old.  I am looking for someone local who wants a fig tree for the digging and transporting.  Posting here so that I can link to Home Orchard Society Forum.

In 2012 I moved a similar sized Brunswick fig tree, which did just fine.