Wednesday, November 18, 2020

Sewing Project, Part II. A Comfortable and Protective Gardening Cap. 11.18.2020

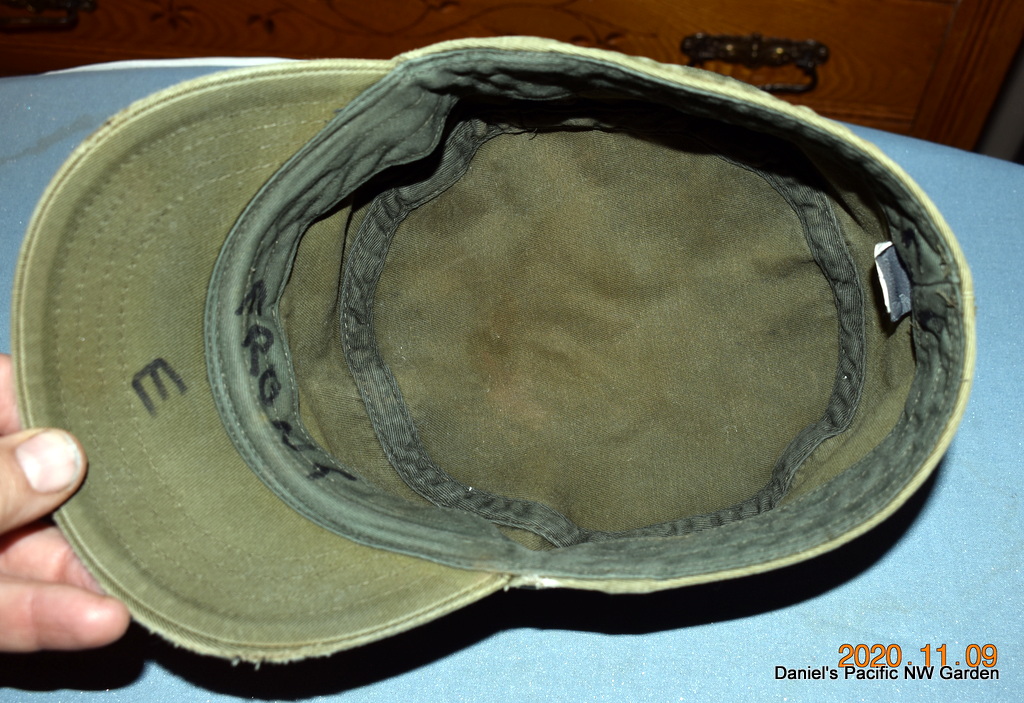
Moving on with my experience with the "Fidel Castro" cap, I decided to make one using cotton flannel.  Flannel is softer and more comfortable, and possibly easier on the sewing machine compared to the tough ripstop olive denim-type fabric.  I used the same pattern, and made some changes.  First, for the tip, I used flannel on both the inside and outside layers, with cotton batting between the layers.  I pre-washed the flannel to adjust for shrinkage.  To give the sides a little more firmness, I used a thin fusible interfacing ironed to one layer, and cut both inner and outer layers of flannel fabric, so that was like a sandwich:  flannel:interfacing:flannel.  The bill was a sandwich as before, using flannel instead of ripstop and using thick heavy interfacing to give it some substance.  This time, I kept the binding on the sides, cutting the fabric on the bias.  That made it possible for the hat to stand a little taller than the first attempt.  For the sweat band, I bias-cut new dish-towel fabric, which is all cotton, durable, soft and absorbent.

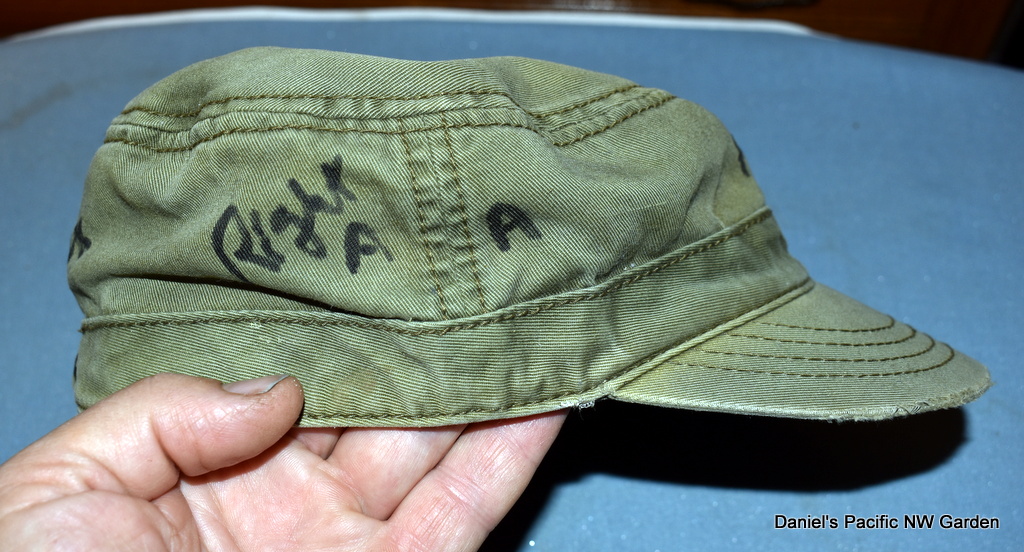
Here is how it came out.  It's still interesting that the fabric came together so differently from the original cap despite using the same pattern.  Not just the fabric pattern and color, but the shape and overall appearance of the cap.  My first thought was "Elmer Fudd Cap" so I did a web search on "Elmer Fudd Cap" and there they were.  However, most Elmer Fudd caps have the ear flaps that tie to the top when not needed, whereas this cap does not have ear flaps.

This is a big improvement on the first prototype cap.  Using the sewing machine walking foot, assembly was much easier.  It didn't skip any stitches at all.  The thickest parts were a little challenging but I am learning how to do better with these challenges.   This hat turned out to very comfortable.  There is no belt at the back - it's a good snug fit due to bias cutting the binding and sweat band.  The original cap didn't have a belt either, and it wore fine for many years.  

I might make a few other adjustments before making the next cap.  I'm happy with it as is, but there is always something to do to make things a little better.  I probably need to add about 1/4 inch to the oval top, because quilting the fabric makes it a little smaller in diameter.  I adjusted the sides to account for that.  Before doing that, I want to put it through the washer / dryer to see how it re-shapes.  It should be OK.  This cap is meant to be treated like any other clothing, washed and dried just like a shirt or trousers.


Making some Apple Cider. 11.18.2020

 With some extra apples around, I decided to make some cider.  I love cider, and have plenty of apples this year, so why not make some?  However, I don't have a cider press.  

We had an old Jack Leland Juicer in the pantry so I tried that.  Instead of pressing the apples, the juicer uses teeth to shred them into pulp, and a filtered centrifuge to separate the bulk of the pulp from the juice, although there is still some pulp and some foam.

For the most part, I used bruised or imperfect apples.  I did not use any parts that had holes or rotting areas, just the good parts.

I used mixed varieties of apples.  It turns out that red skin apples make redder juice, because some of the pigment makes it into the juice.  That also adds some nice flavors, sort of floral or berry. 

Those small apples are Jonathans.  They give the cider a really nice flavor.  The largest are Beni Shogun Fuji.  They give a nice sweetness and more juice. 


I made a couple of large jars to keep in the fridge.  The foam has a delicious flavor, sort of like a sorbet.  The finer pulp settles to the bottom.  I could filter it out, but I think it's healthy to drink it.  After a couple of days in the fridge, the cold cider has a more mellow flavor, and is much more like what I grew up with when my parents took us to the orchard for fresh local cider.

Even though there is some cleanup, it's not too bad.  I have just been making a couple of jars at a time so I don't overdo it.  This is really delicious.

New Sewing Project. A Comfortable and Protective Gardening Cap. 11.18.202

 As someone with no natural scalp covering (hair) I have a couple of choices. Baseball caps don't help.  They have a button riveted in the top to hold together or hide the point where the 6 triangles of fabric come together.  Some how, I often hit my head on almost anything, and that rivet makes a divot in my scalp, which leaves a scab for a few weeks.  Another choice is to become a NY real estate billionaire and hire a hairdresser for $70,000 a year to pile up the side hair into something that looks like a tortured ferret on top of my head.  That's not my favorite option either.  So I decided to make a cap with a one-piece top, quilted for protection.

I had this old cap that I used to like, but it's falling apart and the top was never padded so not much protection.  I took it apart and ironed the pieces flat to make a pattern.  I used to joke that this was a Fidel Castro cap, but then I did a web search on "Fidel Castro cap" and it turns out that it really was  Fidel Castro cap.  I'm not crazy about that but I can use a fabric other than olive drab and that will fix that.

First, I ran the cap through the washer/dryer so I would have something clean to work with.  Then I labeled all of the seams for future reference.


Then I used a seam ripper to tear apart the old cap.  The bill is too solid to take apart but I can work with that as is.  Also, I took photos from every angle, to serve as a guide to assembling the new cap.


The bill is rather hard plastic.  A could make a new one using milk jug plastic, but I don't want to damage my sewing machine by sewing into something similar.  Plus I don't know what would happen to that if it goes through the dryer.  As an alternative, I could use several thicknesses of denim or canvas.  I opted for some heavy duty interfacing from the fabric store, which gives some stiffness but is still soft at the same time.  For the top part, I used rip-stop fabric for the top, flannel from old pajamas for the inside, and sandwiched some quilting cotton between the two.  I machine quilted that with about 1 1/2 inch squares.  I skipped the border around the sides.  

This is the result for the first prototype.  It's interesting that I can take something apart, use that as a pattern, and it comes out looking completely different.   It's a little crude, but it takes me a few efforts to make something decent, which is why this is just a prototype. 

This hat is actually fairly functional and more comfortable than the usual baseball cap.  However, I think I might take it apart and put in a flannel liner and flannel binding on the sides, which will make for even better comfort and better fit.  

I had a lot of problems with the stitches skipping, whole sections of skips.  The sewing machine manual says really helpful things (not really) like "wrong needle" or "wrong thread" or "not threaded correctly." I re-threaded the machine.  I tried a heavier needle, which maybe helped a little.  I tried the heaviest duty needle that I had.  Still some skips.  Then I changed to a walking foot, and surprise, no skipping,


Saturday, November 07, 2020

Some of the Trees in Fall. 11.7.2020

This is the Dawn Redwood now.  The leaves take on a cinnamon color - not the brilliant red of some maples or yellow of ginkgos.  This tree grew a few feet this year.  It's about doubled in height and volume since I planted it 3 or 4 years ago..

The four chestnut trees.  They grew quickly, about 3 or 4 feet a year.  There should be a good chestnut crop in the next few years.  This year there were a couple of dozen.

A volunteer Japanese maple.  This was a volunteer that I dug up and replanted, twice.  It was worth it.  The fall colors are brilliant.


Finishing the Restoration of that Plant Stand. 11.7.2020

 I wanted to get it done so I could get the sunroom back.  Plus I didn't want too many unfinished projects around.

First, here is the completed plant stand.  The metal is painted "bronze" which is black with tiny metallic flecks that show in sunlight.  I did something different with the finials, described below.  The table top is now solid wood instead of that cheapo particle board.  It has a raised edge to reduce issues of spills, and a vinyl flooring surface to make it water impermeable.  The wooden edge is painted black with a surface coat of polyurethane for durability and cleanliness.  Up close, some wood grain shows through that paint, which is an effect that I like.

The finials came out interesting. This is what happens when you spray the with black spray paint and then spray with an incompatible brass look metallic spray paint.  I liked this cool looking textured and multicolored effect although I don't know what to call it.  The finials were a wood-look-something, maybe resin.  This is nicer.

The tabletop was exactly what I had in mind.  It's a little bigger because that's the size of the boards I used and I didn't feel like cutting one lengthwise.  I decided the added surface area would be a bonus.  It gives a little more room for starting garden plants this winter.

This is the underside of the table top, before I painted it all black.  The extra braces are glued and screwed to the main boards, which are also glued together.  I think this is a very strong result, probably stronger than a single wide board.  All of this is scraps from the shed.  I love taking something that was headed for the scrap heap and making something good from it.  Plus, I enjoy doing creative furniture refinishing.  I think the result here was much better than the original, will last longer, is more functional and is much more solid.    

What a mess!  And, I over-sprayed some areas of the porcelain tile flooring.  Fortunately, paint thinner and steel wool cleaned that up completely.

For comparison here is what I started with.  I almost can't believe I kept it :-)  By the way, I decided the drawers were not useful, and looked to junky.  So the replacement table top does not have drawers, just sort of an apron which adds strength and looks more complete.