Saturday, July 19, 2014

Fig Progress Report. Battleground Figs. 7.19.14

Vancouver Brunswick in Battleground.  7.19.14
 Here is the progress report for the Battleground fig trees.

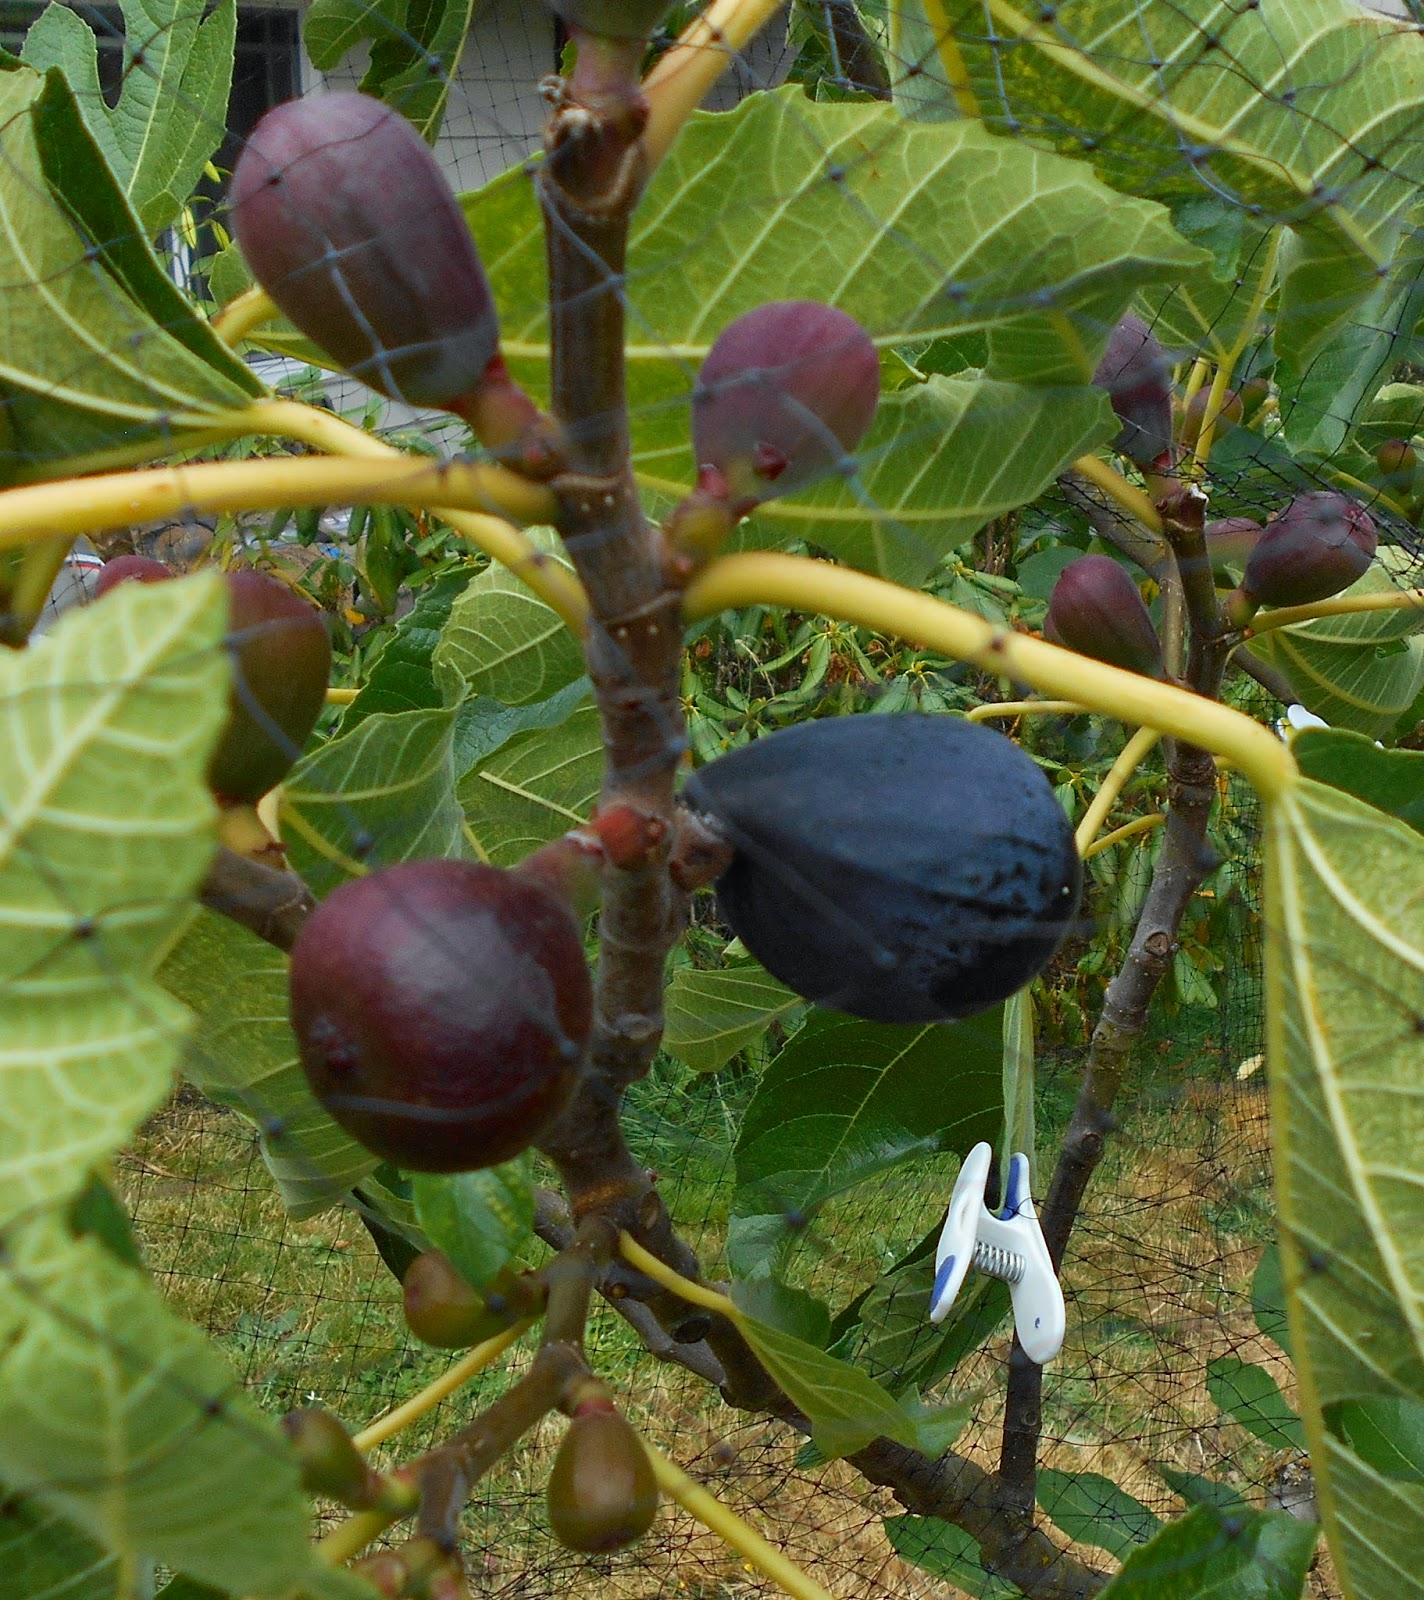
The Vancouver Brunswick, I moved here December 2012, now 13 years old, has a generous main crop forming.  There is one breba.  Today I covered the tree with a net, and placed a plastic sleeve around the trunk.  The sleeve will get a coating of Tanglefoot.  It will be interesting to see if we get to taste the main crop this year.  This is a very sweet fig, but hard to get it to produce much here because they ripen in rainy season.    Maybe in the higher elevation and hotter days at Battleground they will ripen sooner.

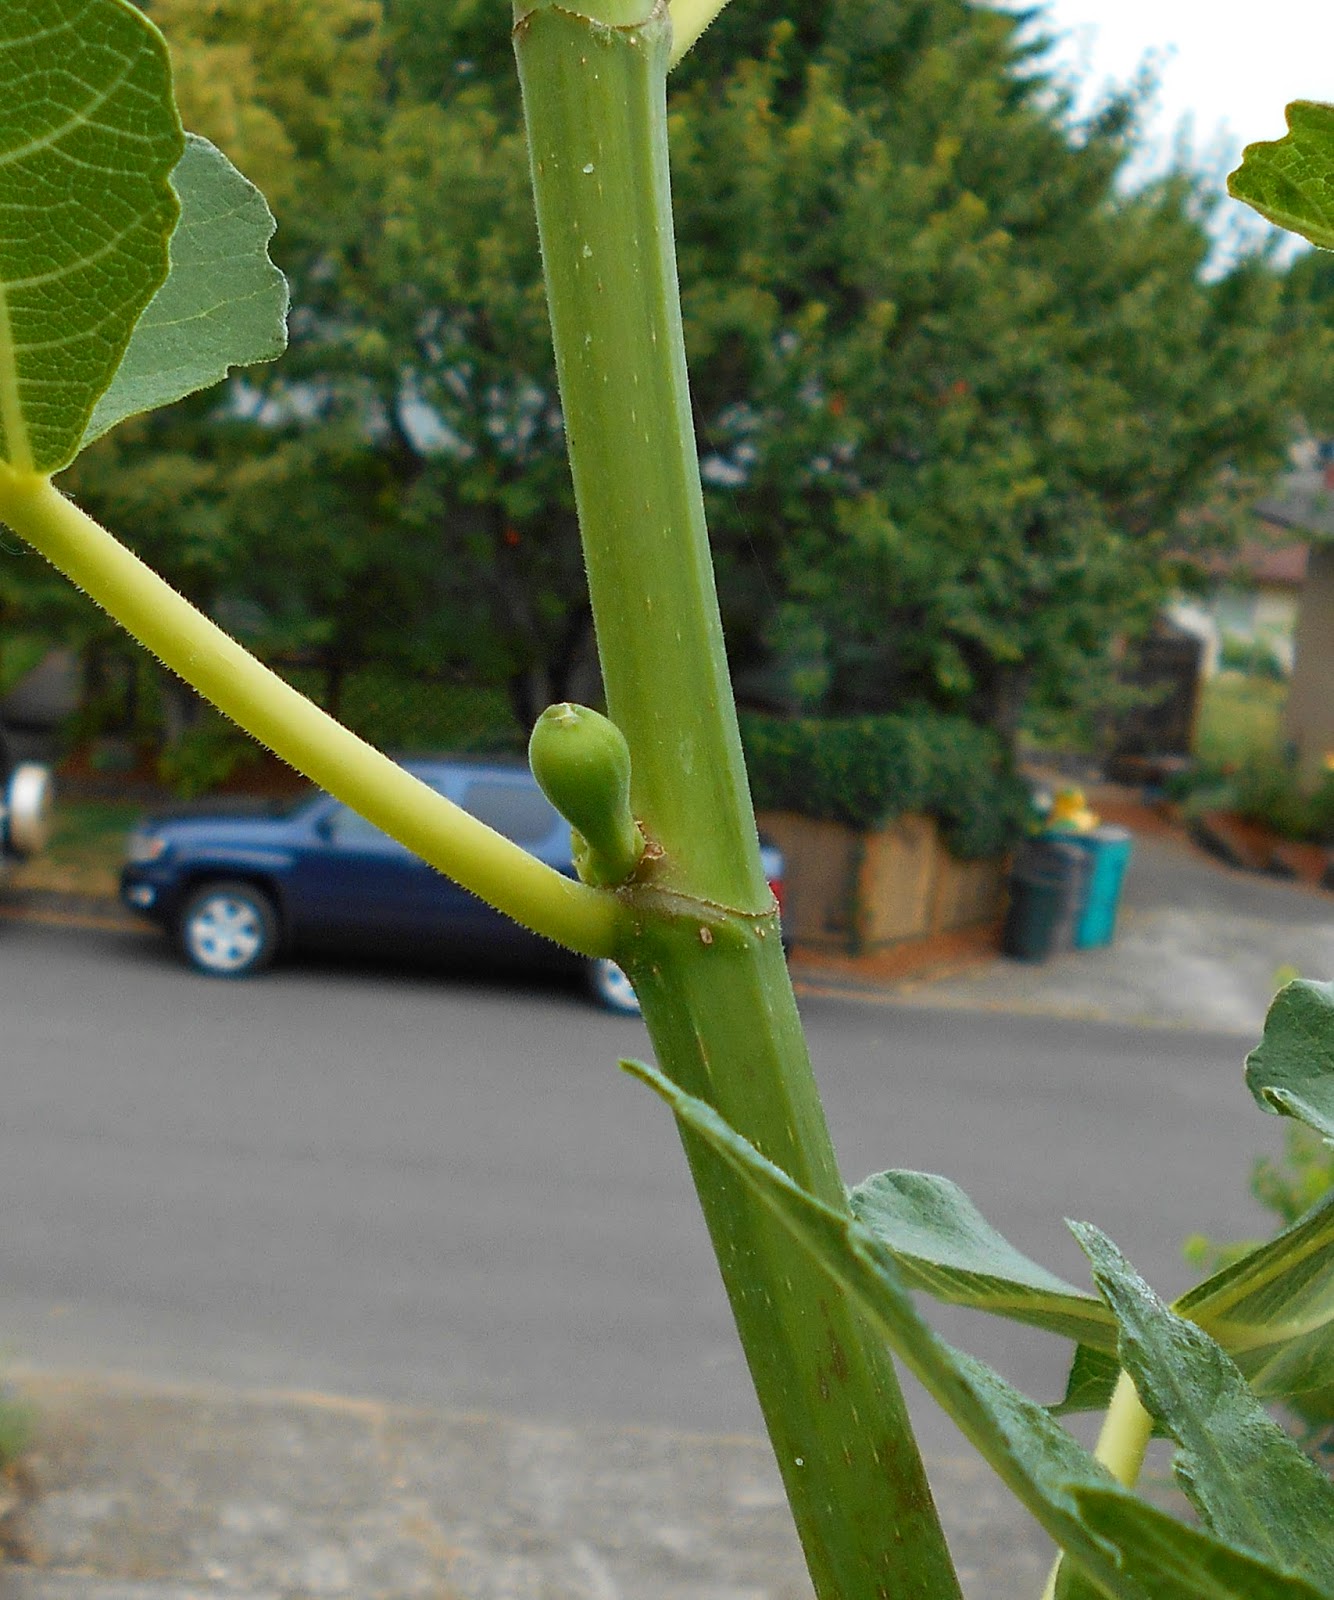
The containerized Carini will soon produce some figs to taste.  The in-ground was a victim of the big freeze.

Smith, LSU Tiger, Atreano, Petite Aubique all have new trees growing from the roots.  I am holding extra nutrients and watering only when they look like they are about to wilt.  I hope that makes them tougher for next winter.

Sal's fig is awkward looking because I converted it from a bushy shape to a single trunk.  It looks like there will be enough figs for a taste.

The rest of the containerized collection is looking good.  Champagne and Tiger may give some figs in containers.  The first year trees, I plan to keep in a shed for the winter, and plant some in the ground next Spring, so they don't get a big freeze in their first season of tender growth.
                        
Containerized Carini Fig.  Battleground.  7.19.14

I have more containerized fig trees than I know what to do with.  I plan to plant a Hardy Chicago, King, and Lattarula in the ground next Spring.


Smith in Recovery from Big Freeze.  7.19.14

Sal's Fig.  7.19.14

Containerized Fig Collection.  7.19.14


First figs of the season. Fig Progress Report. 7.19.14

Lattarula First Figs.  7.19.14

Lattarula.  7.19.14

Petite Aubique.  7.19.14
 These are some of the figs in the Vancouver yard.  The first of the season is Lattarula.   I might have left them one more day, but still very sweet.

Petite Aubique / Petite negri is close behind.  Lots of main crop forming too.

Hardy Chicago, not pictured.  No brebas but main crop growing fast.

Growing on the deck, the Smith in its second year, as well as starts of Dominick and Carini, each 2 feet tall, with start of baby figs.  On deck Lattarula cutting now grown to 2.5 feet tall.

Battleground figs to follow.  They show some promise too.
Smith.  First fig.  7.19.14

Dominick. First Figs.  7.19.14

Thursday, July 17, 2014

Summer Squash. 7.9.14

Yellow Summer Squash.  7.9.14
Belated posting.  These were the first of the summer squash.  Like zucchinis, the squashes form very quickly.  Zucchinis are equally productive as of today.  These yellow summer squash are so delicious.

July Bud Grafting. 7.15.14

All that's needed for bud grafting.  Scion, knife, sharpener, pruning shears, tape.  7.15.14

Plum scion trimmed and ready.  7.14.15.
 Yesterday I did some more bud grafting.  This time I expect they will stay dormant until Spring.  Given the heat, I don't know if they will survive.

I took scion wood from Shiro Asian plum.  I grafted onto some small Hollywood Asian plum stock, grown from cuttings started last winter.  They have put out about 1 foot of growth.  I grafted onto the original, now 1-year-old, main stems.  It was awkward working in that location, and difficult in the heat, so after the second one, I gave up.  Now that I have done a number of bud grafts, they seem quite versatile and even those attempts might take.  They are very shaded in a tomato raised bed.

I also bud grafted a couple of Shiro onto other plum trees.

Elsewhere I've shown photos of the completed bud graft.  Here are the steps leading up to it.

My method is a little different from the books, because I am clumsy.  I make an incision to the wood, actually 5 incisions.  One on each side of the  bud, one across the top, and 2 at the bottom to make a point.  Then I peel the bud from the underlying wood.  With these plums, it works every time, and leaves a nice large patch of cambium for maximum cambial contact with the stock.


Bud "shield" ready for use.  7.15.14

Bud "shield" ready for use.  7.15.14

Shiro bud grafted onto Hollywood Plum Stock.  7.15.14

Sunday, July 13, 2014

Plum bud grafts. Progress Report. 7.13.14

Prunus cerasifolia bud graft on unknown Asian plum.  6 weeks.  7.12.14
 I didn't expect the bud grafts to take off and grow this year.  At best, I hoped they would take, meld with the understock tree, and grow next year.

The Prunus cerasifolia bud graft, grafted as an afterthought and onto a less promising looking small branch, had grown the fastest.  At this point, one can only conclude it is fully melded with the tissues of the understock tree and is a solid graft.  I don't know how much growth to expect.  It would be nice to have bloom next year.  If not, it will be well on its way for the following season.

The Shiro bud grafts did not take off as fast, but two of the 3 have broken dormancy and are growing now.  Again, the most I hope for is to become established and grow next year, for bloom the following year.  I don't mind playing the bee and pollinating next Spring but at some point I want the trees to be self-sufficient in their pollination.

The 3-week buds are varied.  Some look like they have taken, and some I am not so sure of.  The photo is Hollywood plum at 3 weeks.  Again, the bud has broken dormancy and is growing nicely.

I expect that grafts in August will be less likely to break dormancy.  I might graft peaches and graft a plum or two onto some of the plum cuttings from last winter.


Asian Plum "Shiro" bud grafts on unknown Asian plum.  6 weeks.

Hollywood Asian plum on unknown Asian plum.  Bud graft at 3 weeks.  7.12.14
 I really didn't know this would be so easy.  I can't believe I can do this.

Saturday, July 12, 2014

New Starts. Fig trees. Carnations. Roses. 7.12.14

Today I planted some carnation seeds for next year.  We will see if they grow.  It's interesting starting seeds in July, but that seems right for perennial flowers that bloom the second year.  Starting plants for next year is either a suspension of uncertainty, or an expression of a type of hope - that next year will come and I will be here to enjoy.🐝

I had 3 fig cuttings in the fridge.  It was either start them, throw away, or leave them there untill the apocalypse.  So I rinsed them and placed  in moist paper towels in plastic bags.  They look reasonably green and viable.  These cuttings were wrapped in moist paper towels and plastic wrap, still moist and not rotten or moldy.  Probably there since April.  This is the last of staring new fig varieties.  These were Ventura and O'Rourke.

All of the freeze-killed fig trees are back from the dead.  The last was Atreano. Now about 2 foot tall from the roots.  No fertilizer.  See if they do better next winter.  Very lush growth on most.  

I gave away a Hardy Chicago start.  Very happy to find it a home.  🏡  Its mid July now.  No more fertilizer for any of the fig tree new starts.

 
Pencil-size pruning from healthy, vigorous rose bush.


Most of the leaflets are pruned off.
 This is my experiment to start some new roses.  It arose not out of wanting more rose bushes, but because I had left over Dip-And-Grow and didn't want to waste it.  And I am in the mood to try cuttings.

Roses can be easy to grow from cuttings.  I usually start them in winter from vigorous appearing dormant growth.  I have also grown roses from a bouquet, that someone brought into work, mid summer, and from a roadside bush about to meet the bulldozer.

These are mostly from unnamed varieties that I grew from cuttings a decade ago.
Incision to expose cambium.

5 seconds in Dip-And-Grow

Wrap lower part in wet paper towel.


 It's an attempt to use the fig method, which works very well for me.  The main difference is, this is Summer wood, while the fig cuttings are from dormant wood.

1.  I pruned sections about pencil-thick and pencil-long, or a little smaller, from this year's growth.

2.   I removed all leaflets, except the first couple in each leaf.  The reason is, I wanted to leave a little for photosynthesis, but not enough to draw more water than the rootless cutting can absorb.

3.  I made an incision in the lower section, where I want roots to grow.   The incision is made with a sharp knife, through the cambium layer.  Rose wood has a waxy layer, that may inhibit absorption of hormone.   Making the incision also exposes the cambium, which may respond by making callous.  Callous is basically a stem - cell type that can produce roots or vascular tissue, but not usually buds or leaves.  

4.  Dip in rooting hormone, 5 seconds.

5.  Wrap in moist to wet paper towel.  The paper towel is sterile, so will not contribute to rotting of the cutting.  Moisture content is easy to manage.  The white paper is easily inspected for mold and mildew, and easily replaced if those grow.  When roots form, the paper towel is easy to removed, almost falls apart on its own, but wont cause damage if left in the growing medium to compost itself when the roots are growing.

6.  The cutting is placed in a plastic bag.  I blow up the plastic bag, so there is only minimal contact with the leaves, to reduce infection of the leaf with rot causing organisms.  This makes a nice humidity chamber for the cutting, which should not require any watering until it starts growing and is removed.

7.  I placed the plastic bags in a warm room.  Easy to find in July, my house is not air conditioned.  The shade is closed so there is not direct sunlight.

8.  Now wait and see.  If the paper towel becomes moldy, I remove it, rinse the stem, and replace with fresh wet paper towel.  This is mostly the same as I do for figs.  I have never done this for roses, so they might grow and might not.

My grandfather's sisters grew hybrid tea roses by starting cuttings directly in their rose bed.  They cut sections, and stuck them into the soil.  They covered the cuttings using a mason jar, to create a miniature green-house for each cutting.  That was in the 1950s and 1960s, but I imagine they learned that from previous generations much earlier. 🌹

Place into plastic bag, blow up, crimp top.

Incubate in warm location out of direct sun.


Tuesday, July 08, 2014

The time to be happy is now. Robert Greene Ingersoll.

Happiness is the only good.
The place to be happy is here.
The time to be happy is now.
The way to be happy is to make others so.
- Robert Greene Ingersoll

Seedlings. 7.7.14

Morning Glory Seedlings  7.7.14

Holllyhock "Happy Lights" seedlings   7.7.14

Hollyhock mixed double seedlings.   7.7.14
These are the seedlings I started in June. 

I started morning glory seeds because Ning wanted some fast vines, and I ran across the seed packets in Lowes.  I don't know if they will actually bloom this year, but no harm trying.

The hollyhocks are planted now for next summer's flowers.  There is a lot of conflicting info on the internet.  The first - mixed double varieties - I also bought the seeds on impulse at Lowes.  Then, researching the internet, most Alcea rosea - like those mixed doubles - have problems with leaf rust fungus di sease.  I'm sure that will be an issue here.  So I bought some seeds of a more rust resistant species, Alcea ficifolia "Happy lights".  I think the single flowers will be nicer looking, too. 

The A. ficifolia were started  about 2 weeks after the A. rosea,but I think they will have plenty of time to catch up.  The seeds can be planted summer to early fall.

I also planted columbine seeds.  Not up yet.   I have some carnation seeds, which I want to plant soon, if I get the energy.  This is a good time of year to start some of next year's perennials from seeds.

Sunday, July 06, 2014

1st Tomatoes. Brugmansia. Gladiolas. 7.6.14

The First Sungolds.  7.6.14

Brugmansia.  First Flowers after Dormant Overwintering.  7.6.14
 Today there were three firsts.

We had the first tomatoes of the season.  That's very good.  Usually I don't get any until later.  they were just cherry tomatoes, but worth the effort.

The Brugmansia had its first flowers.  It is very fragrant.  It overwinters easily, no effort.  Same as geraniums.  Just let it dry out in the fall, move it into the garage for the winter, bring it back out in Spring and start watering again.

The first of the heritage gladiolas bloomed.  I didn't know what to do with them, so planted all into one container. 
Heritage Gladiolas.   7.6.14

Saturday, July 05, 2014

New flowers in bloom. 7.5.14

Daylily I moved to the Battleground place, 2 months ago.  7.5.14

Crocosmia in bloom.  7.5.14

Four O'clock "Marvel of Peru".  7.5.14
 Some flowers in bloom around the Battleground 2 acres.  These are the first flowers here for the daylilies, Buddliea "Honeycomb", and the Four O'clocks.  The latter have barely begun.  The container plants are ahead of the in-ground plants.
Buddleia X weyeriana  "Honeycomb" 

Hummingbird on crocosmia "Lucifer".  7.5.14.  Photo by Ning Wang.