Thanks to my super-early seed planting experiment, I looked up some info on germination temperatures.
For radishes, (Canadian Dept of Agriculture)
"Radish is a quick growing cool season root vegetable. The seed will germinate in 3 to 4 days with soil temperatures of 18º to 30ºC (64 to 86F) with good moisture. The minimum temperature for germination is 5ºC (41F), the optimum temperature for germination is 30ºC. The maximum temperature for germination is 35ºC (95F). Germination rates decline sharply when the soil temperature falls below 13ºC (55F). The best quality and root shape are obtained when the crop grows and matures at moderate temperatures (10 to 18ºC)(50F-64F) in intermediate to short day lengths. Radish remain in prime condition for only a few days. Roots of globe varieties tend to elongate and develop poor shape in hot weather when the tops also grow taller and larger than in cool weather. Long days induce flowering or seed stalks (bolting) and with warm weather the seed stalk may develop so rapidly that no edible root is formed. Radishes become more pungent in hot weather. Roots remain in marketable condition only a short time before becoming pithy. Growth must be continuous and rapid for good quality.
Lettuce, same source:
Head lettuce grows best at 15 to 18ºC (60F - 64F - I'll assume similar for leaf lettuce). Germination takes place at a minimum of 5ºC (41F), has an optimum range of 16 to 20ºC, and an optimum germination temperature of 20ºC (68F) (depending on the cultivar and type of lettuce). At soil temperatures over 27ºC germination is poor. Hardened seedlings are tolerant (-5ºC to -7ºC) to frost but mature plants are more sensitive to frost (-1ºC) depending on the cultivar...
Brassicas (I'm assuming the Chinese Mesclun), same source. I'm regarding these as a Cole crop, although that may not be accurate. The brassica family are well adapted to cool season production. These plants are quite cold resistant. Young hardened cabbage plants can withstand -10 for a short time, older plants are less hardy. The growth rate of cabbage stops at 0°C and is quickest at 15°C to 20°C. Above 25°C growth stops. ... The minimum temperature for seed germination is 5°C with an optimum germination temperature of 27°C, an optimum range of 7 to 27°C and a maximum germination temperature of 37°C. Cauliflower and broccoli will not stand temperatures as high or low as cabbage....
And finally, carrots, same source:
Optimum growing temperatures for these crops are 15° to 20°C with a minimum of 5°C and a maximum of 24°C. The minimum temperature for germination is 2°C (35.6F); with an optimum range of 10° to 25°C. The optimum germination temperature for... carrots is 25°C. The maximum temperature for germination is... 35°C... These crops therefore favor cool season conditions. Low and high temperatures reduce seed germination. Both carrot & parsnip foliage are hurt by frosts (1.5°C) but this does not usually affect the roots. When there are freezes for over 24 hours, the crowns can be injured and these carrots will not keep well. Adequate moisture is necessary for good yields and quality....When (parsnip) seedlings with roots 6 mm in diameter or larger are subjected to cold temperatures (below 10°C) for a period of time flower initiation takes place. For early seeded carrots of susceptible varieties, bolting may occur.
So, it looks like the current temps or a bit warmer will be OK. I found an old translucent shower curtain, cut it to fit, and covered each barrel. That should let in infrared light and warm the barrels a bitg during the day. I'll look for a thermometer.
Sunday, February 07, 2010
What's growing? What's Blooming?
Blooming in February? You gotta be kidding! We may yet be hit by a killing frost, even a hard freeze. I hope not - I don't have much control over the apricot and plum buds that are starting to swell.

Pussy Willow (Salix) - These are from a young bush, just a stick 2 years ago. I cut off all of the flowering stems, it will help the bush become bushier. This summer's growth will be next year's flowers, so cutting flowers now is just a way to prune for increased flower production next year.
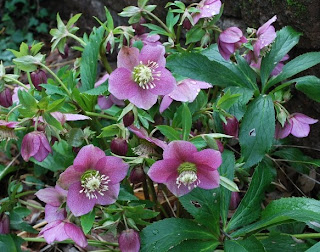 Helleborus is always good for a super-early show, even before snowdrops. They love moist, shady locations, North side of house. The only down side is the flowers tend to droop, so you need to get up close to see them.
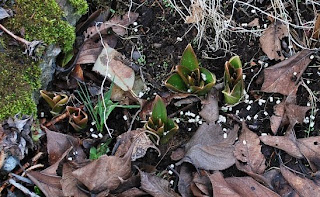 Globe allium. Onion-family plants thrive here. This was one bulb a few years ago, now it's 5.
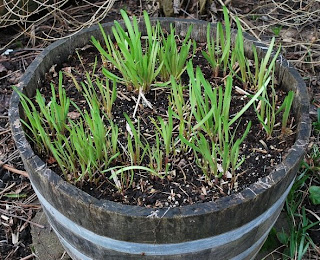 Garlic chives (Chinese chives) - our favorite for dumplings. This barrel on south side of house, soon will be harvestable size. Another barrel, on north side of house, shoots are barely visible. I also have them in the ground - much more difficult to manage, due to weeds and grass. Once grass invades, it's next to impossible to pull out from a grassy plant like chives or chinese chives.
 Another helleborus. Cool!
Super-Early Seed Planting
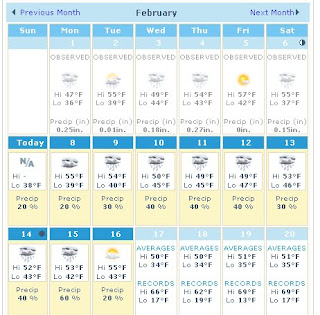
It's been nice and warm, seems amazing for February. Here is a screenshot from weather.com:
 "Tropicals" like tomatoes, chili peppers, eggplants, and basil, can't go into the ground until May, due to the risk for frost and the cool ground. I do need to measure the ground temperature. Cool-weather plants, some of which can even be winter-sown, are another matter, I think.
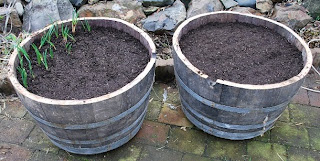 I've been wanting to do this project for a long time. Ning found a couple of "free-for-the-taking" wine barrels, and scarfed them up for use as planters. They've been sitting for a year or two. Today I got out the Skill-saw and cut them in halves, then drilled multiple 1-inch holes in the bottoms of each. Ning wanted to be able to move them around, so we added casters.
The main incentive was a warmer and more controlled environment for chili peppers and eggplants, which are challenging in the Maritime Pacific Northwest climate. It's still 3 months too early for those, but with unseasonably warm weather, I decided to try greens and radishes. Being above ground, South side of house, on a masonry patio, they should be much warmer. Today is 54F. The past week has been in a similar range. If it freezes, I can cover them as long as I have some warning. Freezing should not harm these plants. Weeds are growing actively, and brassicas are a lot like weeds in hardiness. The onions survived hard freeze down to 15 F in December, without damage.
Here's what we planted:
Some lettuce, Black Seeded Simpson - 40 days
Radish, Daikon Miyashige White - 60 days
Radish, French Breakfast - 28 days
Carrot, Scarlet Nantes - 65 days
Radish, Cherry Belle - 24 days
Cilantro, Slow Bolting - not listed
Mesclun, Asian Salad Greens blend, 21-45 days
Plus, I pulled a couple dozen struggling top-set onions from a garden bed, where they had been neglected, separated them, and planted individually for use as scallions.
It's always an experiment. I'll look for a sheet of plastic to cover them, keep them warmer. This is 2 of 4 half-barrels, so I can plant more in a couple of weeks.
They will probably take longer than listed. That's OK. If they are not fully developed by the time that we plant chilis and eggplants, we can harves them as 'baby vegetables' or feed them to the chickens. But given that we have about 85 days, I suspect that we'll have some garden-fresh greens before that time
I like the "controlled environment" aspect of using a prepared potting soil, raised above ground level. Less liklihood of disease problems, easier to plant, harvest, weed, thin. No getting feet muddy and tramping down the soil. Expense is an issue - it takes a lot of soil to fill the barrels. If they were not free, that is another issue. They should last a long time - I have 10-year old half-barrels that still look great and show no signs of falling apart. Yet.
Thursday, February 04, 2010
Pie Intermission: Pepper seeds.
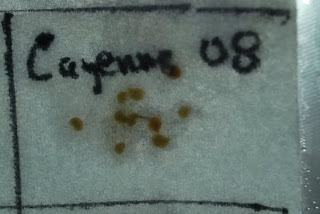
The Pepper Seeds continue to incubate. I think one seed sprouted so far - a cayenne.
This method makes it easy to observe the results without opening the bag. However, I did open it briefly to let some air into it.
The thermometer reads 86 F. This article describes experiments on pepper seed germination - looks like 30C (about 86F) is about the highest you can go before viability drops off. Not much difference between 20C and 30C (68F and 86F). They didn't test lower, and the next higher temp, 35C (95F), gave a much poorer result. It took 6 to 10 days for 1/2 of the seeds to germinate. Based on this experiment, I don't need to heat them so warm, but the mat doesnt' give much temperature control. On the other hand, in seed starting medium, they will probably be a little cooler, due to medium between the seeds and the mat.
This article recommends 70F to 90F. They also recommend a presoak in dilute vinegar or dilute tea. This article also states the same thing.
There seems to be a whole subculture built around growing chilis. I have this book pretty good discussion of chili types, history, and cultivation.
Ecoseeds.com suggests that peat-based media inhibit either germination or growth of pepper seeds. I don't know how scientific their experiment was, but it's worth keeping in mind. Given that there is signiciant criticism regarding the environmental impact of peat harvesting, there may be some bias - no way for the reader to know.
 One little sprout.
 Here are the rest of the seeds.
Olive Oil Piecrust
Last week I dreamed that my Mom made a pie. I don't know why - my Dad was the real pie maker.
Anyway, we do need ways to use the fruits and vegetables that we grow. The pie shell is universal - use your eggs in it when making a quiche or vegetable pie, or use your fruit to make a dessert pie.
Wanting to keep it healthy, I make an olive oil crust. Step by step below.
It's pretty easy. There are only 4 ingredients, and nothing is unusual. It comes out nice and flaky, every time. I suppose if I wanted buttery flavor, I could add a butter flavored extract, but I don't really miss it.
 Measure out:
3 1/4 cups flour
1/2 tsp salt
3/4 cup olive oil
3/8 cup skim milk
 Combine the flour and salt, then add the milk and oil.
 I use chopsticks to 'flake it all' together, then a wooden spatula and my hands to make a ball.
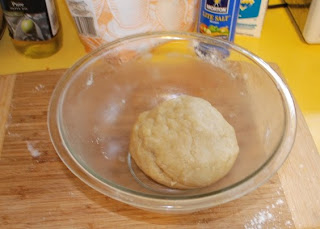 My Dad would refrigerate it at this stage, or after rolling it out. I went ahead and made the crust.
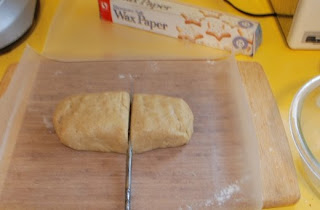 Then I divide it into uneven halves, the larger portion for the pie shell, the smaller portion for the top.
 Roll out between 2 layers of wax paper. This is the secret for an oil crust, it's not firm like a shortening bad-for-you crust
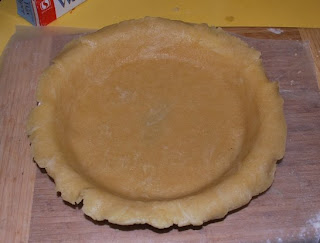 I peel off the top layer of wax paper, then roll it onto the rolling pin, use the rolling pin to lift into the pie plate, then shape it.
Then I roll out the top crust, and set aside to make the filling.
I'll blog on the filling tomorrow.
Subscribe to:
Posts (Atom)