Tuesday, September 29, 2020

Apple Grafting Update. 9.29.2020

 During late winter, I did a grafting project to create the mini-trees for what will be my mini-orchard.  This is part of my plan to be able to continue gardening and growing fruit, with lower maintenance and no ladders.  From ground level, I can prune, spray, pick, inspect, putter.  I can also grow multiple varieties in the safety of the deer fence.  But first, I need the mini-dwarf trees.  To create those, I used scion from my existing apple trees and highly dwarfing rootstocks bought via mail order.

I did the grafting March 16th.  Most were whip-and-tongue, done as shown in this vintage woodcut print, noted as by Dr. John A Warter in 1867:


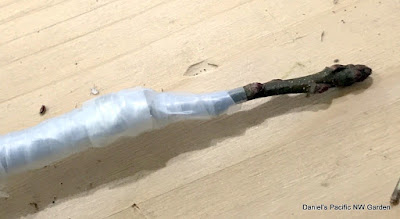
I grafted most onto the highly dwarfing but sturdy rootstock, Bud-9 (short for Budagovsky-9). After grafting them, I wrapped tightly with 1/2 inch wide strips cut from zipper lock freezer bags, potted them in the usual potting medium and they looked like this.

One of the grafts was Co-op 32, generic name for the early bearing, disease resistant hybrid apple "Pristine".  I liked this one a lot, but the mature branch had fallen off of it's multigraft stock about 4 years ago, held on by a tiny bit of cambium and bark.  By the time I removed the branch, there were tiny growths of stem that year.  I kept one, and grafted it onto another multigraft the following year.  It didn't do well but survived and added a few inches.  This time, I removed that and grafted it onto some Geneva 222 rootstock - still very dwarfing but maybe a bit more vigor than the highly dwarfing Bud-9.  There wasn't enough to graft as a whip-and-tongue, so I did a cleft graft, matching up one side's cambium layer and hoping that was enough.


I also did some weird, cross-species grafts that will be described in the next post.

Here is how the mini-trees look now.  All are whips about 2 to 3 to 4 feet tall.  I did keep them in a spot where the pots would be shaded but the tops were in full sun; watered almost every day; gave some Miracle Grow a couple of times.

The graft unions healed nicely.  In a few years, this area won't be visible except with looking very closely.

That Co-op 32 apple cleft graft, which I was prepared to write off, did quite well too.  As well as any other.  That tree is also about a 3 foot whip now.  I'm very happy to have rescued that variety.  So I still have the original scion, in a way.  It's just on its own roots now.


 By the way, this is the lineage for Pristine (Co-op 32) apple, developed in 1975 by the PRI consortium and labeled Co-op 32 in 1993.


Next, these will need to be planted in the apple garden.  That can happen as fall and winter proceed.  Two raised beds will need to be removed, which might be after a frost.

I'm not certain yet about spacing.  I have a Liberty apple on M27 highly dwarfing rootstock, which at 20 years old occupies a space about 5 to 6 feet wide.  With closer pruning, it might be ok with the 5 feet spacing.  The wider the spacing, of course, the fewer I can grow and the more room they take, but I want them to have the space they need.

Doing this is inspired by the late Gene Yale from Skokie, Illinois, who had a very nice miniature tree orchard that he created over the years.  This was him in his back yard in 1997.  He used various distances between his trees, and pruned some smaller than others.


Sunday, September 27, 2020

Planting Garlic. 9.27.2020

Garlic is something I like to do on nature's schedule.  It's fall, late Sept.  Sept (preferably) or October is Garlic planting time for me.  That's why I was in a hurry to construct this raised bed, which meant clearing out the mess of snow peas, weeds, and their trellis that occupied that location (needed doing anyway), buying the parts, leveling the ground, putting it together, and filling the bed, including getting some soil.  Getting things is not easy in the time of Coronavirus, especially for someone who is at higher risk for complications.

 Anyway, all of that is done.  I planted Musik (or is it Music?) that I grew last year, the largest and among the best tasting garlic cloves and heads that I've ever grown.  Three reasons:  (1) Musik is a great variety, and very delicious. (2) Growing them in shelter.  All of those people who insist that deer and rabbits don't eat garlic plants are either just quoting someone else, or their deer and rabbits have not read that book.  Repeated munching and torturing of the photosynthetic biomass of growing garlic plants does not make for good production or big bulbs.  And (3) the raised bed situation makes for much easier weeding, hoeing, and other care.

I used a trowel with marked measurements, and planted with the bottom of the trench at about 4 to 5 inches.  I planted the cloves 6 inches apart, and the rows are a foot apart.  I think the raised bed allows for a little closer together planting compared to in-ground, but this is roughly what is done in-ground too.

I also dug up the few remaining bulbs that I had let mature their scapes.  I had planted those in Spring and didn't expect much from them.  Some of the books say they won't develop cloves if planted in the spring, but these made about four, average sized cloves.  I planted those here too, so now one row is from those salvaged garlic cloves, which is good.


 Almost everything else here can be done in the course of time over fall and winter.  It's a nice feeling to have this job, which I like, done.

Planting a Seedling Oak Tree From A Container. 9.27.2020

 Last year I rescue this seedling, squirrel-planted oak tree from somewhere.  From the leaves I'm guessing it is a Northern Red Oak.  It survived a root injury and grew about 8 inches.  This location is near the woodlot.  I stepped it out, the easement extends 30 feet from neighbor's fence, and this is 40 feet, so that should be OK.  There is a ginkgo tree a few feet from here, something killed it.  I don't know what.   I've had three ginkgos die on me, so I think it's the ginkgo tree and not the location per se.

In the container where I've been taking care of this little tree for a year.

I like to bare root my trees before planting them into the native soil.  There are a few reasons.  First, I get to inspect the root system.  Second, I can spread the roots around in the soil so there are no girdling roots.  Third, it's recommended by WA State horticulturalist Linda Chalker Scott, for these and other reasons - for example, roots tend to circle around in a hole that contains an nice potting medium whereas the surrounding soil is native.  Fourth, I think one of the issues with previously planted trees, maybe those ginkgos too, was that moles love the potting medium and dig through it, disturbing the roots and providing a route for voles, which eat the roots.   All of the trees that I planted during my first couple of years here, which I planted including their original potting medium, were severely disturbed by moles.  Since I started bare rooting them, that doesn't seem to happen, or not nearly as much.

This tree's roots look fine.  The damaged root is not 100% better but there is a lot of growth of the rest of that root, surrounding the injury.   There are also some new roots, thick and white, which is a good sign of root growth going into fall.

Planted into the ground.  It's a nice looking little tree.


This is on the deer all-you-can-eat salad bar route through my yard, so this tree needs protection.  I read that oak seedlings are eaten by deer.  I also added a plastic mesh with 1-inch openings.  Deer seem able to pull leaves through this more open, but sturdier wire fencing, so I use both.


Friday, September 25, 2020

Making some sourdough bread. 9.25.2020

 Today I made some sourdough bread.  I made two loaves - one a standard white bread, and the other a 1/2 whole wheat, 1/2 white flour with added sesame seeds, millet, poppy seeds, flax seeds, and sunflower seeds.  It's about a teaspoon of each type, but a tablespoon of the sunflower seeds.

I made buns from the white bread, instead of a bread loaf.  I used a cast iron muffin pan, which makes buns about the size of an English muffin.  There was some dough extra, so I used short, wide canning jars to make some additional buns. 

For sourdough starter, two weeks ago I decided to start a new "mother" batch.  I combined 1 tbsp four (organic, unbleached) with 1 tbsp water (well water, not chlorinated).  I used a 1 pint canning jar, let it sit a day, stirred in another tbsp each of water and flour.  I repeated that process for a week, then removed half of the mixture and mixed in 1/2 cup flour and 1/2 cup water.  After letting that sit overnight, I used 2 tablespoons for a starter, and poured the mixture into a quart jar containing 1 cup of water and 1 cup of flour.  That jar is now the "mother", which I keep in the fridge, use every few days for starter, and replenish with equal parts water and flour about once every two weeks, letting it ferment until frothy before putting back into the fridge.  This starter has a nice buttermilk flavor, and the bread comes out really nice.

These were baked at 375 F.  The items in glass needed 45 minutes.  The buns in cast iron needed 30 minutes.

These were quite good.  I think the white sourdough buns would be nice for a quick garlic bread.  I buttered one, and made a small sandwich with another.

The wheat and seeds bread was also very tasty, especially toasted and buttered.

Planting Garlic Bulbils. 9.25.2020

 This year I let a couple of the garlic scapes make bulbils.  I think these are the variety "Musik" but I'm not certain.  The bulbils were really tiny, like rice  I don't know if they will grow, but it's not a big deal if they don't.  

Here is one of the scape heads with bulbils.  It was raining, so they are wet.

I planted them about 1/2 inch deep, an inch apart.  It's roughly 50 per 4 foot row, so about 100 altogether. 


Now it's just a matter of keeping weeds out and seeing what they do.  I don't expect to see any growth this fall, but you never know.

Crazy Potato from Compost Pile. 9.25.2020

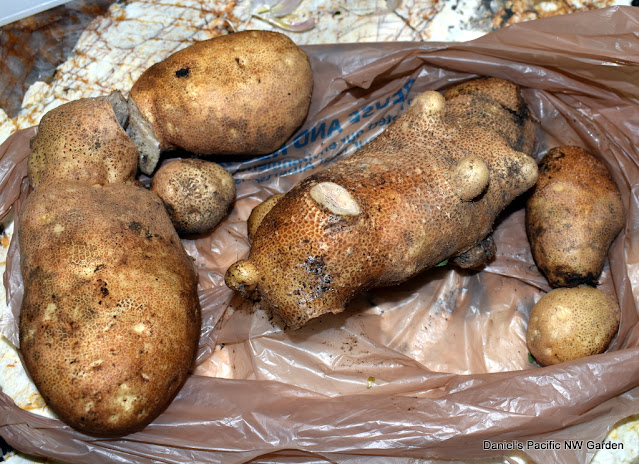
 Yesterday when I was collecting compost for the new raised bed, I discovered these crazy potatoes in the bin.  They grew without added water or other benefits, just what came from the composting plants.  Potatoes tend to pop up all over, since I put the plant tops into compost and plant the potatoes in a different location each year.

These were Russets.  They made for some nice air fried French fries.


Apple Harvest So Far. 9.25.2020

 I picked some of the early fall ripening apples.  This year the Liberty apples are some of the first.  I think my approach of grating multiple varieties to each tree had some merit.  Not only does that help with pollination, but there are different varieties in the same space, and they ripen at different times, spreading out the harvest.  I label the Liberty apples for Ning.  They are his favorite.  I like them too.

This year a King David apple graft, a heritage cultivar first grown in Arkansas, had its first apples.  It's not very vigorous, and needed about 4 or 5 years.  They turned out to be quite tasty, good texture, nice in every way.  Small, which is fine.  I don't care for giant size apples.

The King David apples.

Some of the Liberty apples.

This year I'm storing them in a shed, where they should be cooler than when I stored them in the garage.  I'm also putting them on newspaper and trying to avoid stacking them.


I found some King David apples on the USDA pomological watercolor website.  As with other images, I edited a little for size and clarity.


This is the description for King David on orange pippin website  "one of the lesser-known apples that were promoted by the famous Stark Brothers nursery at the end of the 19th century... discovered as a chance seedling...but most authorities agree that Jonathan is one of the parents, and it has the aromatic qualities associated with that variety.  The other parent is believed to be Winesap or Arkansas Black, and visually it has a resemblance to the latter."  I usually like any apple with Jonathan genes.  They have a flavor that stands out very nicely.

These are really good.  Maybe I will graft a scion from this graft, onto some super dwarfing scion for my miniature fruit tree mini orchard.

Dahlias. 9.25.2020

 These dahlias have been blooming and blooming since mid summer.  I just planted them in the vegetable garden where I found space.  Next year they deserve a better location and tying up.  The question now is, do I leave the tubers in the ground or dig them up and store them in the garage for the winter.


The Last Batches of Sauce Tomatoes And Better Boys. 25 Sept 2020.

 Yesterday I harvested the rest of the Ranger sauce tomatoes and the Better Boy slicing tomatoes.  I left the Bodaceous and cherry tomatoes on the plant for today.  It's raining, so there is done splitting.

Even though some catalogs claim that determinates, like these sauce tomatoes, don't need staking, the plants really did much better in cage support structures.  Back burner project for this winter, make some better cages.  Two plants fell over and were touching the ground.  Those plants were much more worse for the wear, with badly damaged tomatoes and rotting leaves.  Even so, with the plants looking as bad as they did, the crop was very nice.  I have enough for some more cooking up into whatever I want for another week or so.  The round ones with the sauce tomatoes are Early Girl Bush.  Those were good for slicing too.

There are also enough Better Boy for a couple of weeks if they keep that long.

I also picked Jalapenos.  The plants remain healthy looking and vigorous.  I should let a couple of them ripen and save the seeds.  This was a good variety and I forget which one it is.  

With this year being one bad news after another, I did not know if these crops would make it to the result.  Growing them is more about the doing than the getting.  Yet here they are, lots of beautiful and delicious, nutritious garden grown vegetables.   It's very good for the soul.


Thursday, September 24, 2020

Fig Watercolors from USDA Pomological Collection. 9.24.2020

 These are from the USDA Pomological watercolor website.  

They have this introductory statement

"USDA Pomological Watercolor Collection is one of the most unique collections in the Rare and Special Collections of the National Agricultural Library (NAL). As a historic botanical resource, it documents new fruit and nut varieties, and specimens introduced by USDA plant explorers from the late 19th and early 20th centuries. The collection spans the years 1886 to 1942. The majority of the paintings were created between 1894 and 1916. The plant specimens represented by these artworks originated in 29 countries and 51 states and territories in the U.S. There are 7,497 watercolor paintings, 87 line drawings, and 79 wax models created by approximately 21 artists. Lithographs of the watercolor paintings were created to illustrate USDA bulletins, yearbooks, and other publications distributed to growers and gardeners across America. "

They have the following attribution requirement. 

 "Use of the images in the U.S. Department of Agriculture Pomological Watercolor Collection is not restricted, but a statement of attribution is required. Please use the following attribution statement: "U.S. Department of Agriculture Pomological Watercolor Collection. Rare and Special Collections, National Agricultural Library, Beltsville, MD 20705

The "Royal Black" fig original had the following notation:

"Mr. Tassa, living at 631 Maryland Ave., S.W. has brown, white, and black fig varieties said to have been brought from Italy in about 1894 by his brother who lived near Pennsylvania Ave. and 2nd Street, N.W. The black fig resembles this drawing. A son of this brother who imported the figs lives at 1365 Meridian Place, N.W., and has two fig trees. of the "black" variety growing on the premises of a house owned by him at 1368(?) Meridian Place (opposite side of street, next to alley). H.R. Fulton, August, 1942"

I did some minor editing.  My eyes need a little sharpening and color enhancement, and I removed some extra border so the images would be larger.  The watermark is automatic.


Edit:  I made some changes to this post for clarity, and improved the photo uploads.  9.25.2020

Vintage German Fig Illustration from Vintage Printable. 9.24.2020

 Vintage Printable provides public domain illustrations for download.  I doctored this one a little, croppin extraneous border, and modifying the color for clarity.


Celeste Figs. 9.24.2020

 This is the first crop ever for my Celeste fig tree.  This was grown from a cutting.  Celeste is a historic Southern variety.  Some of the references say it won't bear in the Maritime Pacific Northwest, but they were written before climate change started accelerating.  With a warmer season, maybe it will.

This tree is about 5 years from rooting the cutting.  The breba crop fell off, but these main crop figs, while small, are so sweet and rich!  And there are a few bowls full.  

Celeste is also called "The Sugar Fig".  Good name, these are very sweet.  The darker figs usually have the richest flavor, and these are no exception.


Nerine. 9.24.2020

 I had these in a container that I overwintered in the garage, for about 10 years.  Last winter I planted them in my garden.  They survived last winter, which was mild, and the summer, which was dry.  Now it's blooming.  Very nice.  My great aunt Emma had "Surprise Lilies", which are quite similar but I can never get them to grow here.

We'll see if these Nerine survive this winter.  They are nice, but I'm not up to digging them up and storing them.


New Raised Bed Is Completed. 9.24.2020

 This is the first of a planned three new raised beds.  The old ones, made from fir 2 x 6's, are starting to deteriorate.  They have also tended to sink with time, so the lowest 2 x 6's no longer show above ground / mulch level.  I've been building up the soil in them for 8 years, and that is nice.  Everything grows very well in them.  The old beds are also not where I want them now.

I felt a sense of urgency about the first one.  I want it for garlic, which grows very nicely for me in raised beds, better than in the ground.   Also, it needs to be fenced.  Herbivores eat most of my garlic if I leave it unprotected.

This new method makes a bit larger bed from the same size planks, compared to my old method.  My older bed has also sunk quite a bit.  So,  I bought 1/2 yard of topsoil to mix with the original raised bed soil.   At first I was adding the new topsoil to the bottom level, but then I decided it would be better to mix it all together.  Some is uneven but I think it's mostly mixed.  The new topsoil mix is gummy when wet, whereas my mix crumbles somewhat.  Not knowing where that topsoil came from, or what might be in it, I supplemented it.  After mixing together the old and new soil, I added about an inch of aged compost from my yard - a year or two old - and spread a cup of dolomite lime over the entire bed, then turned it a few times with a shovel, and tilled a couple of times with a hand held "claw" tiller tool that I liked.  Then I raked it fairly smooth.

It's been raining, so the soil management was not perfect, but I wanted to get it done.  Maybe I should let the amended soil cure and age and settle a little before planting the garlic, but I might get started soon anyway.  I usually plant it about now.


Wednesday, September 23, 2020

First Crop from Garden Gold Miniature Peach Tree.

 I planted this peach tree last winter.  I also planted an El Dorado peach tree, which was smaller and did not have any fruits.  The word "tree" is used advisedly - it's only about 3 feet tall, if that.  There was prolific bloom, typical for genetic dwarf peaches.  I allowed about one dozen to stay on the tree.  I want it to stay small.  Growth was really quite good, and the peaches just ripened.  

Garden Gold Peaches.


These are free stone peaches.  The flavor was excellent.  A tree ripened peach is so much better than anything you can buy.

Next comes the challenge.  I'll need to come up with a good cover for the winter.  Genetic Dwarf peaches are highly susceptible to peach leaf curl disease in the Pacific Northwest.  That disease is carried into the buds by rain, starting about November.  So, the tree will need spraying or covering, or both, come November.  I think this year a clear plastic cover will suffice, because the trees are so small.

I will keep the trees at a miniature size.  My goal is something like a tomato plant in size and garden footprint, but a tree instead of an annual vine.   I'll be happy if there are 2 dozen peaches a year.

I had a Garden Gold peach tree in my old Vancouver yard for quite a few years.  I let the size become too big to readily cover, didn't get around to covering it, and it had severe Peach Leaf Curl, killing a lot of the branches.  That cover is very important.  Keeping it small is also important, if you want to be able to cover it.

I also had an El Dorado ganetic dwarf peach tree too.  I kept it in a container.  I moved the container out of the rain for the winter.  That worked very well, but it needed watering two or three times a day on hot summer days.  I think this method that I am trying now will be more workable.

Baked Pasta Sauce. 9.23.2020

 My friend Rich gave me this recipe.  It turned out to be really, really good.  The recipe made use of sauce tomatoes, onion, garlic, and Jalapeños from my garden, which is something I liked about it.

Cut about 10 sauce tomatoes and layer on bottom of oiled casserole dish.

Add one big minced garlic clove.

Add 1/2 chopped medium onion.

Add 3 sliced Jalapeños.

Dust with salt and pepper and some pepper flakes.

Drizzle with 1/4 cup olive oil.

Repeat with another layer of sliced tomatoes, minced garlic, chopped onion, sliced Jalapeños, and the salt, pepper, pepper flakes and olive oil.

Bake at 350 without covering, 50 min.

Here's how it looked before baking.


Here's how it looked after baking.


Here's how it looked on some spaghetti.


There was about 1/2 remaining as a bonus amount (say bonus amount, not left over.  It really is a bonus).  I kept that in the fridge overnight.  Then I air-fried a summer squash, sliced into French fry size slices and some disks, dusted with season salt, garlic powder, pepper, drizzled with olive oil.  Air fried 9 minutes at 400, mix, air fry another 9 minutes at 400.  Then cover with the pasta sauce, which is heated in microwave for a couple minutes.

Here's how that looked.


 Both meals were delicious.  This is one of the best recipes I've made, ever.

Edit:  24 Sept 2020.  This sauce is also delicious on rice. 


New Raised Bed. 9.23.2020

 This is the first of three new raised beds that I have planned.  The old ones are in a location where I want to plant miniature fruit trees.  They are eight years old, and the untreated fir wood is rotting, especially the lower planks.  

This is part of my effort to build some gardening infrastructure for the future.  These beds are three planks tall - about 18 inches.  This height will be easier to garden as I age.  I will have the beds far enough apart, that I can have a walking assist device or bench between the beds.  Around the beds, I will have tree chip mulch.  The construction is surprisingly easy.  The corners are pre-cast concrete blocks with slots in the sides and a hole through the top.  The hole accommodates a rebar, which is pounded into the ground to hold them in place a little better.  The slots are made to fit a 2 x 8 plank.  I bought 8 foot long planks, the length of the bed.  For the width, I cut them in half, for 4 feet.  I bought treated lumber, and will line with plastic.

After leveling the ground, I lined three sides with plastic, and removed one end to roll the wheel barrow into the bed to dump garden soil.  When I get near completion, I will replace those planks and line the end with plastic before filling the end.

 The bottom is lined with a re-used layer of hardware cloth.  That wasn't big enough, so I added re-used chicken wire to make up the difference.  I folded the chicken wire to double it.  The purpose is to prevent tunneling animals from working their way up into the bed.


End removed to allow me to fill using a wheel barrow.  When I'm ready, I can just slide the boards back into the slots.

I wanted to re-use soil from previous raised bed.  That soil has received a lot of compost and some minerals over the years.  The dimension is also nominally 4 feet by 8 feet.  However, the concrete corner blocks actually increase the dimension.  Instead of losing 2 inches each war from butting the corners together, there is about a 2 inch gap in the block, so 4 inches are gained at each corner.  In addition, those old beds  had sunk into the soil over time, so the height isn't as much.  I bought a truckload of top soil. Combining the 1/2 yard of purchased topsoil with the existing soil from one bed, might fill that bed. 

When this is done, I'll plant garlic in this raised bed.  It's the only one that I am really motivated to complete before winter starts.  The others can be done during the winter.  My plan is, one for garlic, one for cucumbers, one for peppers.  There will be room for some other plants.  These are the main ones that benefit from raised beds in my garden.


Saturday, September 19, 2020

Redlove Era Apple. 9.19.2020

Today I harvested the first Redlove Era apple, and also a Redlove Calypso and a bunch of others.  This was the first apple from Era, which is in it's second summer now.  The Redlove Calypso has been in the ground less than a year.  It had three apples, and I ate one a month ago.

I forgot to upload a photo of the uncut apples.  I will do so if I can locate it.

For comparison, here are Airlie Red Flesh, Redlove Calypso, Liberty, and Redlove Era.  Liberty is a medium size apple, Airlie Red Flesh is small-ish.  The Calypso and Era apples were small, silver dollar size apples.


Era is much deeper red.  The skin is also more red, compared to Calypso.  Airlie usually has more red or pink compared to this apple.

The Airlie and Liberty were both sweet, apple-flavored apples with almost no sourness.  Calypso was very tart, and not much else.  Redlove Era was really delightful , a fruit or berry flavored apple, tart and sweet, sort of like cranapple.  

Fruit trees usually need a few years for their fruits to reach full size and flavor.  
it's nice to get this taste.  So far, my favorite is Redlove Era.

Slices from Redlove Era apple.  Very tasty.  The photo doesn't quite catch the true red color - a dark scarlet.


Corn (Maize). From Seikei Zusetsu, Japan, 1804

 Seikei Zusetsu is a book containing agricultural woodcuts from early 1804 and created in Japan in 1793 by unknown artists in Japan.  This image is from wikimedia commons.  I edited this image slightly, cropping for a narrower page border to emphasize the image better.  I find these images very compelling, combining some things I love to look at - Japanese art, 19th century book engravings (technically these were end of 18th century), botanical art, and history of agriculture and horticulture.  This is an image of corn, a crop originally developed in Mesoamerica (I guess millennia before Maya, let alone Aztec empires),  and spread around the rest of the world as part of the post-Columbian exchange.   I chose this image because now is corn harvesting time.


Friday, September 18, 2020

Bee forage, or not. 9.18.2020

 The wildfire smoke level is down to about 100, from well above 500 two days ago.  That's still not "clean" but not "hazardous to life" that it was.

I checked on the bees, through the window in their beehive.  I THINK they are OK.  Not much activity, today was cook and rainy so I think they wouldn't be going out anyway.  The yellow jacket traps have a few dozen yellow jackets - bad news, really. That means there are still lots of them out there.

Since it's cool and there are no bees out there, it may not matter now to have nectar and pollen plants.  But there might be sunny days now and then.

This is the patch of wildflowers that I planted in July, I think.  It was after the irises that were in this spot finished blooming, and I moved them elsewhere.  They are blooming nicely now.  I was surprised that they did this well, planting the seeds so late and watering only a few times when first planted, and a few times this month.  I don't know the source of the wildflower mix.  There are lots of bachelor's buttons, some coreopsis, cosmos, and a few zinnias.  That is most of it.  Deer have not eaten any of it.


These are the buckwheat that I planted in the former potato patch, roughly two weeks ago.  I think they benefited from the smoke emergency, because the soil did not dry out so fast.  I don't know if these will just be a ground cover / "green manure" cover crop, or if they will bloom before the first frost.

These are the other buckwheat, planted in mid summer.  They are blooming very well.  It's not a big enough patch to sustain a hive, but it's not nothing.  This is a learning process for me.


Phacelia is not blooming yet.  I think it might be close.

Squash Harvest. 9.18.2020

 I decided to harvest all of the squashes today.  The stems were dry and woody, so that tells me it's time.   This was a nice harvest, and some are new types that I never grew before. I regret a little bit not isolating the blossoms and hand pollinating each with its own variety, but at the time that wasn't an option.  I also did not realize how much I wanted to save seeds this year.

There are some new types - the Red Kuri Japanese squash produced quite a number of small, acorn-squash or larger size squashes.  The Japanese Kobucha squash, on the other hand, made only one.   The Pink Banana Squash made two very large and several small to large squashes, but one large one was vole-chewed and developed rot as a result.  No waste - that went to chickens who will eat the squash and its seeds.  That's OK, I got mine too.  Then my other favorite is the Galeux d'Eysines pumpkin (Apparently "Galeux" means scruffy or scabious) - beautiful pumpkin and makes really good pies.  So does Pink Banana Squash, which is special because my great aunt Emma gave me seeds to this one 55 years ago, I grew them and my mom used them to make pies.  These seeds were from Baker Creek heirloom seeds.  

 There are also some summer squashes, which will be used in a couple of weeks, and the two big stripy  / green  ones are heirloom Italian Zucchinis that I am saving for seeds.  I hope the progeny are not a tasteless mix, so next Spring I'll grow one from the old packet as well.  The big white one is "Illinois Squash" which I've never eaten and which I don't know what it will be like.

Those yellow summer squash are incredible good prepared as follows.  Slice into French Fry shape slices.  Don't try to skin them first, the skin is tender and cooks even more tender.  Dust the slices with season salt, pepper, garlic powder, maybe some pepper flakes.  Drizzle with vegetable or olive oil, stir, then air fry 400 F, 8 minutes, toss, air fry for another 8 minutes.  The best breakfast or snack you can have. 

 You can also do that with Zucchinis.


Sweetcorn Harvest and Freezing. 9.18.2020

 Sweetcorn has been coming "on line" for the past week.  There were a few ears from the first planted batch, the second planted batch basically didn't grow or the plants got eaten by something.  So these are the third and fourth batches, which were planted early / mid June I think, and I wondered if that was too late. As it turned out, they are producing a lot of big tasty perfect ears.

This also answered a couple of questions I had.  One, there wasn't enough room to plant four-row blocs, which was recommended for best pollination.  Instead, I planted three-row blocs.  Those have done fine pollination-wise.  Maybe a few small ears, but not a problem.  I also wondered if they were planted too late.  This makes for a fall crop, but did much better than the earliest ones.  Which where OK and better than nothing when I got some sweet corn from those.  

There were a lot of tomatoes to pick at the same time as the sweetcorn.

I think these were "Ambrosia" but they might be "Bodaceous".  I like the "SE" type corn.  The supersweets are too sweet and not enough corn flavor.  The SE type ripens for me, is sweet but not sugary sweet, and has a good flavor, tender but not mushy kernels.

I blanch for three minutes in boiling water, transfer to ice water, and when cool, slice off "planks" of corn.  They don't make planks if sliced when hot, which is interesting.  I like those.  This is different from fresh, but such good flavor and so welcome in midwinter, that I grew extra this year just to freeze.  The last bloc is also almost ready to harvest.