Showing posts with label sourdough. Show all posts

Friday, September 25, 2020

Making some sourdough bread. 9.25.2020

 Today I made some sourdough bread.  I made two loaves - one a standard white bread, and the other a 1/2 whole wheat, 1/2 white flour with added sesame seeds, millet, poppy seeds, flax seeds, and sunflower seeds.  It's about a teaspoon of each type, but a tablespoon of the sunflower seeds.

I made buns from the white bread, instead of a bread loaf.  I used a cast iron muffin pan, which makes buns about the size of an English muffin.  There was some dough extra, so I used short, wide canning jars to make some additional buns. 

For sourdough starter, two weeks ago I decided to start a new "mother" batch.  I combined 1 tbsp four (organic, unbleached) with 1 tbsp water (well water, not chlorinated).  I used a 1 pint canning jar, let it sit a day, stirred in another tbsp each of water and flour.  I repeated that process for a week, then removed half of the mixture and mixed in 1/2 cup flour and 1/2 cup water.  After letting that sit overnight, I used 2 tablespoons for a starter, and poured the mixture into a quart jar containing 1 cup of water and 1 cup of flour.  That jar is now the "mother", which I keep in the fridge, use every few days for starter, and replenish with equal parts water and flour about once every two weeks, letting it ferment until frothy before putting back into the fridge.  This starter has a nice buttermilk flavor, and the bread comes out really nice.

These were baked at 375 F.  The items in glass needed 45 minutes.  The buns in cast iron needed 30 minutes.

These were quite good.  I think the white sourdough buns would be nice for a quick garlic bread.  I buttered one, and made a small sandwich with another.

The wheat and seeds bread was also very tasty, especially toasted and buttered.

Wednesday, March 14, 2018

Sourdough Cast Iron Skillet Pizzas. 3.13.18

Pizza Pizza! Not about gardening, except for the Roma tomato sauce.  Back on track with sourdough crust, cast-iron skillet pizzas with home grown Roma tomato sauce. These crusts take a long time to rise, starting in the morning for an evening pizza. I might experiment with a faster yeast crust, or a hybrid for more sourdough flavor, but they are worth it. Time to start Roma tomato seeds today, too.

Sunday, March 11, 2018

Sourdough bread with Jalapenos. 3.11.18

Since Ning had his heart surgery, I quit adding cheese to the breads. This loaf is sourdough, with jalapenos sauteed in olive oil, plus 2 tbsp olive oil. I don't miss the cheese, and love the flavor and texture. I've been feeding and using and regenerating this sourdough starter for more than a year now, and it's still excellent.  Often, I use at least 50% whole wheat flour, but sometimes I just use unbleached bread flour.

Thursday, December 22, 2016

Sourdough Bread. Steps 5, 6, 7. Transfer to Pan, Rise, Bake.

Sourdough transferred to bread pan and canning jars.
 I let the initial dough rise in the mixing bowl.  I don't count how many times I fold it in the bowl, about every hour or so.  It could probably be less but I enjoy it too much.

After a few hours, I transfer to glass bread pan.  These old vintage pans are often found for sale at Goodwill, as well as yard sales, for $2 or $3.  I read that the older ones are less likely to break, compared to new ones made from a cheaper formulation.  I tried a new "vintage look" Pyrex bread pan but it did not transfer heat as well and I didn't like the result.
I let this one rise about 5 hours.

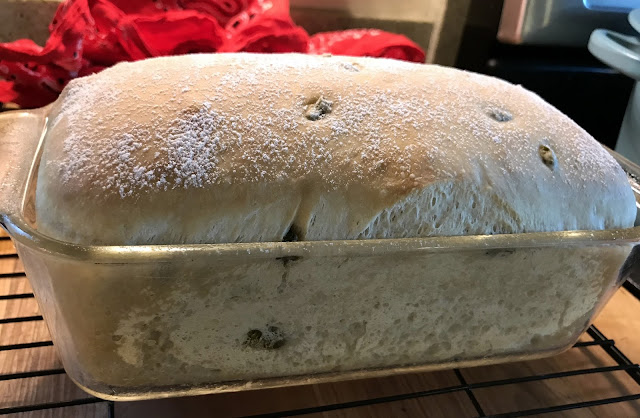
 These loaves rose 5 hours.  I don't time carefully.  I worked on the kitchen remodel and did some shopping.  The loaves rose a little more than I usually allow, here about 1 inch above the rim.  You can see bubbles through the glass.

I dust with flour.  I don't know what that does, but the finished loaf looks nice.

Then bake in preheated oven, 425F for 15 min, then reduce heat to 375 for another 15 min.

After baking.  The old Pyrex bread pans show the bottom has browned nicely.

One beautiful sandwich loaf and 2 mini-loaves cooling on the rack.
You can see through the glass, the bottoms of the loaves browned nicely.  The top is also lightly browned and sounds hollow when tapped.  I turn them onto a rack and let cool under a thin cotton towel.

When fully cooled, I transfer into a plastic bread bag.  They can sit overnight without becoming too dry.

This loaf came out awesome.  Crusty crust, chewy texture, sourdough flavor.  I love this bread for toast and for (vege)burgers.  Often I just toast and butter it.  So much better than store bought, that stuff should be called something other than "bread".

I wanted to try making my own starter again before posting this, to make sure it worked.  It did, as described here, and was actually better than the original starter.

Slices of home made sourdough bread

Sourdough, Step 2 and 3. Pre-ferment and Making the dough. 12.22.16

Sourdough starter after overnight pre-ferment

Sourdough dough after mixing in flour.  Sticky but not liquid.
Once I have a starter going, the starter itself is easily maintained in perpetuity.  I keep it in a wide-mouth jar, in the refrigerator.  I use about ¼ cup of this mother culture, each time I make a loaf.  When it's down to about ½ cup volume, I mix in another 1 cup of flour and 1 cup of water, loosely cap the jar, let it sit for ½ day, tighten the cap and return to refrigerator.  The details of timing and amount are not precise, and it doesn't matter.  The culture is resilient and alive, and handles minor variations without objecting.

I start my dough as a pre-fermented starter, the evening before making a loaf.  The timing is not precise.  I usually start the pre-ferment in early evening, when I make supper, but have waited until bedtime without it causing any problems.  It is a very low-input thing to do.

I mix together 1½ cup water and 1½ cup organic, unbleached bread flour.  I use an old Pyrex 4-cup measuring cup as a bowl and cover with plastic wrap.  Nothing else.  I think the organic unbleached bread flour makes a better loaf than the alternative.  Then let it sit overnight.  In the morning, the starter is foamy and bubbly.  There is some separation of water which is normal.  There is some variation from time to time, probably due to kitchen temperature, but that does not matter.  It smells sour, which is good.

The final loaf volume depends on the amount of water in the starter.  I make a standard 8½ inch or 9 inch Pyrex bread pan loaf.  The 1½ cup water translates into a loaf with a little extra that I make as a mini-loaf in a wide mouth glass canning jar.  To leave out that mini-loaf, I would use 1¼ cup water and 1¼ cup flour for the original starter preferment.

In the morning, I use an old mixing bowl.  I add 1½ cup flour and 1½ teaspoon salt.  A lot of recipes call for more salt but that is too much for a healthy amount of dietary sodium.  This amount rises well and also tastes very good.

It takes some muscle to mix in the flour.  I gradually mix in enough so that the spatula will stand upright without falling over, but it is still very sticky.  I don't turn it out onto a board and knead.  This method results in a fully hydrated dough.  Then I let it sit roughly an hour, and use the spatula to fold it several times, turning the bowl by hand and folding from every side.  The consistency by that point is no longer sticky.

Later I'll post as the loaf develops.  Sourdough is the ultimate "slow food".  I think my loaves are delicious, filling, and make bread something to be excited about instead of that mushy cake-like stuff from the store.  Plus, there is no added sugar, so they are healthier.

I often use whole wheat flour for the actual loaf, or add other additives to be described later.  This description is for the basic white sourdough sandwich loaf.

<-------------------------o--------------------->

Sourdoughs are made around the world, from many types of milled wheat and rye flour, and using many methods.  There are diverse types of bacteria and yeast that work together in sourdoughs.  The bacteria and yeasts seem to come from the grain mill, where suitable organisms from the air survive and inoculate the grain and flour, but may also be in the kitchen and the baker's hands.  Once established, a sourdough culture becomes resilient to introduction by other organisms, but may adapt to new regions and circumstances if the starter is taken to a new place.  Discover Magazine The Biology of Sourdough.    and The Sourdough Microflora.  Biodiversity and Metabolic Interactions. 

Probably most important, Josey Baker's website and book.  Baker is the source for enthusiasm, accessible artisanship, and the concept of a fully hydrated dough, which is different and better than what I did in the past.  Even though I make sandwich loaf, and his are hearth style artisan loaf, my bread is better for reading his book and watching his videos.

Wednesday, December 21, 2016

Sourdough Starter. 12.20.16

Sourdough Starter after 2 weeks.

Sourdough Starter after 2 weeeks
 Even though  I've been using a sourdough starter that I started 2 years ago, I decided to see if I could repeat that process now.  The original starter contained grapes from my garden for the wild yeasts that grow on grapes.  That is not necessary at all.

This is a variation on the countless sourdough starter instructions.  The small jar and small volume makes for less waste.

I use organic, unbleached flour and unchlorinated water.  I don't know if either is required.  I suspect bleaching kills natural bacteria in the flour, and being organic is something I prefer.  Chlorine is in water to kill bacteria, too.  I don't know if sourdough bacteria can overcome that, or if you can just use normal tap water.

It's very easy and works nicely, but takes a long time to do it's own thing.

Use a clean small jar.  This is a 1 pint canning jar.  A small jelly jar would be fine.  You want a small head space so the oxygen will be depleted by the bacteria. 

Day 1.  Combine 1 tablespoon of flour and one tablespoon of water.  Mix and screw on the lid.  Let it sit.

Sourdough Starter after 2 weeks.
Day 2.  Add 1 tablespoon of flour and 1 table spoon of water.  Mix and screw on lid.  Let it sit.

Day 3.  Remove about one tablespoon of mixture, then add 1 tablespoon of flour and 1 tablespoon of water.  Mix and screw on lid.  Let it sit.

Day 4-14.   Repeat Day 3.

During the first few days, not much happens.  The flour tends to break down a little and settle with fluid on top.  Then, gradually, bubbles start to form.  Most recipes don't go the full 14 days, but I wanted to be sure.  I did this before at 7 days and the bread did not rise.   This time, at 14 days, the gas production - what makes the bread rise - is robust.  The lid actually bent outward from the gas pressure.  I can apply a new lid.  You can hear a pffft when the lid is unscrewed.  During the first week the aroma was more like spoiled milk - butyric acid.  Now, it's more like yogurt - lactic acid.  I think it's ready to try making a loaf.  I will start the pre-ferment tonight.

You can always buy an established starter.  King Alfred Flour has a good recipe for sourdough starter.  King Alfred also sells a sourdough starter so that this process can be avoided.    Their starter has been maintained for more than 100 years.

Wednesday, September 21, 2016

Update. 9.21.16

Buffalo Grape.  9.21.16

Rock Garden Perennial Border.  9.21.16
 I've been trying to work through some hardware issues, which resulted in decreased posting.  I don't usually carry my good camera around while working in the garden, because I tend to damage delicate equipment.  The Apple equipment is a few years old (I-phone and I-pad) and I've found that Apple equipment does not age well.  In addition, back-compatibility of program updates is poor, and Apple inc is too overbearing with their treatment of users, so I've been de-appling my computer life. 

Things are starting to come together again, on my old Windows-based laptop.  Meanwhile, I've been removing hardscaping from the old place in prep for eventual sale, mainly a koi pond that presented a child hazard.  I'm not a young man any more, so hauling wheel barrows of rocks has taken a month, and it's not done yet.

With cooler weather, I renovated the worst of the house perennial borders at the Battleground house.
Border, with labels.  9.21.16

 That renovation involved - removal of thistles and wild mustard, both of which have been tenacious and invasive.  I laid down newspaper or cardboard, torn such that water can seep through, but hoping that weeds and grasses will mostly be smothered.  I removed most of the bearded irises  - ugly about 90% of the year, and too welcoming to grass weeds.  I planted divided sedums, sempervivums that I had been growing in old iris beds as a ground cover, kept daylilies and divided some, kept helleborus and some sedum in place, planted crocosmia that I divided from the old place, moved poppy roots, with dormant top, and added lambs ears - Stachys byzantina, and echinacea varieties, both of which were on the almost-dead table at Fred Meyer and Home depot, on deep sale.  These were root bound, so I cut off the winding roots, cut slits into the root ball, planted and watered in.  They perked up and look much better now.  I deep-mulched with tree arborist chips.   The border still needs some river-rock for the edge / pathway, but is almost done.

The goal is a bed with very reduced maintenance, mostly drought tolerant plants but that respond to some care, mostly deer and rabbit tolerant plants, at a very low cost.  The only new plants were deep sale with some need for TLC.

Sourdough Pizza with peppers, cayennes, and onions.  9.21.16
Meanwhile, with so many tomatoes and peppers, I've been trying to find ways to eat them.  This sourdough pizza came out pretty good.   The sourdough crust used my usual starter, with just flour, water, and salt, no other additives.  These are Nikita peppers (green) and cayennes (red) - really tasty.