Friday, April 22, 2016

Tomato Plant Grafting, Update. And Tomato Cuttings. 4.22.16

Better Boy Tomato Graft, on SuperNatural Root Stock.  4.22.16
Now the grafted tomatoes are out of the humidity chamber.  Only two of the six, survived.  The reason was not the technique, but my anxiety.  I took them out of the chamber too soon.  The leaves wilted, in some cases not recoverable.

The two that survived are Better Boy and SuperSweet 100.  The Better Boy looks especially good.

Meanwhile, I had kept a few of the tops of the rootstocks, by placing them in a cup of water, and kept on window sill.  Those cuttings grew nice roots in the water.  I also had a Better Boy that I accidentally decapitated, and am rooting that as well.

This can be a way to increase the number of tomato plants in a vegetable garden.  If there are lower branches, cut those off and root in water for planting back in the tomato patch.  Doing so means free plants.

I still have some plants for scion, mainly Roma.  Those will be next.  Romas are great cooking tomatoes, but in my garden the plants tend to be smaller compared to other types.  Maybe grafted plants will be more vigorous. 
First Attempt at Grafting Tomatoes.  One Week.  4.22.16
Tomato Cuttings in Water at One Week.  4.22.16

Tomato Cutting Rooted in Water.  4.22.16
I trimmed the wilting leaves from the grafted SuperSweet 100.  Maybe that will give it a better chance to take off and grow.

Actually I'm pretty happy that even one, and maybe two, took off and are growing.  Now they should grow quite fast.  Even ungrafted tomatoes grow fast at this stage.

Thursday, April 21, 2016

Raised Beds, Peppers, Onions, and Tomatoes. 4.21.16


Maturing Egyptian Walking Onions.  4.21.16
Peppers in Protected Raised Bed.  4.21.16

First Tomato Plants Planted Out.  4.21.16
With early warming, I don't know what will happen with early planting, but am planting things out as soon as they seem ready.

The overwintered Eqyptian Walking Onions are producing topsets.  These are in a container / small bed constructed from tree edging rings.  So this is my onion ring planter.  I recovered these last year from a nearly-dead plot, weed competition and herbivores.  Now they are vigorous and excellent.

I used large-cell chicken wire fencing to protect the raised pepper beds.  This is my favorite type of raised bed now, easy to work accessible, and easy to keep clean.  It's early to have peppers outside.  I don't know if deer will reach over and much on the plants.  I hope not.  They should be secure from rabbits.

I planted out the first of the tomatoes.  These were non-grafted, own-root seedlings I started earlier.  Better Boy, Jersey Boy, Sunny Boy - I guess this is a "Boys Club", also Supersweet-100 and Sungold.

Pawpaw in bloom. 4.21.16

NC-1 Pawpaw in bloom.  4.21.16
I've been using an artist's paint brush to transfer pollen between flowers of pawpaw varieties "NC-1" and "Sunflower".  Supposedly, "Sunflower" may be self fertile.  This tree bloomed first, and maybe some flowers did take.  The stigmas are receptive before the flower produces pollen, and once the anthers ripen and release pollen, the stigmas are not receptive.  So the timing for both the donor and recipient flowers is important.

The tiny "Mango" pawpaw tree- about 18 inches tall - has 2 flowers.  I pollinated one today.  I doubt that will produce fruit, but you never know.

Preparing Garden Bed From Sod. Black Plastic & Mole Family Method. 4.21.16

Start raised bed by spreading black plastic and weighing down edges.
 I started these beds Jan 1,   so they are about 3 1/2 months in the making. This method is minimal effort compared to rototilling a patch of fresh sod, and not nearly as obnoxious .  I wanted some much larger garden beds, mainly to raise corn and sunflowers for chicken feed.  There are also some other things to grow for the kitchen garden, overflow from the raised beds.

Three months or so later, uncover.
 The method is very straight-forward.  Obtain medium grade black plastic from the grocery or hardware store.  Spread over the planned garden bed.  I bought sheets that were 10 by 20 feet, so that is the dimension of the garden beds.

Weigh down the ends and sides with bricks, stones, logs, or dead rabbits.  Not serious about that last, and they don't keep long enough.
Till or turn over soil.
Wait a few months.  The exact timing is not rocket science.  I figured 3 months would be plenty, but 2 months might have worked, or they could sit a couple more months.

When uncovered, all of the grass and weeds were dead.  Oddly, there was green moss.  I consider that about the same as peat moss and worked it into the soil.

We have a family of moles in our yard.  There are annoying, and dig where I'd rather they don't.  I accomodate to them by lining the bottom of raised beds with chicken wire, which keeps them out.  For a while, I collected mole-hills in the wheelbarrow to use as the base soil in raised beds.  Now I usually use a garden rake to smooth molehills and fill in low spots in the yard.

As it turned out, moles loved the black plastic.  They tunnelled throughout the beds, such that all that remained was finely tilled soil and a few patches of moss.  I started with a hand tiller, but it was easier to use a garden rake - type - hoe to break up the soil and smooth it.  Very easy.

Note, I turned over another bed last month, and the soil was much tougher.  There was no mole-assistance with that bed.  These moles were my buddies.  Moles are carnivores, so I imagine there are no bugs, slugs, or caterpillars in the bed.  Didn't see any.  No earthworms, either, but they will return.

Wednesday, April 20, 2016

Asclepius Syriaca Seedlings. Year Two. 4.20.16

Asclepius syriaca sprout.  4.20.16
I thought the milkweed did not survive our mild wet winter, and had rotted away.  I had not labeled the area.  It turns out, at least this sprout survived and is growing strong.  Others may or may not follow.  I was excited to see this, even if it's the only one to survive.

Update.   4.21.16.  All told, there are 6 milkweed plants growing through the grass clipping mulch now.  They look stout and healthy.  Much larger and more robust appearing than last year.


Corn. 4.20.16

Germinating Indian Corn "Painted Mountain".  4.20.16
Over the past 2 weeks, I have been planting rows of Indian Corn "Painted Mountain".  This variety is genetically diverse, from Native American collections, and is considered more cold tolerant than others.  The soil temp is 58 to 60 degrees overnight, and high 70s to low 80s during the day.  This is unseasonal heat.  The normal practice is wait until mid May or later.

I decided to plant now.  If there is a frost, that will kill the plants.  If  we have an unseasonable warm year all year, it will be good to get it growing early.

I also planted a block of Trinity Sweet Corn 3 days ago, far removed from the Indian corn and not downwind.  The intent it plant more every 2 or 3 weeks, to get a long summer of sweet corn.

Blackberry plants. 4.20.16

Establishing blackberry plant "Columbia Star"  4.20.16
 Most of the blackberry plants are growing.  All 6 of the "Prime Ark Freedom" plants, that were so small when received in the mail, are growing new leaves. 

Of the 3 "Ebony King" plants that I bought at Lowes, as dry bare root plants, one is growing, the other two look alive based on can coloration but no growth yet.

I also bought a potted "Columbia Star" plant a few weeks ago.  That turned out to be a small tissue culture plant that had been placed in a larger container.  That one is also growing.
Establishing blackberry plant "Ebony King".  4.20.16

Establishing blackberry plant "Prime Ark Freedom".  4.20.16

Bearded irises, second wave of flowers. 4.20.16

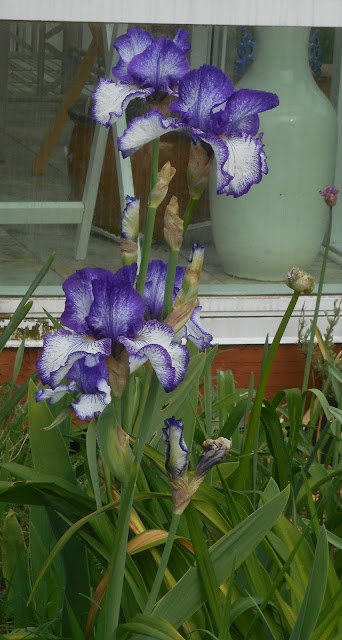
Now is the second wave of iris flowers, after the extra earlies. Most of these are historic irises. Most of the irises are yet to bloom, but there are many buds. This looks like the best year ever for them. I almost gave up last year, but this Spring makes the effrort worthwhile.

There was a little basal rot this year, but only a fraction of what I had in the past.  The clumps are much larger and many more flower buds, compared to the past.  They are all mulched with arborist chips - I wonder if that helped?  I've always read that irises should not be mulched, but my thought is arborist chips are very open, and might restrict spread of disease.

Iris beds.  4.20.16

Bearded Iris "Alcazar".  Faint fragrance.  4.20.16

Bearded Iris "Her Majesty".  Introduced 1903.  Strong fragrance.  4.20.16

Bearded Iris "Indian Chief".  Intro 1929.  Strong sweet fragrance.  4.20.16

Unknown, was at Battleground property when we bought it.  No fragrance.  4.20.16

Bearded Iris "Pallida dalmatica".  Introduced in 1500s.  Very strong sweet fragrance.  4.20.16

A rebloom of Eleanor Roosevelt.  Introduced 1933.  Fragrant.  4.20.16

Modern Bearded Iris, unknown variety.  Not fragrant.  4.20.16

I think this one is "Autumn circus".  4.20.16

Friday, April 15, 2016

Grafting Progress Report. Persimmons breaking Dormancy. 4.14.16

Graft Progress.  NOID Asian pear on Maxie. 4.14.16
 These Asian and American pear whip-and-tongue grafts were done about mid Feb, so now at 2 months.  I grafted early beacuse I thought Spring might arrive early.  The Asian variety is growing the fastest, and the American variety is close behind.  The vivid green color stands out against the reddish leaf color of the Maxie hybrid pear understock.

I give the early pear grafting experiment a success rating.  I've read that pears are the easiest fruit to graft, with apples coming in second.  Even so, it's a very rewarding project.

As pear pollenizers, these will likely need 2 to 3 years to bloom.   I have not seen pear grafts bloom one their second leaf, and some not on their third leaf.

Graft progress.  "Rescue" pear graft at 2 months.  4.15.16

New whip/tongue grafts.  "Chocolate" persimmon on Saijo stock.  4.15.16

 I read that persimmons are more difficult to graft, and need some special considerations.  It helps to have understock that is in active growth.  I also read that they should have protection from sun, so that the scion does not dry out before it takes.  We have temps in the 80s predicted within a few days.  I obtained scion for the persimmon variety, "Chocolate", at the Home Orchard Society scion exchange, and kept wrapped in plastic, in refrigerator, until this week.  I did 2 whip/tongue grafts onto Saijo, wrapped completely in parafilm tape, and further wrapped in aluminum foil to protect from sunshine.  They will need checking in a week, but I doubt a take in less than a month if they take at all.

I chose "Chocolate" because (1) they had it, (2) I read that "Chocolate" has some male flowers so can pollenize other persimmons - not likely needed, but interesting to consider, (3) I bought some of this variety fruit at Albertson's last winter and they really were good.  On the negative side, I also read this variety might not have time to ripen in Maritime Northwest cool summer/fall.  This is where grafting is helpful - I don't waste the time, orchard space, tree care, and money, for a full one-variety tree that might not bear at all.

Most of last year's grafts have healed to the point where the graft unions are difficult to see.  They are sturdy, stout branches now (plum) or are on their way to being so (apple).
Hanska plum whip/tongue graft at one year.  4.15.16

Hanska plum whip/tongue graft at one year.  4.15.16
 Persommin update, grafting and observations of growth.

I read that persimmons can be more challenging to graft, compared to other fruit trees.  It is reported that helpful measures include, grafting the dormant scion onto actively growing rootstock, and sheltering the graft from sun until it takes.  I obtained scion of the persimmon variety "Chocolate" at the Home Orchard Society scion fair a few weeks ago, and stored wrapped in foil / plastic bag, in the refrigerator.  Now the existing trees are growing actively, so I cut the scion in half and grafted to two sites on the variety "Saigo".    I wrapped fully with Parafilm tape and covered with aluminum foil.  I may change the foil wrap to something more loose in a couple of weeks, depending on how they look.

The persimmon variety "Chocolate" is reported as having occasional male flowers, which is not necessary for Saijo or Nikita's gift, but might be interesting in the future.  According to Raintree, Maritime Pacific Northwest summers are too cool for ripening fruit of this variety, so I did not want to buy an entire tree.  On the other hand I've tasted "Chocolate", grown in Willammete Valley, and liked them very much.  They are reported to have occassional male flowers, which might be interesting.  Saijo and Nikita's gift, my other two Asian or Hybrid varieties, are not considered to need pollination, however.

The American persimmon varieties are leafing out more slowly, compared to Saijo.  Nikita's Gift is between the two.  There is still potential for frost, but that seems like a minimal risk now.  Saijo has the start of a few flower buds, which emerge on new growth, not directly from dormant stems.
"Yates" American persimmon at 2nd leaf.  4.14.16

Nikita's Gift hybrid persimmon early growth.  4.14.16

Saijo Asian persimmon with emerging flower buds.  4.14.16


Thursday, April 14, 2016

Grafting Tomato Plants. 4.13.16

Choosing similar size plants.
 This is my kitchen garden science experiement today. 

Tomatoes are grafted to provide increased vigor and productivity, and for disease resistance.

I obtained scion by growing seeds of tomato varieties that I like.  Among these are Better Boy, Supersweet 100, Sunny Boy, Sungold, and Roma.

I grew rootstock from seeds ordered from Johnny's Selected Seeds.  The variety is "Supernatural" which despite its name, is not GMO.
Try to match stem size.

Cut both stems with one slice, to match angle.
 Supernatural is specifically a rootstock variety.  It does not make edible fruits.

The seedlings are big enough to handle.  I chose each, tried to match stem sizes, sliced with razor blade, and attached with silicone clips.  I obtained the clips several years ago via internet search, but forget where.

Then I replanted each grafted seedling in moist seed starting medium, then misted the grafted seedlings and placed them into a humidity chamber.  I made the humidity chamber using a plastic wastebasket, an old Tee shirt moistened to increase humidity, and covered with plastic wrap.  This set-up is now in a closet, where it needs to be kept in the dark for 3 days.

I have never done this before.  I don't know if it will work.
Line up and attach silicone clip.

Tomato version of "Play Misty For me"

Humid and dark for 3 days.  Waiting.  Waiting.  Waiting.