Friday, September 18, 2020

Saving Seeds. 9.18.2020

 From late summer, about mid August, until now, I've been collecting seed heads and seed pods etc. to save for next year.  Part of that will be for wildflower meadow, and part for vegetables or other flowers.

I saved flower and chive seeds buy cutting the seed pods or tops off, and putting them into brown paper bags, upside down, so the fried seeds would fall into the bag.   Others, such as cucumbers, I let the pulp ferment in water for 2 days, then let them dry on newspaper, the same as is done for tomato seeds.

These were the "bush" pickle cucumber seeds.  I was hospitalized when they were at their peak, so no pickles this year.  I let some of the fruits fully ripen to a tan/yellow color, with a husk that seemed a bit papery.  Then I cut three open, scooped out the seeds, let them ferment, and dried for a week on newspaper.   I thought they would stick together, but they did not.  This is enough to start a pickle farm.  Now they are in a paper envelope for the winter.

These were Oregon Sugar snow peas.  The holes indicate that a weevil has tunneled into them and hollowed them out.  So these are not viable.  I wasn't as crazy about Oregon Sugar as I was about Taiwan Sugar anyway.  Oregon Spring grew too tall, produced too late, and the snow-peas were not as good as Taiwan Sugar.  A similar thing happened to Taiwan Sugar but not as many.  I put them into a jar in the freezer, which is meant to kill the weevil.  If I can find them again.

Shirley Poppy seeds.  For these, I just cut off the pods when the stems turned brown.  After they are fully dried out, shake out the seeds like a pepper shaker.

Four O'clock seeds.  I saved, separately, red, yellow, and pink flowered types.  They come up volunteer anyway, but I thought I might add them to the fig tree area.

Marigold seeds.  These are messy.  I didn't realize that it's easy to pinch the pod, pull off the dry petals, then tear open the pod to release the seeds.  So these are seeds mixed with petals.  They have a nice herbal - floral scent.  I think the petals are OK.  There are enough seeds here to start a marigold ranch.  They will go into the wildflower meadow.  This is a yellow French variety that the honeybees liked.

When the seeds are dry, I transfer them into paper envelopes.  I'm not getting outtoo stores because of the coronavirus and stupid, stubborn people out there who want to be modern typhoid Marys, so these are home made using a paper tablet and painters tape.  They are just as good and basically free.  I use paper because it dries out, while plastic retains moisture that can cause mold..


Tuesday, September 15, 2020

Cherry Pie. 9.15.2020

 In July, we picked about 6 pounds of pie cherries from the backyard orchard.  I made batches of pie filling, which I froze in zipper lock freezer bags.  Yesterday I thawed out a package and made a pie.  The crust is a standard Butter Flavor Crisco based crust.  Can't beat the flakiness and flavor, although I should probably try oil crust again.


Quilting Project. 9.15.2020

With unrelenting, health-threatening, wildfire smoke filling the air, the advisories are to stay indoors with air filters running and a/c on.   The coolness actually kept the garden from drying out, so I have not had to water.  Will wear a filtration mask today and check.  

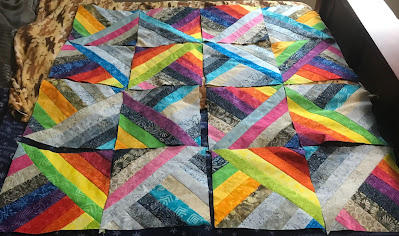
Meanwhile, I worked on the quilt project that I posted 9.6.2020.  The first steps are in that post.  The method and overall pattern are from Ruby Star Society.  My take on that is using batik strips that I bought via Amazon, one roll of muted blues and sandy colors, and one of rainbow colors.  For some panels, I arranged the rainbow colors based on the pride and inclusion flag.   For other panels, and mixed them with the sandy beach colors, and for some panels, it was all the seashore blue and sandy tan colors.  I also added a strip from left over batik fabric I bought to make an Aloha shirt, which I also used for making a mask.  That way, more of a part of my life now, is in this quilt top.

I will need to edit this post later.  The blogger platform isn't designed to do on I-pad / Firefox browser, what I want to do.  (Edited 9.15.2020.  The lap top works better than I-pad, although it's still not a perfect process.  That may be because I use Firefox browser.)

After deciding which colors went where (and arranging and rearranging, and then arranging and rearranging), I sewed them into panels.  I sewed the strips into pairs, then sewed the pairs together, until each panel consisted of 10 strips.

Then I ironed the seams flat, toward the darker patterned fabric side.  Then I evened up the squares, and trimmed to make as perfect square as possible.  Mine were all 18 3/4 inches on each side.  I also measured distance between opposite corners to make sure those were all equal.  I think in the linked instruction, they are 20 inches on a side, but mine came to 18 3/4.  That may be due to different size of fabric strips.  

Here they are, all ironed and trimmed.  I think the quilt starts to feel like it will really happen, now.

Then I paired up the squares in combinations that I liked, with no two pairs alike.  That some thought and arranging and rearranging and more thought and more arranging and more rearranging.  In each set of squares, one panel is at 90 degree angle to the other.  That arrangement is necessary for the final flying kite or butterfly appearance of this quilt pattern.

 
Then I clipped the edges together and sewed a new seam, all the way around.  Here is one with the clips.  I needed some very small adjustments, because even with my best effort and multiple measuring, a few did not come out perfect.  This one shows a panel that I made with all of the colors of the pride and inclusion flag, although the colors are in a different order.
 

After sewing the squares together, there are four sewn panel sets.  Then, after more measuring, I cut the sewn squares corner to corner.  These triangles open to form new squares.

I opened up the cuts, which are now squares with stripes in two directions.  Then I ironed the seams flat.  Each square panel is different from the others, because the patterns self-assemble somewhat into new arrangements.

Now I arranged them, and rearranged them, then went away, then returned and rearranged so more, to come up with an arrangement that I liked.  I had to use the bed because I don't have a table this large. Each row has at least one rainbow, as does each column.  I tried not to have the same pattern or color combination in one panel adjacent to the same pattern in the adjacent panel, although that is difficult to accomplish.  The result is a pattern that looks "random" but actually is very much intentional and planned.  I think more rainbow would have been too much, and less would have been not enough.  So I think equal parts rainbow colors and blues/tans works pretty well.

Next, I will sew these panels together to make the quilt top.  I think it will need a batik border too, primarily grey or tan, and a mostly black binding.


Saturday, September 12, 2020

New Face Masks. 9.12.2020

 I still use the home made, pleated masks that I have been making.  They are not a perfect fit on the sides.  Also, the sewing machine has some challenges with the multiple layers of the folded pleats, and sometimes skips stitches.  It probably doesn't help that I added a light, nonwoven interfacing as a liner, and the inside fabric is cotton kitchen towel, which some studies showed to be very good as a viral filter.

This pattern is quite different.  The fit is much better.  I made one that had ripstop pants fabric as the outer layer. The mask looked great, very professional, but it wasn't breathable, which is a problem.   I made these new masks with batik cotton quilting fabric outer layer, light interfacing liner, and kitchen towel inner layer.  This filters smoke very well, and is breathable but probably the upper limit to how thick I can breath through comfortably.  This makes a good mask for both wildfire apocalypse and coronavirus apocalypse.  I'm not sure about plagues of locusts, frogs, or zombies. 

I'm having a difficult time loading photos.  I'm using Ipad.  If they don't work out, I'll need to edit later. (Edited 9.15.2020)

The materials - this was some batik fabric that I bought to make a shirt.  There was some extra.  The NY Times article that I read stated that cotton batik fabric is the best, along with "tea towel" which is kitchen towel.  Later articles state a nonwoven filler is helpful, so I added a nonwoven interfacing.

I cut to the downloaded pattern from the link above.  I ironed the interfacing onto the inside aspect of the batik fabric, before cutting.

I followed the article instructions, pretty much to a T.  It was very straight-forward.  I used two food bag twist ties to make the metal nose strip, which is sewn inside the mask before final assembly.  I also used polyester shoestring for ties, cutting to fit and sealing the cut ends with a butane lighter, so they don't fray.

This mask has an excellent fit.  It seals much better at the sides, compared to the pleated masks that I was making.  Those mask pleats were also difficult to sew, whereas this mask doesn't have pleats, so no problem.

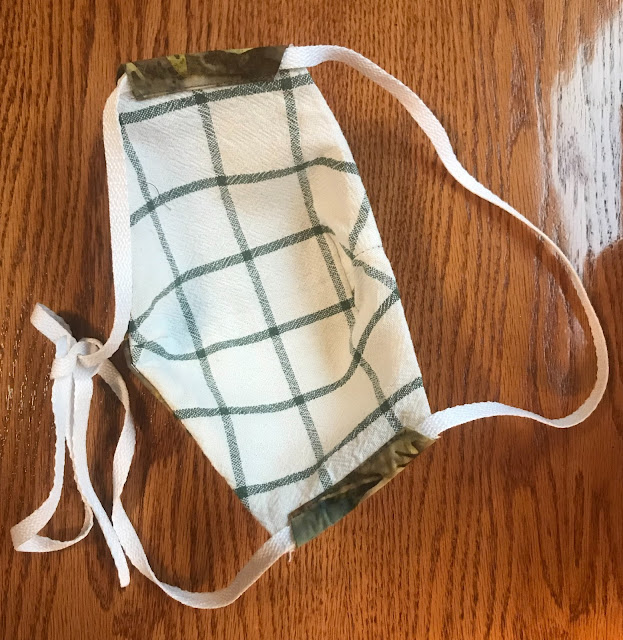
The inside of the mask, showing the tea towel fabric.  That is quite comfortable.  I think these masks filter out a lot of the smoke particles in the current Pacific NW worst-air-quality-in-the-world situation due to wildfires.  I feel much less short of breath and lung tightness when wearing this mask outside, compared to not wearing it.


Fire and Smoke Season. 9.12.2020

The Pacific Northwest is becoming less amenable to the old ways of the temperate, evergreen rainforest, and more inclined to be chaparral.   There is probably no sense in denying that, even if we mourn the lush, beautiful forests and humane climate.  Just as a person goes through stages of life, that can't be reversed, so is this region and much of the planet.  This change should not be news to anyone - as a species, in many cultures, continents, faiths, and economies, humanity has made this choice.  The information has been out there for a generation.  So we need to adapt to what we have created.

The fir trees, spruces, pines, can't survive this dry climate.  They turn into tinder, and burn explosively across the vast forests.  This is also not new, although it's much more extensive now and the effects and dangers are much greater.

I'm all for trying to stop the human contribution to climate change.  I re-purpose, up-cycle, repair, restore, reduce, and try to be thoughtful about my decisions.  I am also realistic regarding the futility of one caring person's effort, like a poppy seed in the cosmos.  I still do it, but I know - the corporations, the populists, the teeming developing mega-nations - they won't change. 

So we also have to thoughtfully adapt.  You really can't intelligently live in a forest fire zone, and have a house nestled among  towering fir trees, no matter how pretty and cozy it is. That will become a spreader event for wildfires.   You can't have evergreen "landscape cushions" up against the house.  Or directly under fir or pine trees (I have a couple like this.  They will be cut down soon).  When it comes time to plant new trees, it's important to look into whether they are potential torches, or possibly fire retardant.  It's also important to evaluate the water needs of what you plant.

There is no perfection.    One can only evolve, be thoughtful, and continue trying.

A list of fire resistant landscape plants.  

I think, in general, conifers are fire promoting.  Some eucalyptus are as will, but I'm not sure about others.  Deciduous trees are less so, although if they have died with leaves on the tree, or under the tree, yes, they will burn too.

A list of fire hazard plants.  This is from Marin, so a little different climate but with similarities to what we are becoming in the Pacific NW.  

A much longer list from Ashland.  Fire resistant plants.

I had the most likely to burn trees removed earlier this year, but I can't tell neighbors what to do.  Theirs are clearly a wildfire risk.  There are a few shrubs to remove if the current wildfires don't come and do it for us.

The view now.  I-phone does not pick up all of the yellow color.  Everything looks jaundiced.  The county health department says, stay inside.  Fortunately we have what we need.  I have a bug-out bag in the car, with emergency supplies, meds, and very few, small sentimental items.


Sunday, September 06, 2020

Next Quilting Project. 9.6.2020

I made some curtains for the kitchen and did some clothing repairs. I have the fabic to make a shirt - a dark batik. However, now I think I want to start a quilt. It will be raibow colors, mixed with beach colors (blues and sandy browns), in triangles. First, sewing together the stripes that will be cut into triangles once done. I arranged the strips into the approximate pattern that I want, then rolled them up so they won't get mixed up again.

 I'm not sure that I like buying the pre-selected bundles of strips ("jelly rolls"), sight - unseen. You get what they send. You have to make something that will utilize those strips, since they are already cut 2 1/2 inches wide by (I think) 44 inches long.  I have not calculated the price per yard, but I have a nagging feeling they cost more than buying by the yard.  The advantage is that you get lots of colors and patterns, so maybe don't have to buy as much.

I don't know what this method is called.  It starts with sewing together 10 strips, in the desired order, to make larger squares.  Then trim the squares, pair them facing together at 90 degree angle, sew them together, then cut at 45 degree angles to make 4 new squares, each consisting of two color combinations.  I'll show as I go, which will be slow.

Yellow Four O'Clock. 9.6.2020

This is the same yellow Four O'clock. It just continues blooming and blooming and blooming. It's in a West / Southwest exposure, poor soil, and I have not watered it once this summer. I have been saving seeds from the red Four O'Clock. The plan is to save lots of seeds from this one too. It started blooming a little later, so I image the seeds will ripen later too.


Rufus. 9.6.2020


Buckwheat For Honeybee Forage. 9.6.2020

 I think the major honeybee forage now is dandelion and queen anne's lace.  About late June or early July, I planted an area of my garden with buckwheat.  I think it was early July.  The seeds germinated quickly, and grew rapidly.  They are now blooming.

From what I read, the buckwheat is a fantastic bee forage.  However, the nectar supply is in the am, so you have to watch then for honeybees.  This morning, the flowers were covered with honeybees.

They are still very active on borage and oregano flowers.  Next year I'll have to plant a lot more borage and oregano, I think.  Also, deer don't eat those.  I remembered that in the past, deer ate the buckwheat plants.

I tried growing buckwheat in 2015.   I don't remember a lot about it, except it looked about the same, and deer ate it all.  This time it's in the fenced garden.

Since buckwheat seems to bloom so quickly from seeds, I planted a second approx 8 foot by 8 foot area with more.  I don't have a lot of room.  That was the potato area.  If I had the ambition, I could clean up another equal or larger area for the same, but there is more firewood to cut.

This photo was in afternoon and using cellphone, so apparently not much nectar.  They are all over the neighboring oregano flowers.


As I understand it, the entire buckwheat plant  is edible by for fowl, so after it stops blooming, I can feed it to the chickens and ducks.  Also, if there is time, we might get "grain", the buckwheat seeds.  That's an off-chance.  I read that buckwheat mobilizes bound phosphorus in the soil and stores it in the plant, so if it is turned over as "green manure", there is more phosphorus available for future plants.  It also crowds out weeds and shades otherwise unused soil.  So, it's all good.

Thursday, September 03, 2020

Firewood. 9.2.2020

 Our property has a few stands of small to medium size trees.  I love trees, but there was a stand of evergreens within 20 feet of the house.  They were mixed species - pine, fir, juniper, spruce - and planted as a hedge, as little as a foot apart.  Over the years, they reached about 20 or 30 feet tall.  This presented a fire hazard to the house, being near a long row of Leyland cypress on the neighbor's property.  So we had them cut down two months ago.

We have a wood-stove, which is under-size.  This wood-stove is nice as a supplemental heat source on cold winter days.  The ashes go into the vegetable garden, source of calcium, potassium, phosphorus, and magnesium, among others.  We gave away the largest logs, but kept the smaller ones for the wood-stove.

I want to get those into the woodshed to dry and for storage.  All of them need cutting into half, or thirds, or trim of the ends, to fit into the wood-stove.  The larger diameter logs get cut into cookies, to lay sideways in the stove, instead of lengthwise.  I think those will dry faster, and they burn faster.  Each day, I cut enough to fill the small wagon.  It's a hard job, but is gradually nearing completion.  I think there are about three days of work to go.

These go into the woodshed at the other end of the property.  They will cure for a year or two or three, before use as wood-stove logs.  This may be the last of my major firewood cutting.  It's too much.  But it will be nice to have them there for when we want them.


Wednesday, September 02, 2020

Sauce Tomatoes. 9.2.2020

 This spring I started a batch of Ranger sauce tomato seeds for tomato sauce.  I think those are the best ones for my garden and climate, no blossom end rot or other diseases, and they are highly productive, and delicious.  However, the postage and handling from Territorial Seeds was something like $7, when they could have just been put into an envelope and mailed for under a dollar.  And it was only something like a dozen seeds. in the packet.  I'm going by memory, but it was something like that.  So, I"m not sure what I will do for next year. Traditional Romas and Marzettas are great but i lose about 1/2 to blossom end rot.  Maybe just pay it and gripe about the gouging.

I love these going from seed to sauce.  This is the best of slow food.  Mostly, they ripen over about two or three weeks.   This was the first batch, enough for 20 packages of frozen, finished sauce, 1 cup per package.

This is about 3/5ths of the harvest.

I wash the tomatoes, then cut them hem into quarters, filling the cooking pots.

Then I cook on the lowest possible setting, stirring every 10 min or so for the first 30 min, until the tomatoes sort of melt and release juice, then stir about every 20 min.  These simmer for about 2 hours, lowest heat setting, lid ajar to release liquid, until the volume is 1/2 of what it was when they first liquified.

Then I let the sauce cool, to just a little warm.  I ladle it into the food processor, and process so there are no significant pieces of skin.  I do that instead of skinning them because I think the skin is important for nutrition, and is removed commercially due to texture.  By processing them,  there is no detectable effect of skin on texture.  Also, mine are organic, raised in my own garden with no chemicals, so there is no residue to remove.

I portion 1 cup into each freezer zipper bag, and freeze them flat for space considerations. 

I add other ingredients when cooking, for spaghetti sauce, or pizza sauce, or chili.  For spaghetti or pizza sauce, it's usually 1/2 tsp salt. 1 tsp Italian spice, 1 tsp minced garlic, some pepper, and add oregano when it's cooked.

I usually aim for one pizza or pasta a week - usually it's the pizza.  So, I like to make 52 bags to freeze.  This time was 25 bags.  I think there could be enough on the plants still green or ripening for about 20 more if I'm lucky.  That's OK.  I grew 9 plants this time, not wanting to over-do it and wind up with waste.

Saturday, August 22, 2020

Honeybee forage. 8.22.2020

 The clover is done, and there aren't a lot of other things blooming en mass this time of summer.  I have some milkweeds that are finishing, and a few zinnias that are starting, but that's not enough for a difference.  Oregano plants are still covered with bees, but I don't have a huge amount of those.  The main flowers are dandelions and Queen Anne's Lace.  Our yard is filled with those, and the honeybees are foraging them now.


Wildflowers, Seeds Planted in June. 8.22.2020

 This was an area that contained irises.  I didn't want them there, because it is on an easement than can be paved at the whim of the holder.  Instead of just planting grass, I mixed together clover, grass seed, and wildflower seed.  I really didn't expect much, it has been hot and dry.  Even so, they are starting to bloom now.

I think some of these mixes are just extra annual flowers.  I really don't think zinnias, alyssum, cosmos, and bachelors buttons are native wildflowers.  Even so, they are nice.  Pollen and nectar sources are welcome now.


Chestnut Graft Updates. 8.22.2020

 I removed the remaining wrap from the chestnut grafts  - two more grafts.  They appeared a little constricted.  I think they will be OK in the long run, glad I removed them now.

The graft that was loose, I thought did not take, actually remained alive for the past two or three months, hanging on bt a thread.  I shortened it, and splinted it to see if it heals and maybe next year grows better.


Yellow Jackets by the Beehive. 8.22.2020

 This is very worrisome for me.  I saw that some yellow jackets had taken to a fig, and wondered if there might be a problem by the beehive.  So I set out a yellow jacket trap.  Within an hour, there were three dozen yellow jackets in the trap.  So I set out three more traps.  Time will tell.

I don't know where their nest is.  I wondered in the past if yellow jackets had killed off a beehive or more than one.  I read that they can kill them off in a few hours, for food. 

I have ordered some insecticide that can be mixed with cat food and placed in an animal-proof cage.  The yellow jackets carry it to their nest.  That will take a week to arrive.  Meanwhile, the traps will have to do.

So far, no bees enter the traps.  Just yellow jackets.


Thursday, August 20, 2020

Tomato "Bodaceous". 8.20.2020

 Tomatoes got off to a late start this year.  I think we are heading into a good tomato month.  This being the Pacific NW, I'm grateful for whatever tomatoes I get.  I don't know if they are supposed to be this lumpy, but lumpy is fine, these are garden fresh, home grown tomatoes.

"Bodaceous Tomato"  8.20.2020


Edit:  Unfortunately, this was not flavorful at all!  I hope the future tomatoes are better.  It was basically like a grocery store tomato.

Flowers with Honeybees. 8.20.2020

 Just a mixture of photos of flowers with honeybees.

I think borage is one of the top honeybee forage flowers.  They do self-seed, prolifically, year after year.  However, the volunteer seedlings are easy to pull out if not wanted.  Borage has a long period of blooming, and is at its peak when a lot of the others are done.

A groundcover sedum, I think Sedum kamtschaticum.  These were cuttings, basically trimmings from someones plant, they left them on the break table at work for anyone who wanted them.  I just stuck them in the ground, no special care, and they took off and filled their space.  Honeybees seem to like most of the Sedums.


Milkweed.  I think this one is Asclepias incarnata.   I had covered the area this Spring with a ground fabric and tree mulch, but it came up at the edge.  I'm glad it did.  It also has an offspring in a container, which I intend to transplant.

Oregano flowers are usually covered with honeybees.  You can hear them hum before you see them.

I don't know this flower.  It came up in the uncut grass.

Some of the Chinese chives are still blooming.  Good for honeybees, who are always all over the chive flowers.

More oregano.

This is the larger, bushier perennial type sedum.  It's similar to "Autumn Joy" but I don't think it is.