Showing posts with label Quilting. Show all posts

Sunday, May 30, 2021

Drunkards Path Blocks For Quilted Pillow Shams. 5.30.2021

 I decided to use up most of the rest of the shirt scraps, making quilt blocks quilted  pillow shams.   The colors will match the brick pattern quilt, but the look will be different.

So I practiced sewing drunkards path blocks.  I think these are a misnomer when used as circles.  Quarter Moon blocks might be a better name.  But what do I know.

These are handy.  They use up all sorts of small and odd pieces.  This completely uses up some of the shirts.  I added another shade of blue that is not in the  brick pattern quilt, because I wanted the flexibility of another pattern and shade.


These get sewn together so that the quarter moon pie slice is sewn to the piece that holds it, making a square again. Then the squares are sewn together however you like. The hard part isxsewing the curve - it's actually three dimensional that flattens to two dimensionsl, and needs stretching exactly right for the curves tomma to match. I can't say I'm good at it, but I'm learning. Here are four completed squares, which when sewn together will be a circle in a square:
This is something like how I'll arrange them. I'm still moving them around a little:

Saturday, May 22, 2021

Shirt Fabric Quilt Top Assembled. 5.22.2021

 I finished assembling the shirt fabric quilt top.  This is seven shirts, plus the border binding will be one more, a dark blue.  In keeping with the repurposed fabric idea, I want to find a sheet or similar fabric in good shape, before doing the quilting, so that may be a while.  Alternatively, I might find something on sale.

There are things I like and things I don't like about the result.  I'm still new at it, and self-taught at that, so need to be forgiving with myself.

This is an old, traditional quilt pattern.  I found an example online from 1910, Illinois  State Museum.  

Tuesday, May 04, 2021

Quilt Updates. 5.4.21

 These are the two quilts that I am working on.

First, the disappearing nine patch.  All of the nine patches are sewn and pressed.  I also cut the first 1/3 into quarters.

This is one of the nine patches, cut into quarters.

These can be turned in any direction, or mixed with squares from other nine patches before sewing into the quilting blocks.  This is one way.

Combining four of those, it looks like this.

I'm not crazy about how those come together.  I think a less overpowering and more playful look happens if they are mixed together, so this is an example using those same four patches.


I like that a lot more.  It is still open for other colors to be mixed in.  I need a quiet time when I can arrange them on a larger surface - the floor - and no doggie romping around.  That will have to be in an early morning.  Then I can photograph the result so I know which patches to sew together, how.

Then there is the brick sidewalk quilt.  I arranged a few rows of the "bricks" to see how I like them.


I like how this comes together.  I'll use the photo to sew together the rows.  The bolder pattern may need a little more arranging.  I'm not sure that anyone would recognize this as being made from men's shirts.  Some quilters like to emphasize the repurposed aspect, by including pockets or buttons in their quilts.  For this quilt, I just want to concentrate on the fabrics and patterns.

I may need to make it a row narrower, so that I can make it a couple of rows longer.  I need to re-count the bricks.

Saturday, April 24, 2021

Quilting Update. 4.24.2021

 I have been working on the disappearing nine patch quilt that I started in late March.   Since that post, I starched and ironed the fabric for stiffening and stability.  I learned that makes the fabric easier to work with, and with more precision.  The I cut the chambray and the batik fat quarters into squares, 5 inches by 5 inches.  I also cut batik fabric that is slate on black, the same size.  I am thinking this quilt will need about 49 large squares, but I will re-count when I'm closer to sewing them together.  There is enough fabric for three 9-patch squares of each color or pattern.

Today I completed sewing together all of the strips of three's.  Those get made into 9-patches by combining three strips.  This can all be whatever pattern or colors are wanted, or completely random.  But I have a pattern in mind (see previous post, linked).  Currently, I have 1/3 of the nine-patches made, and the rest are strips of three.

When the rest of the nine patches are done, they get cut into quarters, a slice down the middle vertically and a slice across the middle horizontally.  Then I rearrange them to see what I like.

Meanwhile, here is the start of the men's shirt quilt.  I want a quilt for my office where Rufus can lie on the bed and the quilt can withstand more washings than usual.  The men's shirts are noticeably heavier, higher quality fabric.  I raided my closet for some, and found some at thrift stores.  Total cost about $15, whereas the same amount bought new at a fabric store would be several times that.  I like the look and feel of these.  Combining the shirts for the quilt blocks and one shirt for the border, this quilt uses 8 shirts with a lot left over for other projects.  

To process the shirts, I wash and dry hot to pre-shrink them, although they have probably been through that before.   They get heavy starch, the I press briefly.  I cut through the seams.  Then I cut the shapes that I want, in this case 5 inch by 10 inch rectangles.  Later, if I want something finer, I could cut them down to 5 inch squares as in the 9-patch quilt, or something different.  depending on the size and cut of the shirt, that's barely enough blocks for some shirts, and lots of extras for others.

This quilt will be sort of like a brick street or brick wall, in shades of blue, white, grey, slate.  It's a simpler pattern than I've been making, with more muted colors.  I've seen others with similar design on the internet, although have not found a pattern for them so am making my own.

I've been looking for fabric for the backing.  If I can't find anything I like, I may do something similar but different pattern, for a reversible quilt.

These will need a few months to complete.  I enjoy sewing them very much, but the time at the sewing machine can make my back too painful.  So I have to pace myself.

Tuesday, April 06, 2021

Disapearing Nine Patch Quilt. Update 04.06.2021

 I've tried to match the chambray fat quarters with batik quarters, either as contrasting colors and colors that seem to match.  I expect to continue to move them around until time to actually sew them.

 First, I starched and ironed all of the fabric.  That keeps it shaped nicely for cutting and sewing, not stretched and awkward.  I also cut the black (actually a charcoal grey batik on black) into 5 inch squares.  I wondered if the black was too much contrast with the colors.  I don't think so, and those will be smaller when it's all together.

I started cutting the fat quarters into 5 inch squares too.  These are the first few, with the chambray and batik matched in each pile.  There are 12 squares of each, so with the black centers there will be 3 large quilting blocks per pile.  I've actually cut about 13 piles now.  Some don't match as well as these do.  I may need to rearrange them for better color match.


I took a couple day break from cutting, to do some gardening.  Plus I was changing the razor blade wheel in the fabric cutter, and sliced a piece of my finger.  Fortunately, no blood wound up on the fabric.  So I wanted a break for that to heal.

On a side note, I want a quilt for Rufus's bed, which is actually my bed but he takes it over.  I want something more durable than the usual quilt fabric, and also inexpensive.  I bought three somewhat heavy weight 100% cotton, extra large men's shirts at Goodwill, that matched the 50% off labels so they were very cheap.  My wild guess is each can be cut into about a yard or yard and a half of fabric, so this is much cheaper than buying something at the fabric store.  So far, I have plain grey and blue tones, which I will keep to, maybe with some brown or tan, or off white.  We'll see how many I can find.  I think I need a total of about ten old shirts for this to work.   No hurry, and as the weather warms up and the corona goes away with vaccines, yard and estate sales can be an even more inexpensive source of cotton fabric.  I read somewhere that Goodwill throws away a lot of the clothing that is taken there, so I'm thinking this is a good way to recycle with low cost, and the end result will be more durable than if I bought actual quilting fabric which is not as rugged as these.

Tuesday, March 30, 2021

New Quilt Project. Disappearing Nine Patch, Batik. 3.30.2021

 These are the fabric samples that I will use for the next quilt.  There are two  sets.  One is a subtle pattern in plain colors.  The other set is more vibrant, batiks.  They are "fat quarters", fabric cuts sold to make quilts or other projects.  I bought them on the internet, not wanting to venture out to the local coronavirus fabric store.  With the fabric bundles, you kind of have to make the best guess and take what they package together, so not all of them work.  I think most of these will.  

This should be enough for a queen size bed quilt.  I won't know for sure until I see how it fits together.  The pattern will be what is called a Disappearing Nine Patch, a popular pattern that a relative newcomer to quilting can do.  It's basically, cut / arrange / sew into blocks, cut again, rearrange, sew into blocks, then arrange and make the quilt top from that.

These are the fabric pieces that I want to use.  They are folded, so when I cut them into 5 inch squares, each piece will make about 24 squares (I think).  I tried to pair each batik piece with a semi-plain one that is either lighter or darker, and has a color that contrasts or matches the batik piece.


 For practice, I cut up some mail order nursery catalog photos.  The color one is from Baker Creek Heirloom Seeds,  and the black and white one is from Fedco nursery.  Those are two of my three favorite sources of seeds and plant resources.  The Baker Creek photos are the most beautiful in the catalog business, by far.  Fedco gives the most interesting history and background info of any catalog of its type.  My opinion.  My third favorite source is Victory Seeds, which doesn't have a paper catalog this year due to the pandemic.  More about them, later.

I cut the catalog pieces into 5 X 5 squares.  I used black and white to contrast with the color photos.  

I arranged for the red based images to be at the corners, and the green one in the center.  The black and white are in the middle of each side.  There is no law that says they have to be in this pattern, or any other, but it's easier to follow when one is learning.  The squares can be any color or location.

By having the different color, green, in the center, we can see what happens to that patch.

Then I tape together by threes.  With fabric, I would sew with a 1/4 inch seam allowance.

Then join together the three strips of three.  This is called a "nine patch" block, one of the  main standards of traditional quilts.  I could stop there, and make a pile of these quilting blocks, and it wold be a "Nine Patch Quilt".  That would be fine as is, but I like the added sense of movement and playfulness of what happens next.

Now, cut the nine patch into quarters.  The "nine patch" disappears due to the cut, so now it will become a "disappearing nine patch".  So then, instead of a roughly 14 inch by 14 inch square, you have four roughly 7 inch squares.  

 This image is right after the cuts.  What's nice is, instead of all of the squares being squares, now there are big squares, that will come out about 4 X 4 inches, little squares that will be 2 X 2 inches, and rectangles 2 X 4 inches.  What pattern and color comes out in what shape and size is up to the person making the quilt.  Here, the green flowers are now the smaller squares.

One way to rearrange the squares is to turn two opposite squares so that the small squares are at outer corners.  If you wanted, you could do this using all four from the patch that you just cut, or using patches of different colors from all over the quilt.  I have not decided yet.

Or, turn so that the small squares are at the outside corners.  Then it's like there are four big squares in the center, with a kind of border of black & white rectangles and green small squares in the outside corners.


Or totally random, or any other pattern.  Again, there are no laws about any of this.  Another option is instead of cutting at right angles, those cuts can be corner to corner, but I'm not doing that this time.

I have black batik that will be the center, so it will be a kind of accent like bow ties all over the quilt.  I'm not sure if I will do a random arrangement or try to make a more planned pattern yet.

Monday, January 04, 2021

Finished a Quilt. 1.4.2021

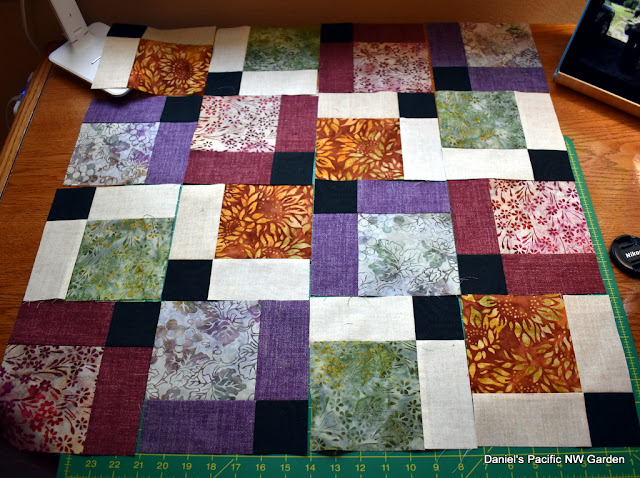
 This is a lap-size quilt.  Or goes on the wall.  I learned a lot with this one, how to quilt it without creases, how to to this patchwork, how to get the binding right.  Next I will make one for the bed, which is the whole idea.  I just wasn't ready before.  I'm thinking to use shades of blues and neutral colors, or I don't know.

Washing the quilt brings out a nice texture, as the fabrics soften up and there is a little shrinkage.  I think it's a beautiful effect.  In fact, I think it's a far nicer look than before washing.


Friday, December 18, 2020

A Quilt Learning Project - Table Mats. 12.18.2020

 I had some unused squares left over from a wall hanging quilt that I made last fall and winter.  That was the first one that I ever made.  

Since I didn't know anything about making a patchwork quilt, I started as simple as I could. I bought a package of 2 inch wide fabric strips in a roll, called a "jellyroll".  Those can be nice to start out, because they include various colors and patterns in one roll up.  On the other hand, one can buy a jellyroll and wind up with pieces that don't look right, or aren't wanted, and on the other hand have to add pieces.  

In this case, I made a "split rail fence" pattern quilt.  That involves three strips, 2 inches wide, sewn together into a square.  The easiest way is to take 3 strips that are much longer, sew them side by side into one long strip, then cut across it every 6 inches.  That will give 6 inch squares with a contrasting stripe in the center.  For my original quilt. I either had dark center strip and light outer strip, or vice versa.  They can be arranged in all sorts of ways.  I wound up with 6 left over and put them into a box.

I wanted to improve my sewing skills, especially for making the next quilt.  I decided to make some table mats, which are basically very tiny quilts.   I thought the split rail blocks were too big for such a small item.  Plus, there would only have been enough for one table mat, which isn't much.  I decided to make something different, basically scrambling the split rail patches.

So, I made six more squares, mostly with brighter and lighter colors.  Some of those were left over pieces from making face masks.  In this case, I arranged them from dark to medium to light colors.  That gave me 12 squares over all.  Here are the 2 squares.

I thought those were too large to look good on small place mats.  Plus, I wanted to experiment.   So, I arranged the six original squares face up, and use the six new squares turning so the seams were at right angles to the first.  I tried to make each combination different, but that wasn't completely possible with what I had.

Then I clipped the pairs together, and sewed all the way around with the good sides facing the inside.


Then, I cut corner to corner, both ways, on all of the squares.

Unfolding the cut pieces, and turning opposite corners of each square in the opposite direction looks like this.

That's an interesting pattern, with repeating shapes.  However, they don't work out for the size and pattern that I wanted.  So I scrambled the patches, turning them in various directions and trying not to have too many that were the same fabric adjacent to itself.  Then I ironed them flat, and sewed the squares together to make two mats.


Now it's exactly the same as making a big quilt, except it's small.  I sandwiched the new patchwork layer, cotton batting, and a cotton fabric backing.  That backing was fabric that I bought last summer on Amazon to make masks, but it was way too flimsy, basically muslin (bad Amazon and bad seller!).  But it's fine for the back side of these table mats.

Three things I learned since the last attempt.  First, if the piecework top, the batting, and the backing are adhered together with washable spray adhesive, then there won't be wrinkles and everything stays together while being completed.  

Second, I watched a lot of videos and learned the right way to do the binding, that border around the edges.  It's not an obvious technique (to me), but really isn't hard at all.

Third, it turns out that the jelly roll strips are exactly the width needed to make binding strips.  I didn't know that.  There's probably a reason.  That did give me some nice choices.

Here is how the table mats came out.  I like some things about these.  First, they are made from scraps of fabric, which is how patchwork quilts originated and is a nice tradition.  I might have chosen some different patterns and colors if I had a big fabric bin to choose from, but I liked how these came out anyway  Second, I like this scrambled split rail fence pattern.  I'm sure it's been done zillions of times, but I didn't find a pattern so I made it up.  It's fun to see the various patterns peeking from behind others, and see the contrasts in shapes, colors, and intensity. Third, I learned some new things.  The mats will soften and puff up a little when they are washed. 


Tuesday, September 15, 2020

Quilting Project. 9.15.2020

With unrelenting, health-threatening, wildfire smoke filling the air, the advisories are to stay indoors with air filters running and a/c on.   The coolness actually kept the garden from drying out, so I have not had to water.  Will wear a filtration mask today and check.  

Meanwhile, I worked on the quilt project that I posted 9.6.2020.  The first steps are in that post.  The method and overall pattern are from Ruby Star Society.  My take on that is using batik strips that I bought via Amazon, one roll of muted blues and sandy colors, and one of rainbow colors.  For some panels, I arranged the rainbow colors based on the pride and inclusion flag.   For other panels, and mixed them with the sandy beach colors, and for some panels, it was all the seashore blue and sandy tan colors.  I also added a strip from left over batik fabric I bought to make an Aloha shirt, which I also used for making a mask.  That way, more of a part of my life now, is in this quilt top.

I will need to edit this post later.  The blogger platform isn't designed to do on I-pad / Firefox browser, what I want to do.  (Edited 9.15.2020.  The lap top works better than I-pad, although it's still not a perfect process.  That may be because I use Firefox browser.)

After deciding which colors went where (and arranging and rearranging, and then arranging and rearranging), I sewed them into panels.  I sewed the strips into pairs, then sewed the pairs together, until each panel consisted of 10 strips.

Then I ironed the seams flat, toward the darker patterned fabric side.  Then I evened up the squares, and trimmed to make as perfect square as possible.  Mine were all 18 3/4 inches on each side.  I also measured distance between opposite corners to make sure those were all equal.  I think in the linked instruction, they are 20 inches on a side, but mine came to 18 3/4.  That may be due to different size of fabric strips.  

Here they are, all ironed and trimmed.  I think the quilt starts to feel like it will really happen, now.

Then I paired up the squares in combinations that I liked, with no two pairs alike.  That some thought and arranging and rearranging and more thought and more arranging and more rearranging.  In each set of squares, one panel is at 90 degree angle to the other.  That arrangement is necessary for the final flying kite or butterfly appearance of this quilt pattern.

 
Then I clipped the edges together and sewed a new seam, all the way around.  Here is one with the clips.  I needed some very small adjustments, because even with my best effort and multiple measuring, a few did not come out perfect.  This one shows a panel that I made with all of the colors of the pride and inclusion flag, although the colors are in a different order.
 

After sewing the squares together, there are four sewn panel sets.  Then, after more measuring, I cut the sewn squares corner to corner.  These triangles open to form new squares.

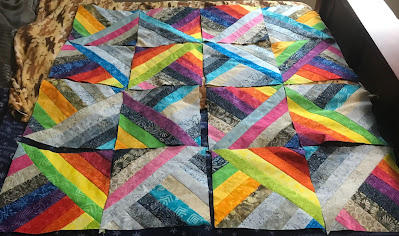
I opened up the cuts, which are now squares with stripes in two directions.  Then I ironed the seams flat.  Each square panel is different from the others, because the patterns self-assemble somewhat into new arrangements.

Now I arranged them, and rearranged them, then went away, then returned and rearranged so more, to come up with an arrangement that I liked.  I had to use the bed because I don't have a table this large. Each row has at least one rainbow, as does each column.  I tried not to have the same pattern or color combination in one panel adjacent to the same pattern in the adjacent panel, although that is difficult to accomplish.  The result is a pattern that looks "random" but actually is very much intentional and planned.  I think more rainbow would have been too much, and less would have been not enough.  So I think equal parts rainbow colors and blues/tans works pretty well.

Next, I will sew these panels together to make the quilt top.  I think it will need a batik border too, primarily grey or tan, and a mostly black binding.


Sunday, September 06, 2020

Next Quilting Project. 9.6.2020

I made some curtains for the kitchen and did some clothing repairs. I have the fabic to make a shirt - a dark batik. However, now I think I want to start a quilt. It will be raibow colors, mixed with beach colors (blues and sandy browns), in triangles. First, sewing together the stripes that will be cut into triangles once done. I arranged the strips into the approximate pattern that I want, then rolled them up so they won't get mixed up again.

 I'm not sure that I like buying the pre-selected bundles of strips ("jelly rolls"), sight - unseen. You get what they send. You have to make something that will utilize those strips, since they are already cut 2 1/2 inches wide by (I think) 44 inches long.  I have not calculated the price per yard, but I have a nagging feeling they cost more than buying by the yard.  The advantage is that you get lots of colors and patterns, so maybe don't have to buy as much.

I don't know what this method is called.  It starts with sewing together 10 strips, in the desired order, to make larger squares.  Then trim the squares, pair them facing together at 90 degree angle, sew them together, then cut at 45 degree angles to make 4 new squares, each consisting of two color combinations.  I'll show as I go, which will be slow.