Tuesday, February 01, 2022

Improved Cadet Caps from Upcycled Fabric. 2.1.22

Cadet caps are far superior to baseball caps, due to the lack of a hard rivet or button on the top, more comfortable, and better general fit for me.  They are also easier to make, for an amateur tailor such as me.  I like these because:  I make them with a liner, so the inside is soft and comfortable.  With a liner, there are no exposed edges to fray.  The fabric is upcycled, with an outer shell that's more durable and lining that's softer and more comfortable.  The upcycled fabric has been softened with repeated washings.  The brim is a heavy interfacing but not the hard edge, rigid plastic that's usually used, so the cap will last much longer.  The fabric is all machine wash and dry, same as any other clothing.  I'm accident prone and somehow hit my head a lot, resulting in scalp divots and gross scabs.  I make the liner with a quilted top, which is comfortable and protective (outer layer plus two fabric layers sandwiched around a layer of  cotton quilt batting).  

The fit has been a challenge.  I made new templates for the sides, giving them a half inch more height and a quarter inch to each end of the side panels, and this result was (nearly) perfect.  It shrinks slightly out of the washer and then is snug.

The best shell fabrics are lighter than denim but heavier than quilting cotton.  For upcycle, men's pants made from 100% cotton, such as chinos or Dockers, are perfect.  Heavy denim is too stiff and heavy to sew on my machine.  For the liner, a soft shirt fabric or flannel is good.  

I found an old canvas Trader Joe's grocery tote that had shrunk too much when washed, to hold much groceries.  That is the outer shell.  The liner is a soft cotton shirt.  I used the old (late '50s / early 60's) Morse (Toyota?) sewing machine to see if I can sew with it.  It works nicely but takes some practice.  Unlike the newest sewing machine, it doesn't skip stitches when encountering a thick seam or hem.  However, the stitches look a little less tight.


Inside


That was a practice run, but it's a good result and I'm happy wearing it for garden work.  The cap that I used for the pattern had an outside hat band and inside sweat band.  I don't think the hat band was all that functional.  I could add a sweat band but I think the added liner has that function.

Here are the templates using some chinos remnants.  I didn't have blue thread sitting around, so set those aside and used a Docker's remnant instead.  It takes some rearranging to have enough for a nice hat with no wear or tear.  The top and brim are from the original cap.
 

Here is the cap when finished.  I'll make the blue one later.


Here, along with the tote made from the same fabric.


The liner is soft cotton corduroy, same shirt that I used to make Rufus's rain jacket liner.  


This cap turned out almost exactly what I like.  The fit is  very nice.  What I especially like is that I have a cap that fits my needs exactly, can be washed and dried with the laundry whenever I like, is comfortable and protective  I know that my sewing is not as precise and uniform as something from a factory, but that's OK.  


Sunday, January 30, 2022

Forsythia Flowers. 1.30.22

 I cut these a couple weeks ago to bloom indoors.  It's a welcome preview of Spring.


After they bloom, I'll keep them in water to see if they grow roots, as in last year's project.  If they do, they can be planted to extend the forsythia hedge I started then.

The flowers are a little sparse at this point, but should fill in.  There are lots of unopened buds.

Thursday, January 27, 2022

Pruning Blackberries and Raspberries. 1.27.22

 Pruning continued today.  I cut out all of last year's fruiting blackberry and raspberry canes, so all that remains is new growth.  I shortened the canes, raspberries to 5 feet and blackberries to about a foot of secondary growth on the 6 foot primary growth.  I dug out all of the useless varieties of blackberries - Prime Ark Freedom and Arapaho, just keeping Triple Crown.  I made the blackberry bed smaller now that there is only one cluster.  There is room for another if I add it.


It seems like kind of extreme pruning.  However, I think it's not that different from the recommendations,  This years' crop will tell me if I did OK.

Cherry Pie. 1.27.22

 I knew there was a reason I pitted all of those pie cherries!


When I pitted them, I premade the filling and froze it.  That way all I needed to make was the crust.  

Gloriosa Daisy Seedlings. 1.27.22

 I wondered if these needed stratification.  I guess not.  First seedlings emerged in three days.  That's fast.

Gloriosa Daisies are Rudbeckia hirta, similar to Black Eyed Susans but perennial (although Black Eyed Susans apparently can be annual, perennial, biennial) and have more fall colors (center tends to be golden / brown / ochre / brick red, outer parts of petals are yellow) to the flowers.   I'm glad I tried without stratification.


Such tiny seedlings.  I think they will grow quickly and probably more will germinate.

Wednesday, January 26, 2022

Pruning Apple Trees. 1.26.22

 January can be a good time to prune apple trees.  They are not actively growing or producing apples, so we get a good look at their structure.  Many other farming / gardening jobs are on hold although there is always something.

My apple pruning goals:  Try to keep the branches at a height that won't be easy for deer to reach, but I can reach without a ladder.  My fruit goals are to have various varieties ripening from summer through fall and into early winter.  Not bushels of fruit at a time, but rather bowls at a time.

This is what started as minidwarf Liberty Apple, now at 22 years old has overgrown some of the dwarfing effect of the rootstock.  I bent higher branches horizontally to let them fruit within reach.  I cut off all vertical shoots, a few buds after their origins.   In front of Liberty is the columnar North Pole, with McIntosh flavors but larger and sweeter.  I just cut the top and prune side spurs to keep them about
a foot long.  Those were a few weeks ago.


Another NorthPole.  Both North Pole apple trees are on minidwarfing M27 rootstock, which gives small,  very slow growing tree but keeps the size manageable and maintenance easy.


Also Golden Sentinel.   Also columnar.   It's had some bark problems, seem to be healing but I'm leaving two healthy looking lower shoots in place as potential replacements.  If the existing top doesn't produce this year, I'll cut it off and let the vigorous young shoots take over.  I think it's on M9 dwarfing rootstock, but I forget.


I also pruned the Jonagold and Winecrisp - which has grafts of Sweet-16, Fameuse, and Duchess of Oldenberg.  Mostly, remove high vertical shoots, open up the canopies a little, remove long willowy branches that, when weighed down with apples, bend to easy deer heights.   Stubby branches don't bend so easily so are relatively safer from Bambizilla.   I pruned the dwarf multigraft that has Sutton Beauty, Airlie Redflesh, Liberty, Baldwin, and Prima.  I'm debating removing more of the Airlie Redflesh because those get too much scab.  The star of that tree is the ancient variety, Sutton Beauty (discovered about 1848).  Prima is a good disease resistant variety so I'm curious about how that will do.

There is one more apple tree to prune in this group, a large multigraft with Akane, Summerred, Fuji (Beni Shogun early variant), some Pristine shoots (early early very good disease resistant, sparkly good flavor), more Jonagold, and a red flesh from Home Orchard Society that might be descended from the variety Grenadine.  

Then there will be the three front yard apple trees, and that's all.  I very good that Im this far along on the apple tree maintenance.


Pizza. Home Crust. 1.26.22

 This is the pizza dough that seems to work best.  The recipe calls for more flour but then it's too dry and difficult (damn near impossible) to work.  It also calls for not kneading, but without kneading, the flour doesn't become evenly moist.   

Recipe (my version):

First, combine...

1 cup bread flour

2 tsp yeast

1 tsp salt

1 1/4 cups warm water.

Stir together in bowl, cover, let sit until lots of bubbles.  About 30 min.

Then gradually work in about 2 more cups of bread flour.  I knead it together in the bowl.

Let dough rise for about an hour until doubled.

Cover and refrigerate,  It's nice to use a Rubbermaid type bowl so the cover doesn't come lose.  Refrigerate overnight or up to two week.  Longer duration gives a more sourdough like flavor and texture.

This is great because you don't have to worry about timing before making a pizza.  

To make the pizza, cut into half and roll out on floured board, making circles about 1/4 inch thick.

Then I use the cast iron skillet method.  One of the skillets is actually a cast iron tortilla pan, which is bigger but very shallow, like a pizza stone.  I oil the pans and transfer dough to pans.  Preheat oven to a toasty 500F.

The sauce:  1 cup home made tomato sauce ( just boiled down sauce tomatoes, pureed, frozen), thawed with 1/2 tsp salt, 1 tsp Italian herbs, dash pepper, 1 tsp dry minced garlic.  This time the sauce was a little runny so I mixed in a few spoons of dried tomato powder (slices of tomato dried in food dehydrator then blended into powder).  I made the tomato powder last summer using extra slicing tomatoes.  They actually have more flavor compared to the sauce tomatoes, and by drying them rather than cooking down, they don't cause an overcooked flavor.  More fresh.

Topping:  Spread on the sauce  then mozzarella, thin onion slices, thin garlic slices, 

mushrooms, JalapeƱo slices, this time I added squash slivers,

Baking:  Place the cast iron skillets containing pizzas onto stove burners.  Turn heat up to high, or slightly below high.  Heat for 4 minutes,  The sough will rise and the bottom will start to brown.

Then transfer to 500F oven, mid to high rack,  Bake 7 minutes, until top is bubbling and toppings are roasted.

Remove from oven (careful, hot) onto cooling rack.  Sprinkle with dried oregano.


I think the squash might have been better under the other veggies.  It tended to fall off.   This is my favorite pizza recipe.  Even though I love sourdough crusts, this crust is really excellent.  Also these photos were before scattering on the oregano.  Finally, I like to add Tabasco sauce for extra zing.


Stratifying Perennial Seeds. 1.26.22

 There is conflicting information about whether some perennial seeds require stratification.  The seed packets don't state it.  Some references state that Coreopsis and Echinacea require stratification.  That means the seeds need a "winter" before they will germinate.  In the past, I've done that with apple seeds, peach, plum, daylily, milkweed seeds.  I'm not sure if I did for Echinacea.   Rudbeckia supposedly requires stratification, but mine (annual Rudbeckia hirta) grew like crazy without a cold treatment.  Maybe the seed supplier pre-stratified the seeds, or maybe the annual ones don't require stratification, I don't know.

It's easy.  For these, thoroughly moisten a paper towel.  Scatter the seeds on the moist paper towel, fold it, place into zipper lock sandwich bag, and seal.  Refrigerate for a month, then plant the seeds.

These will be ready to plant about March 1.

s need stratification.  To stratify, they need to be chilled in moist conditions.  That's how I germinated apple, peach, plum, daylily, milkweed seedlings in the past.  Some instructions state stratification is necessary for Rudbeckias and Echinaceas, and others either don't mention it or state it isn't needed.  The seed packets don't always mention it.  

Even though the first Rudbeckias germinated like crazy without stratification (annual Rudbeckia hirta), I'm not certain the others will.  So I moistened some paper towels, scattered seeds on them, folded, placed in sandwich ziplock bags, and placed in fridge.  They'll be there for a month, then I'll plant them.


A Nice Yeast Bread Loaf. 1.26.22

I haven't been making sourdoughs for a while and the culture died. I decided to try a yeast pizza crust using the refrigerator method - flour, water, yeast, salt. Nothing else.  Mix, knead, put into bowl, let rise to double, cover and refrigerate. Can use any time in two weeks, and has better flavor and texture after several days to a week.  The chilling makes the dough more workable and holds in fermentation bubbles for a nice texture.  I made a batch, then thought I'd make a second batch for a loaf of bread, but refrigerate in loaf pan. Otherwise the same recipe.  After taking Rufus for a walk, it was already completely risen so I sprinkled on bagel seed topping and baked 375 for 45 min. This had a great texture and flavor. Even though the topping is just sprinkled on, the flavor is present in the bread slices.
This reminded me of why I always made my own bread. It doesn't keep as long as store bought but is so good, it is used up before molds have a chance to spoil it.

An Orchid Flower.

Last summer, I divided this cymbinium and repotted it. Then it didn't get much care. Nice flowerto cheer up the winter days.

Tuesday, January 25, 2022

MaltoMeal Muffins. 1.25.22

My mom used to make these many years ago. They were my favorite breakfast muffin. These are made using Malto Meal hit cereal and the usual other muffin stuff (flour, sugar, salt, baking powder, oil, egg, milk). The recipe is on the box.
I like to use cast iron and preheat the pan. That gives a crispier muffin bottom and sides. This tasted exactly like I remembered, and brought back memories of being in the kitchen with my mom.

Tabasco Pepper Seedlings. 1.25.22

This is a sign I've been watching seed packs entirely too close. Here are two, barely visible, tiny, Tabasco seedlings beginning to emerge.
It took them two weeks, which isn't bad. I was spoiled by the zesty JalapeƱo seeds that took off running so quickly. Maybe they sensed I was discoraged by their slowness :-) I did plant new ones yesterday, along with new Thai Dragon seeds. By the way, just while planting the Thai Dragon seeds I could taste and smell the hotness. That never happened before. Now it's a matter of normal seedling care. They'll stay on the seedling warming mat another week or two, to see if other seeds germinate.

Monday, January 24, 2022

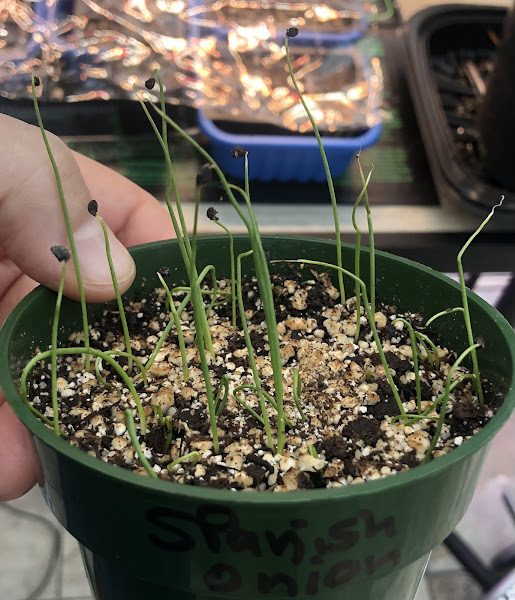
Onion and Shallot Seedling Update. 1.24.22

 The onions and shallots are doing pretty well.   About the same as previous years.

Unknown Shallot, seeds from a planted grocery store shallot.

Ambition hybrid Shallot.
Red Whethersfield heirloom onion. I might plant more of these seeds. They are a long-storage onion.  Edit:  Why think about it?  I went ahead and planted a 2nd container.   That way I wont say, later, "I wish I had planted more".  :-)
Yellow Spanish Sweet Onion, also heirloom variety. Some more seeds germinated. I think they are just old seeds and it's harder for them to wake up. Like me. :-)
Camelot Shallot. These were also old seeds. This is more than enough shallots, but they should keep many months in a cool dry place, so we'll eat all we grow.

First Bloom. 1.24.22

 A few buds are opened on a flowering cherry in the chicken yard.


The variety is "unknown".  Several years ago, I grafted a bloom spike from a flowering cherry tree in Vancouver, onto a volunteer wild cherry seedling.  This is the result.


Planting More Seeds. 1.24.22

 I gave up on the first Echinacea seeds.  From my reading, they don't maintain viability long at all, maybe a year at best.  I planted fresh seeds for those.  I found an old packet of dwarf carnation seeds dated 2014.  I don't recall ever growing them.  Eight years is a big stretch, but if I don't plant them, I won't know.  So I planted them too.


I also planted some Gloriosa Daisy seeds.  They are described as perennial Rudbeckia hirta, but some sources state that early planting can give same - year flowers.  Growing perennials from seeds can be very rewarding.  All of the mystery is taken out.  It shows one doesn't have to buy a potted plant for ten bucks, a three dollar seed packet will produce an entire row.   There is a sense if accomplishment, "I did that'" instead of "I bought it".  Even more if the seeds are home saved, but you have to start somewhere.

Of the peppers I planted earlier, only the JalapeƱos and Serranos have germinated so far.  I'm trying a new packet of Thai Dragon, plus a planting with more Tabasco pepper seeds.  And a Hontaka Cayenne from the Chili Pepper Institute at the University of New Mexico.  I also decided to play with miniature tomato varieties, Micro Tom Tomato and  Red Robin Tomato  The plants grow the size of small pepper plants.  If they grow, I can see how they do under LEDs.  And last, starting some wild-type Coreopsis for the "will the damn deer eat them?" flower bed. I haven't planted a couple varieties in the photo, yet.


Seed Viability Testing. Capitano Beans. 1.24.22

 Here is the conclusion for the Capitano bean viability test.


Roughly 5 or 6 seeds appear to be viable,  Some are already rotting and others are questionable.  I think what I'll do is, plant all of the packet thickly. If enough grow to get a crop, I'll see if I like them and save seeds.  If they don't grow at all, that's OK,    Beans get planted when it's warm, maybe May or June so it will be a while.

Tuesday, January 18, 2022

Testing Bean Seeds For Viability. 1.18.22

 I was sorting old seed packets and found this one.  I don't know how old it is.  Five years?  Two?  Ten?  I don't recall ever harvesting this variety.  The packet was opened so I must have planted some.  It's a mystery, sort of like where did they bury Jimmy Hoffa.


I looked these up. They are a yellow pod Roma type bean. Why would I buy that? Well, there are the seeds. I decided to test them for viability. If they don't grow, the whole packet becomes chicken feed. If they do, I can eat the sprouts and, when it's warm and the air is perfumed by apple blossoms, I can plant the remaining seeds in the kitchen garden. Or maybe when the air is perfumed by rose blossoms. Apples might be too early. Count out 15 beans. Place them on a wet paper towel and fold it over twice.

Place them into a generic zipper sandwich bag, then onto the seed starting mat.
Now I can sit back and watch them grow.

Planting Peach Seeds. 1.18.22

 These are seeds that I stratified in the refrigerator.  The source peaches were from a tree that I also grew from a seed, that one from the variety "Oregon Curl Free".  The original tree died from canker but was not bothered by Peach Leaf Curl, the "leprosy" that usually kills most peach trees here.  Those peaches are delicious, nice size, yellow clingstone, great fresh, in pie, or canned.  The tree is highly productive and never bothered by peach leaf curl.

It might seem like it would take a long time for a seedling peach tree to produce fruit.  However in my experience, it takes about three or four years.  Almost as fast as a bought tree but no issues with the rootstock possibly being a problem (such as susceptibility to canker or carrying a nursery-borne virus).

The peaches ripened mid August.  I scrubbed some pits, wrapped in wet newspaper, and kept them in a closed jar in the refrigerator until a week ago. 

The pits are hard as rocks (maybe that's why they're called "stones" ha ha). I know peaches can be grown by planting the whole pit, but maybe they benefit by splitting the pit and removing the seed (see below).  That's what I did before. I used a hammer, tapping with some force on the pit edge against the concrete garage floor. A couple of seeds got smashed. Here are some nice looking ones.
To my eyes, these look nice and firm and viable. I planted six in seed starting medium in a seedling six pack.
Cover with more seed starting medium, water, label, place on seed warming mat.  The label is important.  Sometimes I think my mind is a sieve.
Will they grow? Who knows. I think, maybe.

[On removing hard shell from the seed.  Long ago when mastodons and wooly camels bellowed their forlorn songs across the frozen Pleistocene Savannas, I read an article in the Rodale era Organic Gardening and Farming Magazine describing how much better some seedlings grow if their outer coats are removed before planting the seeds.  The rationale was that the sprouts consume considerable energy breaking open the hard coat.  If the coat is removed, that energy goes into a burst of growth.  Why would I remember that after all these decades?]

Monday, January 17, 2022

Seedling Progress Notes. 1.17.22

 The peppers are starting to grow.  The Early JalapeƱos are first.  Those are new seeds.  Maybe a Serrano is also emerging.  I look at them too closely but it keeps my mind occupied.  These were planted 1.11.22 so first to emerge was only 6 days. 


One thing I am learning is new seeds sometimes germinate faster and more uniformly, older seeds are slower and more sporadic.   My thought this year is save more seeds, such as from the peppers.  I think the fresh home saved seeds are faster and more vigorous as well as being a frugal and more reliable option.

The carnation seeds started to germinate too.  These are a few years old.  I bought the seeds but forgot to grow them.  


I haven't grown carnations before.  I don't know what to expect.  I'm guessing they will bloom late summer here if I start them now.  I don't know if they will survive the wet Pacific NW winter or whether deer or rabbits will eat the plants.  These are the variety  Picotee mix.  I'm also growing some Chaboud.  It's interesting how little they've changed in the past century.  This image via internet search.  Same as the peppers, 6 days to first sprout seen.

More of the New York Early onion seeds have germinated, but not many.  About a dozen.  I will be happy with a couple dozen, along with the shallots, a few Spanish onions that germinated, and the Whethersfield Red onions.  Some of those should be good keepers.  NY Early is and Whethersfield is described as a long keeper.  I have shallots that are all good from last summer too.


Saturday, January 15, 2022

Seedling Update. Onions, Shallots, Rudbeckias. 1.15.21

Of the onions and shallots, Red Whethersfied Onion seeds are looking good,quite a few growing in under a week. Ditto for Camelot shallots. The Ambition shallots look pretty good despite the seeds being a year older. The New York Early onions are barely germinating despite being newly bought seeds. I see one or two sprouts so far. That's kind of disappointing so I planted another container of those. Maybe they are just slow. They grew very nicely last year, and are still keeping very well. 

 Red Whethersfield Onion Seedlings
Ambition Shallot Seedlings.
All of the Rudbeckias are growing already. I thought they might need stratifying, but they all germinated in about 3 or 4 days. That's even though those seeds are two or three years old. I added new 6-packs, some old Echinacea purpurea seeds (2018 and 2019), and Gallardias (2019). If they don't grow, it's OK. No use keeping the seeds if I don't grow them. Carnation seeds are not up so far. Neither are celery. Kale germinated in two days.

Thursday, January 13, 2022

Setting Up Forsythia Bouquet / Cuttings. 1.13.22

I saw on a garden calendar that if forsythia stems are cut now, they can be persuaded to bloom early, indoors. Also it may be an OK way to start some more cuttings. I'd like to add about eight more plants to lengthen the hedge I started last year. Not much to it. I just cut them and put them into water. I'm aiming for about a foot long and not too flimsy.
The big vase contains Linwood (I think. It was grown from a discarded pruning about twenty years ago). The one in the jar is a more narrow, more vertical shrub with flowers more pale yellow, wider petals. I don't know the name.

Cleaning Up Some Flower Seeds. 1.13.22

During late summer / early fall I picked flower heads that appeared to be drying out. I stored them in paper lunch bags. Today I got them out, cleaned them up, and stored each type in their own paper envelopes. French Marigold. This strain must be pure, because they are all descended from a volunteer plant from three years ago. They have all grow out with identical plants and flowers.
Then grasp the flower base and pinch to hold the seeds in place, then pull off the petals. Then pull out the seeds. They come out nice and clean, ready to plant in Spring.
These dried marigold flowers are nice and perfumey. They remind me of my great aunts. I also cleaned up seeds from cosmos, and four o'clocks in two shades of pink - not sure if I will grow those.

What's Blooming? Helleborus. 1.13.22

 This is the sole outdoor flower in bloom right now.  


Planting Multiplier Onions or Shallots. 1.13.22

 These are either potato onions - a very old heirloom variety that multiplies in the ground, like a shallot - or shallots.  I messed up the labeling.  I'm hoping for potato onions but some have a red color that is probably shallot.  

I had them in a paper bag in the pantry so they would stay dry.  I decoded to plant them now.  It's mild.  They should even overwinter OK.

I planted then in a row near the end of what will be the chili pepper bed.  They wont take much room there and won't interfere with the peppers.  Even with rain and mud, it's not bad planting in a raised bed with a nice foot path. :-)


Footpaths in Kitchen Garden. 1.13.22

 I've been laying soil barrier and covering that with woodchips for a (if it works) mole-minimized and weed-reduced if not weeds-eliminated kitchen garden area.  Closer to completing this job.  The wood chips make a nice walking surface.  I'll deal with the drip irrigation lines later.

I couldn't be happier with the kitchen garden.  It's only mid January and the hardest work is completed.  


Aerial Views. 1.13.22

 Ning took aerial photos using his drone.

The garden acre.  About 1/3 to 1/2 acre is usable once easements and wetland/woodlot are accounted for.  


Most of the "brown" areas are leaf-covered beds for crops not bothered by "our" deer (sweetcorn, potatoes, and squashes that will be protected) and annuals for the soul and for pollinating insects.  Fruit and nut trees don't show well in the photo.  There are lots of those.  This week I added wood chips around the raised beds in the fenced kitchen garden.  The other half of that is miniature and espalier fruit trees.

The house is on the other side of the road.  Photo doesn't include the front orchard and small vineyard.  Hens and duck get the run of the fenced area behind the house, which is planted with roses, rhododendrons and other shrubs and small trees.