Thursday, January 13, 2022

First Shallots and Rudbeckias Germinated. 1.13.22

 This seems pretty fast for the first seeds to germinate.  I always wonder, will they grow?

It's interesting, the first onion-family seeds to germinate were the shallot seeds that I saved last fall.  Last year, the fastest squash to germinate were saved seeds, with bought seeds taking one or two weeks more.  Must be the freshness although maybe I let them ripen more thoroughly.  Or maybe it's coincidence.

"Grocery shallot" home saved seeds.


He Shi Ko scallion seeds. These were bought this year.
Rudbeckias, Marmalade and Prairie Sun. It's interesting how reading the internet can make things complicated. I read that Rudbeckias need refrigerator stratification for 4 weeks before germinating. I was thinking about doing that with another batch. but here these are, already growing. Not bad, the first are up seven days after planting.
More of these seeds remain to emerge. I'll keep them on the warming mat at keast amfew more days, then move them close to LED lights for better, stockier growth.

Wednesday, January 12, 2022

Goal: Create a Tomato Variety with Short Stature, Heirloom Flavor Red Cherry Tomatoes. 1.12.22

 This is an ambitious goal.  There are all sorts of red cherry tomatoes out there.  Most are hybrids, and most are sweet/tart but not the more complex, tomatoey flavor of heirlooms.  Most grow tall and rangy.  What I want is a dwarf, short interstem plant (brachytic dwarf) with true red tomatoes, cherry size, prolific production like clusters of grapes.  I would like if they have jointed stems that break easily for easy harvest.

Last year I grew Dwarf Johnson Cherry Tomato.  Not too far off except:  The tomatoes are pink with pink flesh, too mild flavor, not jointed so they don't pick easily.  It is a brachytic dwarf, so there's that,  and I will grow them next year.

There are thousands of varieties out there. I certainly don't know them all or even most.  In the end, I also want one that grows true from seeds, so hybrids also don't count.  

I decided to try to be scientific about this.  I will choose parents with suites of traits that, together, might help result in my goal.

(1)  Livingston's Dwarf Stone - a red heirloom tomato, brachytic dwarf, introduced by the Livingston Seed Company in 1902.  Not a huge size tomato.  This line is ancestral to other brachytic dwarf tomatoes.

(2)  Reisentraub.  A German-developed, red heirloom cherry tomato, around since the mid-1800s.  They bear huge clusters, like clusters of grapes (complex inflorescence), that are claimed to have heirloom beefsteak tomato flavors, bite size tomatoes.

I have not found a highly detailed yet clearly labeled (for the amateur) map of tomato chromosomes with associated traits, but I did see this example, which helps significantly.  Based on that information, my main interests involve three chromosomes.  Mainly two. Some link useful traits together, which will help.  

Chromosome #1:  locules, few=L and many=l (Capital letter is dominant).  Compound inflorescence=s, simple inflorescence=S.  I think Dwarf Stone is lS and Reisentraube is Ls.

Chromosome #3:  Brachytic trait =b, normal internode length = B.

Chromosome #5:  Jointed stems (for easy picking ) jointed is dominant (J).  there is also a nipple tip trait, Reisentraub has it (nf) and jointed stem,  Dwarf Stone does not (Nf) but I don't know about join   ted stems.   These traits will help later.

So as far as I can tell, Dwarf Stone is Chr #1:  1S  Chr #3:  B and Chr #5:  jNf.

Reisentraub is Chr #1:  LS  Chr #3:  b and Chr #5: Jnf.

I know there are lots of other genes involved, on these and the other of  the tomato's  12 chromosomes, but this is what I have.  Other traits & chromosomes might help in later generations to select for uniformity or flavor or tomato size, for example,

Now, Dwarf Stone has to be the female parent.  All of Dwarf Stone 's seedlings should be normally be dwarf, a recessive trait.  If the cross takes, the seedlings (F1 generation) will all carry a dwarf gene but they will grow normal height.  That's how we know the cross took.  A successful cross will have F1 generation with few locules (more likely cherry), simple inflorescence, red, jointed stem, yellow skin (so red fruit), no nipple trait.

Taking seeds from F1 generation and growing them out, 25% of seedlings will be brachytic dwarf (b).  So plant lots of seeds, but discard any plants that grow normal height.  Easy to identify at a couple of inches tall.  When they bloom, if they have multiple inflorescence, from Reisentraub, they should also be two locule.  Compound inflorescence is a recessive trait, so that should be 25% of F2 generation.  Also, those will be purebred for both the inflorescence type, and as a marker for the dominant few-locule trait.  Save only seeds with those traits.

Similarly, save only seeds for plants that have jointed stems and nipple trait.  Nipple trait is recessive, and linked to jointed stem (which us dominant) so selecting for nipple trait, 25% of seedlings, will mean both that and the jointed stems are pure.

That isn't all but those are the traits I wanted.  After growing out F3, choose the ones with cherry trait and best flavor, select those for saving seeds and further purifying until they are true to type, takes about 10 generations.  There is no promise I will be gardening that long, but I think by watching how traits are linked on chromosomes and which are dominant vs. recessive, I can have a strain I feel good about in four generations.  Another way to increase my chances would be back cross the F2 dwarfs with Reisentraube, and only grow out the dwarfs in F3.  Then the offspring will be 75% Reisentraube, still brachytic dwarf, and maybe I would get there faster.

So those are my thoughts.  There is probably a lot wrong with them, but we have to start somewhere.  I think I'm at least good with the parent selection, what F2 might look like, and selecting brachytic trait and cherry tomato trait (few locules, although some salad tomatoes are bigger and also have few locules) (plus compound inflorescence) and nipple (plus jointed stem) trait.  Those are a long way away and who knows what any of the uncertainties of life will bring.  Then again, I might have fun and a nice variety in the end.  Plus hopefully even the dead ends and mistakes will be tasty.

Tuesday, January 11, 2022

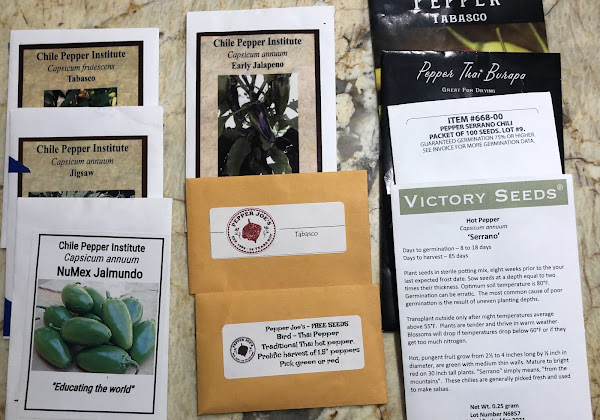
Starting More Seeds. Peppers, A Few Flowers, and More. 1.11.22

It's not necessary to start them this early, but at least the onions benefit from the head start. I think the Rudbeckias will too, and most of these can be planted outside before last frost date (onions, kale, maybe rudbeckias). I like to start peppers early because they grow so slowly in my garden, and to get an earlier and larger crop. They can be grown inside under LEDs for quite a while, until ready.   Plus some if these seeds are several years old. They might not grow. Starting now gives me a chance to try again if needed.
It's been quite a few years since I grew Tabascos or Thai peppers. They will be fun to try in their new raised bed. Serranos and JalapeƱos always do well for me. Serranno plants are larger, so need more space. They are also more productive in my growth conditions.  The only new pepper seeds for this year are those from the Chili Pepper Institute in New Mexico, and Serranos from Victory seeds, which are all open pollinated so I can save seeds from now on. Depending on the plant and how things go, I would like to overwinter a couple next fall, which would mean an earlier start and more peppers per bush. The chili pepper raised bed has room for about a dozen plants, so I intend to start a few more in a month.  The seed starting mats will have spaces again by then.
Maybe a card file, well used, would be a better way to keep track of stored seeds and how the varieties do. I think I depend too much on tech. I'll work on it. These are 5 x 8 cards. Printing them out, they are more legible and compact than if I hand write on them.

Sunday, January 09, 2022

Reviving Another Geranium. 1.9.2021

Here is the other geranium I decided to revive. Looking through my notes, I was growing it in 2006, so I've had it a while. Mostly I overwinter it with dry dirt on the roots in the garage.
I shook off loose dirt, removed dead leaves, pruned of dead branches and pruned back the longest branches.
Then repotted in fresh potting soil and watered it in.
I think it should grow. No more water unless it looks dry, and no fertilizer. Keep out of direct sun.

Saturday, January 08, 2022

Geranium Revival & Cuttings. 1.8.22

I have a couple of geranium plants that I want to grow next year.  One was a 2 year old plant that was stuck in a back row last year and didn't have much chance to shine, but did survive.  The other was a ten year old, variegated leaf variety that I dug up and left bare root.  

Here's the first.   I left it bare root on top of the dahlia tubers in peat moss. I planted it in a flower pot, in some potting soil.


Then I trimmed off everything that looked obviously dead. Here's what remains.
That's all it needs or can handle for now. I watered and placed it out of too-bright sunshine. We'll see if it recovers. It's sad looking, might or might not recover. Here are cuttings I took from the dried out variegated geranium plant.
I cut off everything that looked dead. The cuttings are in water. We'll see how they do. This is a heirloom variety, "Mrs. Pollock", grown in the 1850s. Not a typo - before the civil war. The leaves are pale green because it was in the dark, in the garage, dried out.
I think they'll probably grow. Earlier this year I stuck prunings into the ground and did nothing, and they grew. I might clean up some more and grow a row of them next year. Geraniums are highly heat and dry tolerant, and deer don't touch them. Neither do rabbits. To think about cost savings, if each grows to a $3 size, and we start ten from cuttings (free), then that's $30 saved. I wouldn't spend that much on geraniums in the first place, so it's really having an opportunity to have a row of nice plants and create them myself.

Seed Starting 2022. Onions, Shallots, Rudbeckia. 1.8.22

 I've been setting up my seed starting stand.  One of the warming mats is cleaned up, I wShed plastic pots, soaked some seed starting medium, and today planted seeds.

Onion Sweet Spanish.  Heirloom Variety.   Baker Creek Seeds 2021.  

Red Wethersfield Onion.  Heirloom variety.  Fedco Seeds 2022.
New York Early Onion.  Heirloom Variety.  Fedco Seeds.  2022.

Grocery Store Shallot.  I planted them last winter.  Some bloomed.  I saved seeds Fall 2021.

Camelot Red Shallot hybrid.  Fedco Seeds.  2022.

Heishiko Japanese Bunching Onion.  Heirloom Variety.  Victory Seeds.  2022.

Rudbeckia hirta "Marmalade".  Outside Pride Seeds.  Undated, maybe last year.

Rudbeckia hirta "Prairie Sun".  Park Seeds.  2021 or 2022 growing year.  These are labeled "Origin Germany".


Most sources state that onion, shallot, chive seeds only keep a year.  We'll see if the year-old Spanish Onion seeds grow.  If no germination in 2 weeks, I'll plant more of the others.

The grocery shallots might be F1 hybrids.  That would make my seeds F2 and they might (1) not grow at all or (2) might be all sorts of sizes and shapes or (3) might turn out similar to their parent.  It is an experiment.  Plus, I didn't cover the flowers so they might have cross pollinated with onion flowers.  That's fine with me.  I also don't know if that is possible.  

In my garden, NY Early and Sweet Spanish grow very well, the onions are excellent, store a long time, but might be a little too large.  This year I want to compare those and Red Wethersfield.  All three are open pollinated.  Whichever ones I like, can set aside bulbs to make seeds in their second year.


The Rudbeckias are for the flower beds.   I'm not clear on whether they will bloom in their first year.  If my memory is correct, I started Rudbeckias early, many years ago, and got nice flowers during their first year.   I can interplant them with French marigolds so the area will bloom either way.

Using Black Plastic to Kill Sod For Flower Bed. 1.8.22

 This only works if you are not in a hurry.  Grass and weeds won't survive under a sheet of black plastic.  Depending on the season, that requires several months.  I started vegetable beds in 2016 using that method.  The ground was ready by late April.  That link here.

This area will be annual flowers, mainly zinnias, marigolds, cosmos.  I might stick in somecdahlias and sunflowers as experiments to see if deer eat them.   At the back, by the fence, are the forsythias I started for a hedge.  

Thursday, January 06, 2022

Adding Eggshell and Coffee Ground Supplements to Raised Bed Soil. 1.6.22

Now that the last raised bed has its full amount of topsoil, I want to enrich it with available amendments. I generally use compost (garden and kitchen source), coffee grounds, eggshells, wood ash, and leaves. The other raised beds have had all of those added already, either through the year last year or in the fall and winter. This last one, just completed, has only some wood ash at a somewhat deeper level (1 foot deep), and the new supplement of biochar mixed in to the top few inches. 

 My attitude is that not a lot is better than too much. For example, everything is growing well already, so the soil it pretty much OK and we want it to stay that way. Too much of alkaline supplements could result in soil too alkaline for good growth. On the other hand, gardening removes some minerals and the action of time, tilling, bacteria and fungi, degrade soil structure and impede drainage and root growth as the soil is used over the years. Rain also leaches calcium and some other minerals. 

 The most deficient mineral is Calcium. My soil tests always confirm Ca deficiency. Steve Solomon in his books about growing vegetables west of the Cascades, also discussed adding a lime agent, especially dolomite lime that also contains magnesium. Either wood ashes or lime will correct soil acidity in the right amounts, and add lime. Wood ashes also add other minerals, especially potassium (Mostly Ca,then K, then Mg, P, S, Fe and Na). Source. Source. UC Davis recommends not more than 5# per 100 sq feet. I use under 1 pound per 4 x 8 foot bed (32 sq feet). 

 The internet is an excellent source for myth and unsupported non-info, and the idea of adding eggshell to garden is a good example. lots of sites claim eggshells will deter slugs (in my experience, they don't), keep deer away (nope), increase soil calcium or dont (they do). They usually miss that along with eggshell there is the membrane, a source of some nitrogen and some sulfur. A lot depends on preparation and how much and other factors. The best research that I've found so far comes from Iowa, which is a farming state and has massive egg production, resulting in massive amounts of eggshells? There, farmers do plow eggshells into their soil, and corrected for calcium carbinate content, they work as well as agricultural lime. source.   There is also some research on eggshell as a detoxifier of heavy metals in soils.  Apparently, the metals bind to the eggshell and become unavailable for plants to take up and leave traces of in food.  I'm not really concerned about that, but the eggshell is porous, and may be a site for ion exchange for other minerals, and a place for soil microbes to proliferate and do their thing, which I think is probably good.

All that considered, I save eggshells and let them dry out. I usually crush the dried eggshells by hand, but lately I use the food processor to grind them more finely. I let coffee grounds dry out too, for easier handling. I'll look for more about them later, but basically I add them as a nitrogen source, secondarily as a potassium source, and a matrix for soil bacteria, fungi, and food for earthworms. 

 I added about a pound of ground eggshells, and 2 pounds of semi-wet coffee grounds. That's all until time for planting in two months. I'll rake them in when it's not raining. There is no hurry, this bed wont be planted with anything for two more months.

Tuesday, January 04, 2022

The Final Raised Bed Is Filled with Soil. 1.4.22

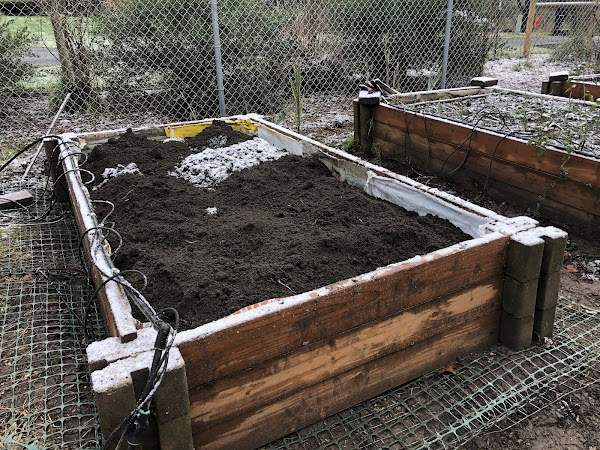
Today was drizzling but otherwise OK. I become a bit anxious when there is an unfinished project. So, I filled the last raised bed the rest of the way with top soil. Given how much it's rained and snowed this week, I want to think that the lower layers are all settled, so the top level settling might be minimal. Before adding more soil, I dusted the previous layer with wood ash and the cremated remains of chicken femurs. Those came from the chicken thighs I use to make Rufus's dog food. If the uncremated bones are used, they don't degrade all that fast, and can be dug up when planting and digging. So I let them dry out, then throw them into the woodstove whenever I burn some logs. Then the bones become very brittle, crumblng apart with a finger touch, and most are just ash. Bone ash adds Calcium and Phosphorus, and wood ashes add Calcium, Potassium, Magnesium, and some other minerals. They are alkaline but not quite as much as lime and I the soil tested acidic anyway. So it's a beneficial amendment or at least no harm done. When I fill, I empty the buckets so he ground is uneven, with mountains and valleys. Well, maybe for a hobbit but it is uneven. That way, after mixing, there is no distinct "lasagna" layer. Then I added biochar all over that - the black appearance is biochar.
Then I used the garden claw hand tiller to mix it in, then I used a shovel to mix some more. Then I used the garden rake to mix and smooth.
Next I'll add about a pound of crushed eggshells to the top and mix those in, and a layer of leaves Then it will settle and mellow and earthworms will purposefully tunnel through all of that, leaving trails and starting to built good soil structure. Then, I'll lay the paths between and around all of the raised beds. I'll discuss eggshells and what university agricultural research says about them with that post. There are lots of people on the internet repeating what others say, positive and negative. Almost none of them report actual research.

Thursday, December 30, 2021

Snowing like Crazy! 12.30.21

Amazing how much it snowed. Not cold enough so far to cause any damage. Still the coldest months to come. We will see how it goes.

Tuesday, December 28, 2021

My Grandparents in their Garden. About Mid1960s.

This is my favorite photo of my mom's parents. They lived in Western Illinois (Mt. Sterling). It's diffficult to see the garden in this photo. My grandfather, Glenn Wilbur Alcorn, always grew sweet potatoes, tomatoes, potatoes, sweetcorn, turnips, dahlias, zinnias, balsam. I'm sure those are dahlias to her right and balsam to his left. I recall my mom telling me that his doctor told him to garden, after he had a heart attack. I don't remember if my grandmother, Ivy Icenogle Alcorn, also worked in the garden. I'm thinking she must have, but my recollection is more of him.

More pH Tests. 12.28.2021

This is the pH of the bed that currently contains garlic. This is the only raised bed whose soil is entirely from our property, having been salvaged from a neighbor's road building on an easement on our property. This soil color is dark brown, compared to the purchased topsoil being black.
This is New Raised Bed #1. This time I'm doing it right, soil:distilled water 1:1 and letting it sit in a tall jar overnight to settle and clarify. I also did that with the garlic bed soil.
This is comparison of distilled vs. tap water. I assume the pH paper is calibrated with distilled water, since that is what they direct us to use, and I did. D for distilled and T for tap. Our tap is well water run through a purifier and softener system. It's not as acidic as distilled water.
I feel much more reassured about the adding lime and/or wood ashes. New raised bed #1 (and #2) soil is from the top level of the beds, which is soil I have amended with compost, lime, wood ashes, las year. It's certainly not alkaline, and the garlic grew very well, so I think I have a good system going.

Monday, December 27, 2021

Topsoil pH and Chemical Tests. 12.27.21

I used a home test to check the pH, N P K content of the topsoil I've been using to fill raised beds. This is a test of the un-amended soil, nothing added. pH
Nitrogen
Phosphorus
Potassium
pH, using pH strips and dilution 1:5 to make it readable.
I think these are a little difficult to interpret, but maybe OK. If Im reading correctly, pH using the liquid reagent is about 6, maybe 6.5. Nitrogen looks depleted and both phosphorus and potassium look deficient. By the pH strip method, the pH is about 6, maybe 6.5 so similar to the liquid reagent test. I'm not surprisd the topsoil would be depleted. Now I feel more comfortable fertilizing and adding a liming agent (wood ashes).

Sunday, December 26, 2021

Fungi. 12.26.2021

There are mushrooms growing all of the time. Last winter I spread a layer of tree chips in several areas, often on top of a newspaper layer. The newspaper is completely gone now, and the woodchips are starting to disappear. Meanwhile mushrooms continue to pop up. They like growing in those wood chips.
The benefits of fungi are legion. The soil should be interlaced with fungal mycelium, for soil health and therefore plant health. Often, I remove some mushroom caps and place them on the raised bed soil the get them started in the new soil.

Winter Day. Raised Bed. Deer. Rufus. 12.26.21

It snowed again. Rufus got to take a walk. He likes to snoop. He sticks his nose under the snow, then snorts like a horse. Then he sticks his nose under the snow, then snorts like a horse. Then...
There were some deer between the woodshed and the woodlot. They like it there. It gives them a chance to see if I leave the garden gate open so they can eat the remaining plants and fruit trees.
They grew nice and big, munching on my fruit trees and flowers and veggie plants. I set a goal of not more than 10 to 15 buckets a day in the raised bed. Today I added about 15, lost count. More is too much for me. At this rate, it will be filled within two more weeks. Next layer is compost from a year-old compost heap, then what I imagine will be the topmost layer of topsoil.
Rufus supervised.

Friday, December 24, 2021

Saving Squash Seeds. 12.24.21

These are seeds from the Pink Banana Squash that I hand pollinated. When I gutted the squash (like making sausage, gutting a squash is not for the squeamish), I rinsed the seeds and then left them to dry for a week on newspaper. I stirred them a few times so they would dry thoroughly.
The bits of newspaper stuck to the seeds are harmless and I don't remove them. This is enough Pink Banana Squash seeds that, if I planted them all, and they all made squashes, I could feed a moderate sized city.

Garden Raised Bed 1/2 Filled With Soil. 12.24.21

Due to space constraints, I have to fill this raised bed, bucket by bucket. I tend to overdo the work then regret it and get mad at myself. I have all Winter, and Spring if needed, before it gets planted with the main crop. This year, a community of moles moved in under the previous raised bed and had big mole parties. I think they were mole weddings, or maybe mole political rallies. They dug up the paths and mixed dirt with the nice thick layer of tree chips I had as a pathway. So the pathway is useless now. So, I dug off the top layer, which made the bottom four inches or so of the rebuilt raised bed. Eventually the tree chips will compost themselves and just be soil. Then I covered that with about six inches of new topsoil. Then a bag of leaves, which wont add much volume but will add a little organic matter and feed the soil fungi and earthworms. Now I've started adding the top layer of topsoil. When completed, the bed is 18 inches high, a good height for accessible gardening.
I'm ahead of schedule. If I set my goal for a half dozen buckets a day, it will be done in January. Then I'll put down a barrier in the pathways and cover with something that stays reasonably clean and comfortable to work on.

Next Step on Quilt - Making The "Quilt Sandwich". 12.21.21

I struggled with ways to make the "Quilt Sandwich"- Backing layer, inner batting layer, top pieced quilt layer. With my first quilts, I tried spray adhesive that washes out when the final quilt is washed. That stuff is aweful - fumes like an auto body shop. Even with windows open and fan running. Plus, I still couldn't get the layers matched up to my satisfaction. It was a mess. With the last quilt, I spent a few hours pinning it together on the sunroom floor which is big enough and is porcelain so won't be scratched by the pins. That worked OK but took a lot of trial and error. Working on the floor isn't that much fun for me, either. Taping the bottom layer to the floor helped a bit but not a lot. This time, I cleared off the kitchen island and used that. That actually worked a lot better. I can work while standing, fold the quilt layers over as I pin them together, smooth under and over as I go along, the coffee pot is close by for emergency infusions. The island surface is slick enough that I can slide the quilt back and forth to smooth it and pin.
Now this quilt sandwich is all together and ready for sewing. That will take a while, but is rewarding because the final quilt begins to emerge. Even before it's sewn together, with the layers all there it now has the thickness, the feel and the weight of a real quilt. I think putting the quilt sandwich together is one of the most difficult parts. Working on the island helped tremendously.

Tuesday, December 21, 2021

Rebuilding the Last Raised Bed. 12.21.21

Today I laid down a mole barrier, and rebuilt the raised bed that Ms. amd Mr. Mole destroyed in late summer. I had emptied the soil earlier, which I used for filling the newest raised beds. Today I smoothed the base ground a bit more. I think what happened was part of the original mole barrier was chicken wire, which rusted away. There is still galvanized hardware cloth in place. The moles had undermined the corner supports, which splayed outwards, then the boards collapsed and I no longer had a tidy and functioning raised bed. The base is galvanized deer fencing, with a second layer of plastic deer fencing. These were previously used around trees, so nothing new was needed and I didn't have to dispose of those used fencing.
Around the sides, later I will put down walkways, and the mole barrier overlap wont show any more. The rebar that runs through the cement corners was two feet long, so only 6 inches into the ground. the new rebar is 4 feet long, so 2 1/2 feet into the ground. That should help anchor the corners better. After installing the lower two layers of cement corners and boards, I ran wire from rebar to rebar, to tighten them a little more against splaying outwards too.
Then I added the top layer of cement corners and boards. The wires will not show at all and wont be in the way.
Now all that remains is a sheet-plastic liner on the sides, and fill again with soil. The liner is meant to reduce contact between the boards and soil to a minimum. I can get that started this week, and gradually fill, taking as long a time as I want. This bed wont be planted until May or June, although I'd like to plant a cover crop or cool weather stuff like spinach lettuce, radishes, in Feb or March.

Monday, December 20, 2021

First Snow. 12.19.21

We had the first snow of the year. Rather than putting lights up high, we just put them in the sunroom and on the rail.
My contribution was to make a holiday curtain for the kitchen windows.
Very slowly working on checking pH in garden beds. Most seem around pH 7 so far.

Friday, December 17, 2021

Saving Seeds. Pink Banana Squash. 12.17.21

Today I cut up the Pink Banana Squash that I had hand-pollinated so I'm confident the seed is true to type. The flesh is still pretty good, noce fragrance but a little dry now. I washed some of the seeds and laid them on newspaper to dry for a few days.

Nematocidal Mustard Winter Ground Cover. 12.17.21

I think it's very, very late to be planting a ground cover. However, if the ground is turned over, weeds will sprout and grow thickly before I need thw garden bed in May or June. I think mustard might be as hardy as any weeds, and might either germinate soon and survive fhe winfer, or ferminate afte the coldest weather before I can work the soil again. So I took a chance. This mustard variety is used by potato farmers as a green manure cover crop, because it kills nematodes better than nematocide chemicals.
I used a garden claw to roughen up the soil a bit. It didn't need tilling or digging. this area has been sweet corn for two growing seasons, so I will grow squash here next year. The leaf covered area needed more enrichment, so it has a thick blanket of leaves that will be turned in next Spring.
It was nice to get out into the garden today. This chore was a bonus - I didn't plan on doing it, and I'm curious to see if/how well the mustard seeds grow.