Sunday, January 03, 2021

Clearing Himalayan Blackberries, Again. 1.3.2020

 I've been cleaning up the Himalayan blackberries in the border at the North edge of the property.  This area was impenetrable when we bought the place in 2012.  I cleared a big portion of the blackberries in 2015-2017, planted a row of Leyland Cypress in an attempt to have some privacy, out-compete the brambles, and hold the soil, given a bit of a bank on the North side.  I also planted rhododendrons on the near side of some.  And mostly, grass seed.  Unfortunately, it was not possible for me to keep the rhodies cleared of blackberry.  The cypress grew well but some not fast or thick enough, so there was a growing amount of blackberries to clear again.

Some photos from 2015. These brambles were impenetrable back then, around ten feet tall.  There were some fallen cascara trees mixed with them.

This is 2015, part way through clearing the brambles.  Back then I was using a pruning shears.  Now I'm using a hedge trimmer, which seems to go faster but is also harder work.

 After clearing the first area.  I planted Leyland cypress trees at the northern side, between cleared ground and the falling cascara trees.  That was in winter 2015-2016.

Now, five years later, this batch of cypress have filled in, and there aren't a lot of blackberry brambles in this area.  Almost, but not quite, none.  The caged tree is a ginkgo that is failing to thrive, and probably should be moved out.  Some more of the cascara trees have fallen.  I think they are at their size limit and will continue to fall down.
 

This was the other area, east of the first area.  There were a lot of fallen cascara trees mixed with the brambles.  So those had to be cut off.  After this cleanup, I planted the Leyland cypress trees as in the first group, but they were much smaller trees.  On the near side, I planted the rhodies and some perennials.  That was a mistake - too hard to keep clean.  This week, the rhodies went elsewhere, and I cleaned it up again.  Not nearly as bad as the first time around, but I don't want to have to do it again.  This photo shows the area in 2015.  The entire visible ground area was blackberry thicket.

This is after cleaning the same area up yesterday.  This wasn't nearly as bad as the first time around, but still more than I want to be doing.

Another view after cleanup.  Once I get rid of those piles of blackberry vines, I'll broadcast grass seed in the cleaned up area.  The piles of vines compost fairly fast, and just sort of disappear, but I'll most them to where they are not in the way.  In the future, this area will just be mowed, which will prevent further encroachment.  In addition, the cypress trees are large enough, I think they will mostly out-compete the blackberries in the future.


Friday, December 18, 2020

Three More Elmer Fudd Caps. 12.18.2020

 I learned some things making these.  It's nice making the headband inside the hat, using unused, bias-cut kitchen towel.  It's very stretchy and absorbent.  I used a temporary adhesive to hold it in place while I made the sweat band inside-out, out of the same flannel as the hats.  Then I turned it inside out and sewed into place.

Second, the original cap has bias tape covering the inside seams.  That's really difficult to sew.  What is easier is to construct two hats, about the same size, and sewing one inside-out inside the other as a liner.  It takes a little planning, but then there are no exposed seams.  For the first, I used zigzag stitch, which is fine but using one inside out in the other is more professional looking. 

The lower left cap is the first one that I made, which was all olive drab.  I made a mistake not putting in a sweat band, and it was goofy.  So, I constructed a new cap with a plaid cotton fabric, turned the hat inside out, and sewed it together.  Now the olive drab fabric is the liner, and the plaid is on the outside.  It looks better and is more comfortable.  This hat will keep its shape better than the flannel ones, but isn't as warm and soft.  The flannel caps are more mashable, soft, warm, and comfortable.  They are all machine washable, dryable.  By using a heavy interfacing instead of stiff plastic for the brim, they may not wear out as fast.


A Quilt Learning Project - Table Mats. 12.18.2020

 I had some unused squares left over from a wall hanging quilt that I made last fall and winter.  That was the first one that I ever made.  

Since I didn't know anything about making a patchwork quilt, I started as simple as I could. I bought a package of 2 inch wide fabric strips in a roll, called a "jellyroll".  Those can be nice to start out, because they include various colors and patterns in one roll up.  On the other hand, one can buy a jellyroll and wind up with pieces that don't look right, or aren't wanted, and on the other hand have to add pieces.  

In this case, I made a "split rail fence" pattern quilt.  That involves three strips, 2 inches wide, sewn together into a square.  The easiest way is to take 3 strips that are much longer, sew them side by side into one long strip, then cut across it every 6 inches.  That will give 6 inch squares with a contrasting stripe in the center.  For my original quilt. I either had dark center strip and light outer strip, or vice versa.  They can be arranged in all sorts of ways.  I wound up with 6 left over and put them into a box.

I wanted to improve my sewing skills, especially for making the next quilt.  I decided to make some table mats, which are basically very tiny quilts.   I thought the split rail blocks were too big for such a small item.  Plus, there would only have been enough for one table mat, which isn't much.  I decided to make something different, basically scrambling the split rail patches.

So, I made six more squares, mostly with brighter and lighter colors.  Some of those were left over pieces from making face masks.  In this case, I arranged them from dark to medium to light colors.  That gave me 12 squares over all.  Here are the 2 squares.

I thought those were too large to look good on small place mats.  Plus, I wanted to experiment.   So, I arranged the six original squares face up, and use the six new squares turning so the seams were at right angles to the first.  I tried to make each combination different, but that wasn't completely possible with what I had.

Then I clipped the pairs together, and sewed all the way around with the good sides facing the inside.


Then, I cut corner to corner, both ways, on all of the squares.

Unfolding the cut pieces, and turning opposite corners of each square in the opposite direction looks like this.

That's an interesting pattern, with repeating shapes.  However, they don't work out for the size and pattern that I wanted.  So I scrambled the patches, turning them in various directions and trying not to have too many that were the same fabric adjacent to itself.  Then I ironed them flat, and sewed the squares together to make two mats.


Now it's exactly the same as making a big quilt, except it's small.  I sandwiched the new patchwork layer, cotton batting, and a cotton fabric backing.  That backing was fabric that I bought last summer on Amazon to make masks, but it was way too flimsy, basically muslin (bad Amazon and bad seller!).  But it's fine for the back side of these table mats.

Three things I learned since the last attempt.  First, if the piecework top, the batting, and the backing are adhered together with washable spray adhesive, then there won't be wrinkles and everything stays together while being completed.  

Second, I watched a lot of videos and learned the right way to do the binding, that border around the edges.  It's not an obvious technique (to me), but really isn't hard at all.

Third, it turns out that the jelly roll strips are exactly the width needed to make binding strips.  I didn't know that.  There's probably a reason.  That did give me some nice choices.

Here is how the table mats came out.  I like some things about these.  First, they are made from scraps of fabric, which is how patchwork quilts originated and is a nice tradition.  I might have chosen some different patterns and colors if I had a big fabric bin to choose from, but I liked how these came out anyway  Second, I like this scrambled split rail fence pattern.  I'm sure it's been done zillions of times, but I didn't find a pattern so I made it up.  It's fun to see the various patterns peeking from behind others, and see the contrasts in shapes, colors, and intensity. Third, I learned some new things.  The mats will soften and puff up a little when they are washed. 


Wednesday, November 18, 2020

Sewing Project, Part II. A Comfortable and Protective Gardening Cap. 11.18.2020

Moving on with my experience with the "Fidel Castro" cap, I decided to make one using cotton flannel.  Flannel is softer and more comfortable, and possibly easier on the sewing machine compared to the tough ripstop olive denim-type fabric.  I used the same pattern, and made some changes.  First, for the tip, I used flannel on both the inside and outside layers, with cotton batting between the layers.  I pre-washed the flannel to adjust for shrinkage.  To give the sides a little more firmness, I used a thin fusible interfacing ironed to one layer, and cut both inner and outer layers of flannel fabric, so that was like a sandwich:  flannel:interfacing:flannel.  The bill was a sandwich as before, using flannel instead of ripstop and using thick heavy interfacing to give it some substance.  This time, I kept the binding on the sides, cutting the fabric on the bias.  That made it possible for the hat to stand a little taller than the first attempt.  For the sweat band, I bias-cut new dish-towel fabric, which is all cotton, durable, soft and absorbent.

Here is how it came out.  It's still interesting that the fabric came together so differently from the original cap despite using the same pattern.  Not just the fabric pattern and color, but the shape and overall appearance of the cap.  My first thought was "Elmer Fudd Cap" so I did a web search on "Elmer Fudd Cap" and there they were.  However, most Elmer Fudd caps have the ear flaps that tie to the top when not needed, whereas this cap does not have ear flaps.

This is a big improvement on the first prototype cap.  Using the sewing machine walking foot, assembly was much easier.  It didn't skip any stitches at all.  The thickest parts were a little challenging but I am learning how to do better with these challenges.   This hat turned out to very comfortable.  There is no belt at the back - it's a good snug fit due to bias cutting the binding and sweat band.  The original cap didn't have a belt either, and it wore fine for many years.  

I might make a few other adjustments before making the next cap.  I'm happy with it as is, but there is always something to do to make things a little better.  I probably need to add about 1/4 inch to the oval top, because quilting the fabric makes it a little smaller in diameter.  I adjusted the sides to account for that.  Before doing that, I want to put it through the washer / dryer to see how it re-shapes.  It should be OK.  This cap is meant to be treated like any other clothing, washed and dried just like a shirt or trousers.


Making some Apple Cider. 11.18.2020

 With some extra apples around, I decided to make some cider.  I love cider, and have plenty of apples this year, so why not make some?  However, I don't have a cider press.  

We had an old Jack Leland Juicer in the pantry so I tried that.  Instead of pressing the apples, the juicer uses teeth to shred them into pulp, and a filtered centrifuge to separate the bulk of the pulp from the juice, although there is still some pulp and some foam.

For the most part, I used bruised or imperfect apples.  I did not use any parts that had holes or rotting areas, just the good parts.

I used mixed varieties of apples.  It turns out that red skin apples make redder juice, because some of the pigment makes it into the juice.  That also adds some nice flavors, sort of floral or berry. 

Those small apples are Jonathans.  They give the cider a really nice flavor.  The largest are Beni Shogun Fuji.  They give a nice sweetness and more juice. 


I made a couple of large jars to keep in the fridge.  The foam has a delicious flavor, sort of like a sorbet.  The finer pulp settles to the bottom.  I could filter it out, but I think it's healthy to drink it.  After a couple of days in the fridge, the cold cider has a more mellow flavor, and is much more like what I grew up with when my parents took us to the orchard for fresh local cider.

Even though there is some cleanup, it's not too bad.  I have just been making a couple of jars at a time so I don't overdo it.  This is really delicious.

New Sewing Project. A Comfortable and Protective Gardening Cap. 11.18.202

 As someone with no natural scalp covering (hair) I have a couple of choices. Baseball caps don't help.  They have a button riveted in the top to hold together or hide the point where the 6 triangles of fabric come together.  Some how, I often hit my head on almost anything, and that rivet makes a divot in my scalp, which leaves a scab for a few weeks.  Another choice is to become a NY real estate billionaire and hire a hairdresser for $70,000 a year to pile up the side hair into something that looks like a tortured ferret on top of my head.  That's not my favorite option either.  So I decided to make a cap with a one-piece top, quilted for protection.

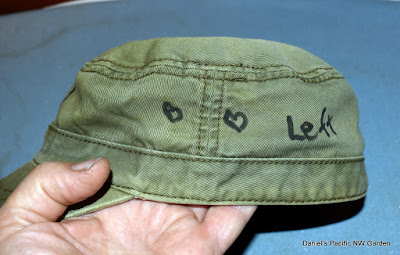
I had this old cap that I used to like, but it's falling apart and the top was never padded so not much protection.  I took it apart and ironed the pieces flat to make a pattern.  I used to joke that this was a Fidel Castro cap, but then I did a web search on "Fidel Castro cap" and it turns out that it really was  Fidel Castro cap.  I'm not crazy about that but I can use a fabric other than olive drab and that will fix that.

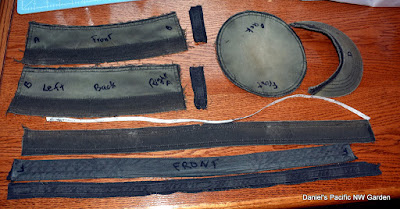
First, I ran the cap through the washer/dryer so I would have something clean to work with.  Then I labeled all of the seams for future reference.


Then I used a seam ripper to tear apart the old cap.  The bill is too solid to take apart but I can work with that as is.  Also, I took photos from every angle, to serve as a guide to assembling the new cap.


The bill is rather hard plastic.  A could make a new one using milk jug plastic, but I don't want to damage my sewing machine by sewing into something similar.  Plus I don't know what would happen to that if it goes through the dryer.  As an alternative, I could use several thicknesses of denim or canvas.  I opted for some heavy duty interfacing from the fabric store, which gives some stiffness but is still soft at the same time.  For the top part, I used rip-stop fabric for the top, flannel from old pajamas for the inside, and sandwiched some quilting cotton between the two.  I machine quilted that with about 1 1/2 inch squares.  I skipped the border around the sides.  

This is the result for the first prototype.  It's interesting that I can take something apart, use that as a pattern, and it comes out looking completely different.   It's a little crude, but it takes me a few efforts to make something decent, which is why this is just a prototype. 

This hat is actually fairly functional and more comfortable than the usual baseball cap.  However, I think I might take it apart and put in a flannel liner and flannel binding on the sides, which will make for even better comfort and better fit.  

I had a lot of problems with the stitches skipping, whole sections of skips.  The sewing machine manual says really helpful things (not really) like "wrong needle" or "wrong thread" or "not threaded correctly." I re-threaded the machine.  I tried a heavier needle, which maybe helped a little.  I tried the heaviest duty needle that I had.  Still some skips.  Then I changed to a walking foot, and surprise, no skipping,


Saturday, November 07, 2020

Some of the Trees in Fall. 11.7.2020

This is the Dawn Redwood now.  The leaves take on a cinnamon color - not the brilliant red of some maples or yellow of ginkgos.  This tree grew a few feet this year.  It's about doubled in height and volume since I planted it 3 or 4 years ago..

The four chestnut trees.  They grew quickly, about 3 or 4 feet a year.  There should be a good chestnut crop in the next few years.  This year there were a couple of dozen.

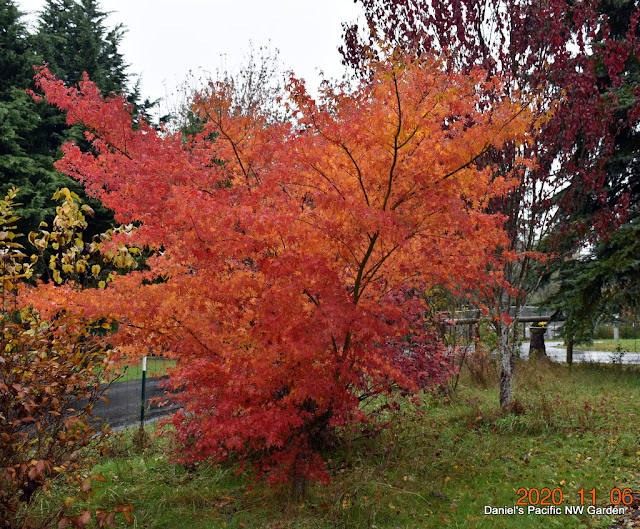
A volunteer Japanese maple.  This was a volunteer that I dug up and replanted, twice.  It was worth it.  The fall colors are brilliant.


Finishing the Restoration of that Plant Stand. 11.7.2020

 I wanted to get it done so I could get the sunroom back.  Plus I didn't want too many unfinished projects around.

First, here is the completed plant stand.  The metal is painted "bronze" which is black with tiny metallic flecks that show in sunlight.  I did something different with the finials, described below.  The table top is now solid wood instead of that cheapo particle board.  It has a raised edge to reduce issues of spills, and a vinyl flooring surface to make it water impermeable.  The wooden edge is painted black with a surface coat of polyurethane for durability and cleanliness.  Up close, some wood grain shows through that paint, which is an effect that I like.

The finials came out interesting. This is what happens when you spray the with black spray paint and then spray with an incompatible brass look metallic spray paint.  I liked this cool looking textured and multicolored effect although I don't know what to call it.  The finials were a wood-look-something, maybe resin.  This is nicer.

The tabletop was exactly what I had in mind.  It's a little bigger because that's the size of the boards I used and I didn't feel like cutting one lengthwise.  I decided the added surface area would be a bonus.  It gives a little more room for starting garden plants this winter.

This is the underside of the table top, before I painted it all black.  The extra braces are glued and screwed to the main boards, which are also glued together.  I think this is a very strong result, probably stronger than a single wide board.  All of this is scraps from the shed.  I love taking something that was headed for the scrap heap and making something good from it.  Plus, I enjoy doing creative furniture refinishing.  I think the result here was much better than the original, will last longer, is more functional and is much more solid.    

What a mess!  And, I over-sprayed some areas of the porcelain tile flooring.  Fortunately, paint thinner and steel wool cleaned that up completely.

For comparison here is what I started with.  I almost can't believe I kept it :-)  By the way, I decided the drawers were not useful, and looked to junky.  So the replacement table top does not have drawers, just sort of an apron which adds strength and looks more complete.


Saturday, October 31, 2020

Tiny Baby Garlic Plants From Bulbils. 10.31.2020

 This year I let a few of the Musik garlic plants develop "seed heads".  "Seed" is in quotes because it's not seeds, but tiny garlic bulbs (bulbils) that form at the top.  I planted those at the same time as the garlic plants, a few weeks ago.

Yesterday I saw the tiny plants emerging.  I didn't know if they would grow at all.  These were really tiny.  It will be interesting to see if they survive the winter.  The purpose is to grow a reserve of bulbs to plant next fall.  That way I am less dependent on preserving so many full size bulbs in the summer.  They generally take two or three years to reach full size.  


If they all grow, there should be 50 to 100 of them.  A cold winter is predicted.  I don't know what to expect as far as survival.  This is where I get to learn.

It's interesting that these are ahead of most of the full size garlic cloves that I planted.  Most of those are still under ground.

Trees Update. 10.31.2020

 These are a few of the trees I've planted.  There are quite a lot more.  Here I'm sticking mainly with non-fruit trees, because most of those don't reach great size and store up carbon like the big trees.

 I don't understand how people can buy a 1 or 2 or 10 acre property and keep it almost entirely as lawn.  I just don't get it.  I may overdo the trees, but they are a heritage for future generations.  As they grow, they also show a commitment to the land.

This ginkgo (yellow leaves) is from the three that I grew from seeds that my dad collected in his neighborhood in Illinois.  I gave one start to him and brought the other tree here.  The largest, by far, is in Vancouver.  The second largest died a year from transplant.  This one was the smallest.  It was in a small container for too long, then planted in a bad spot, then I moved it here.  It grew nicely, then the top died but it grew back nicely again.  There is something about here that doesn't suit ginkgos well.  Maybe it's underground animals that chew the roots.  Now that this one has recovered, maybe it will be as majestic as its sibling.

One of the four Greenspire European Lindens that I planted in 2012.  This is the second - largest.  Doing quite well, handsome tree, no fertilizer or watering or other special treatment now.  Tons of flowers for honeybees when blooming.

A close up of that ginkgo from above.  I think it's about 15 feet tall now.

One of the four hybrid (European X Japanese) chestnut trees.  This was a seedling, which has grafts from the others on four branches.  I added those in case the main part is not productive, and to pollinate the others.  Handsome tree.  Chestnuts can be quite majestic regardless of their nut production.  This one is about four years old.

A grafted tree, seedling from Vancouver and top from the male ginkgo tree in my old Vancouver yard, handsome tall beautiful tree.  I don't know why this grafted tree has such screwy growth - not quite vertical and not quite weeping.  Did I graft upside down?  Will it overcome whatever it is that's making it odd?  I don't know.

Another ginkgo that I grew from seeds, this one form Vancouver.  Originally I grafted the other onto it, but the graft was broken.  So this is 100% the Vancouver tree.  It had a slow start but is beginning to take off and grow.

This is an aspen that I started from an offshoot of another aspen that I planted in 2012.  I think this one is about  4 or 5 years old.  Aspens grow quickly.  It must be about 15 feet tall now.

Another hybrid chestnut, one of the four total.  This is the smallest and took quite a while to get growing.  Now it's taking off, about 2 1/2 feet of growth this year. 


Friday, October 30, 2020

Carnivorous Plants. 10.30.2020

 These are some of the Sarracenias.  This summer, with illness and hospitalization and catching up, they didn't get trimmed or repotted.  Even so, some still look pretty good.  This winter, I can work on them to clean them up and pot into larger containers with fresh growing medium.


Alpine Eucalyptus at 2 years. 10.30.2020

 This is the end of the second year for this Tasmanian Alpine Eucalyptus.  Also called Tasmanian Yellow Gum.   It's reportedly more cold hardy than the types known in California.  With la nina this year, we'll find out.

It's difficult to see in the photo, this tree is now about 7 foot tall.  That is without watering this year.  I don't think deer have touched it at all.  It has tough leaves with a somewhat odd fragrance, which may make them unappetizing.  When fully grown, it should have colorful bark


Another close up.  The new growth can be quite nice.


Dawn Redwood at Three Years Old. 10.30.2020

 I planted this Dawn Redwood in November, 2016.  I was going through some anticipatory grieving about my aging dog, and wanted it as a reminder of him when he was gone.  He is buried among its roots, as is his companion dog and at least one chicken.  I like to think that the tree contains some of Charlie's atoms.

Here was the tree as planted  11.16.16.  I removed the potting soil and burlap / clay mix, and washed off the roots.  I pruned off crossing and potentially girdling roots.  With so little root mass remaining, I wondered if it would survive.


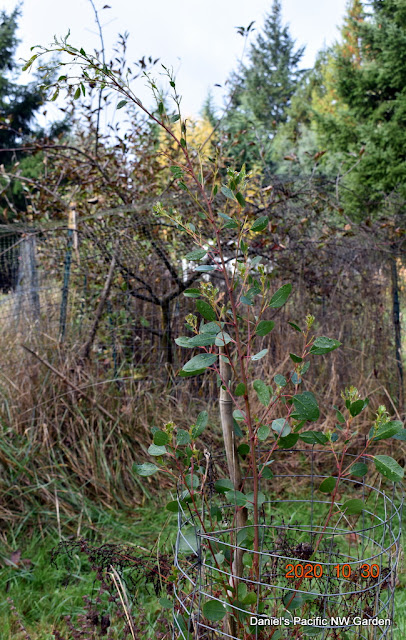
The tree did survive, and thrived.   Here it is almost exactly four years later.  I keep some fencing around it to prevent deer damage to the trunk.  That might no longer be necessary but doesn't hurt anything either. It got no additional water at all this year, surviving as a natural member of the ecosystem.

Dawn Redwood is a tree that existed at the time of the dinosaurs.  It is different from native redwoods, in that it drops its needles each winter.  They were thought to be extinct, with only a record in fossils and coal from millions of years ago, until discovered in a forest in China in the 1940s.  Before dropping, the needles change color to a brownish yellow, which they are starting to do now.


Second New Raised Bed Completed. 10.30.2020

 This is the second raised bed.  I completed it and filled with a mix of purchased  top soil mixed with prior raised bed soil.  The purchased top soil is a little less than 50%.  It's nearly full.  I added maple leaves to the top to see if they compost and add some organic matter.  For minerals, I also added about 4 cups of wood ashes, which contain the cremated femurs of 10 chickens (thighs made into dog food).  That adds minerals, mainly calcium and phosphorus, with some iron, magnesium, and potassium I think.

This is for tropicals for next year - pickle cucumbers and peppers.  They get planted in May or June, so it has lots of time to settle in.  There is one more planned raised bed, no hurry on that either.