Saturday, October 24, 2020

Deer Fence. 10.16.2020

This year's new deer fence worked out wonderfully.  Other than the recent tragedy last week when I left the gate open for just a single night.  Just one night.  

Fortunately, that was after almost all of the veggies have been harvested for the year.  I hope the mini apple trees will survive and come back.  We'll see...  in April.

 This photo was in Nov, shortly after the fence was built. This year, having a good fenced garden was a life saver.  It gave a better crop of plants that in previous years didn't grow at all due to deer and, sometimes, rabbits.  It was far easier to manage that my previous make-shift fencing.  I was able to branch out and grow a few things that I wanted to try, and the animals always destroyed before, like beans and peas.  Even the supposedly deer-resistant plants, like onions and garlic, did better.


It was wonderful not having to think of my vegetable garden as a battleground against deer, and also rabbits.  It was the best, most diverse, most productive garden that I have ever had.

Space is at a premium.  Last winter I didn't have room elsewhere for potatoes, which don't need that protection.   Next year they'll go where I currently have sweetcorn and old raised beds. That will free up some additional space.  Also, I won't plant so many snow peas, which can spread too much for the amount that I want.  I might move some squash outside of the fence, although that can be a iffy prospect because deer like some varieties and leave others alone.  On the other hand, raised beds and fruit trees will take up more room than this year, so I need to plan carefully.


Red Oak Seedling at One Year Old. 10.24.2020

 Here is a red oak tree that I grew from an acorn.  It's one of the few that deer missed on their dinner night out in my garden.  Now it has brilliant red leaves.  Some of the others were a nice red too, but this one is incredible.  I fond a nice location for it and planted in the ground, with some fencing for protection.  Red oaks grow faster than while oaks, so it has potential to reach at least "tree size" during my lifetime

I imagine that the other deer marauding victims will recover and grow next year.  There are a couple that I would like to save.  I also noted that while the red oaks were de-leafed, the white oaks were left untouched.  Tougher, smaller leaves?  Or just not noticed?


Thursday, October 15, 2020

Remodeling a Plant Stand. 10.15.2020

 This has been my plant stand for starting vegetable seeds, for about 20 years.  Most of it is metal, but the tabletop was particle board with some sort of plastic or contact paper to look like faux wood, sort of.

The metal parts are in fairly good shape.  They can be cleaned of with steel wool and given a couple of coats of Rust-oleum.  I'm leaning towards a bronze look, which matches other furniture in the sun room.

I found a plank a little more than twice as long as the table top, and a bit more than half as wide.  I cut two pieces, and edge glued them, along with three braces on the underside which I glued into place and "clamped" with drywall screws.  I also found some 1 x 2 trim in the shed and cut to make a trim all around.  After installing that, using wood glue and 1 1/2 inch nails, I have the general look that I want.

Since this will be a plant stand, I'd like for it to be a bit more water tolerant.  I might finish the top using vinyl plank flooring left over from a bedroom remodel.  I could paint the trim either the same bronze, or black.   I'm not sure yet.  The wood is nothing special at all, but I could do a dark stain and apply a few coats of polyurethane.

Plant stand before starting.  You can't tell, but that fake wood grain plastic coating just peeled off like badly sunburned skin.


It disassembled fairly easily.  This is one of those assemble-with-an-allen-wrench types of furniture.  That metal frame is nice and sturdy.  

I sat the cut pieces of wood on the bottom section to look at them for a while.

After gluing and fastening the two planks together, same for braces on underside, and installing edging.

There is still a front piece to install, but this is most of the construction.  I don't want to install the drawers again.  They are just ugly and useless.  The front piece will somewhat hide the lights that I want to install under the table top.   The new top is almost interesting enough to apply some sort of whitewash type finish, if there is something water-proof that I could use for a seal.  I still think I'm most likely to pain the trim black, or dark grey, and install vinyl flooring as the top surface.  It's just more practical for a plant starting station.

I like this enough so far, I might make a similar wide shelf for the lower part to start vegetable plants under LED plant lights.  The current shelf is narrow metal.  I'm sure there are more wood planks in the shed.  I guess I should finish this part before embellishing it with something more.

Now to wait for Amazon to deliver the wood fillers and Rust-oleum.  I'm not into going to Home Depot for a viral version of Russian Roulette just yet.


Deer Damage. 10.15.2020

 Yesterday when I was checking the shed, I forgot to close the garden gate.  That's the only time I forgot, all year.

With deer, it only takes once.  They completely defoliated every miniature apple tree, every espalier apple tree, and grabbed a few raspberry leaves too.

It's hard to take a photo of something that's not there.  In this case, leaves.  I'm beyond discouraged.  I suppose that this late in the year, that just means they will head into dormancy.  I hope they won't be set back much and won't try to regrow.  Dammit.


Installing Home-Made Shed Doors. 10.15.2020

 This project is almost done.  The shed needs some clean up and painting, and a garden tool rack.  The biggest job was getting myself in gear to make and install a new set of doors.

I posted earlier about how I made the doors.  I cut them from an available sheet of siding, with 1 x 4 lumber cut to make supporting framing and trim.  Then glued them on, with drywall screws, screwed in from the inside aspect while the glue was wet.  Grout and paint.  

The shed turned out to be leaning, which I can't fix.  I installed the doors level, which meant some creative door hanging.  It came out OK.   It's also not in great condition - it was sat on the bare ground who knows how many years ago.  There is dry rot.  Still, it's a shed, not a house.  Getting it working for a couple of years would be OK. 

Here is how it looks now, with the doors and trim installed and the trim grouted. 


That turned out pretty good.  I saved the 2 x 4 framing from the old door, to make a tool rack.  The rest is falling apart, so the boards go to the wood pile and the siding goes to the trash.

For comparison, here was the shed a few days ago.


If there's another warm sunny day, I can scrape and paint. Otherwise, that part will await Spring.

Sunday, October 11, 2020

Yates American Persimmons. Early Harvest. 10.11.2020

 These persimmons are about a month early.  They were already falling off the tree.  Yates is an American persimmon (Diospyros virginiana), so smaller than grocery store Asian persimmons (Diospyros kaki), but with a richer flavor, like apricots with spices and drenched in wildflower honey.  These were just that good.

This tree is fenced, which is good.  I'm sure the critters would have absconded with all of these, leaving me none.


Making New Shed Doors. 10.11.2020

 This shed was on the verge of demolition.  However, it's quite close to my garden and orchard.  It would be nice to store tools in it.  I would spend a lot less time and effort carrying tools across the road from the house.  That would make gardening more pleasant.  We already store straw and some kindling in it.  The door is huge, and very heavy.  It pulled the hinge screws out of the frame.  The door itself is 4 feet wide, 6 feet tall, and has its own frame made from 2 X 4s.  

I think that a scraping and repainting would preserve the shed for another several years, if not a decade.  It needs a new plywood floor.  I can do that.  The inside framing seems fine.  The siding is T1-11, which is bad, but it's a shed, not a house.  I can clean up or replace bad pieces, seal and paint them to last a few more years.

The main problem is that door. It's incredibly heavy, and re-installing it was a temporary measure.  It just pulled the screws out of the frame again.  I decided to make a new one but make two doors, half the width, and without that 2 X 4 framing.  So they will probably weigh about 1/3 to 1/4 as much.  I found a 4 X 8 foot sheet of siding, stored in another shed.  I cut it down to 4 X 6 foot , then cut that into two 2 X 6 foot sheets.  I bought some 1 X 4 boards from Lowes during my last trip there, to cut for framing / trim.

I've been kind of dreading doing this.  It's too many infrastructure projects this year.  However, once starting, it has gone quite fast and not really difficult.  The worst part was moving the big sheet of siding, and cutting it.

Here are the sheets of siding, with the cut 1 X  4 boards arranged like I wanted them.  I used these to add some strength, and help flatten the siding which had a slight, subtle warp.

I numbered the boards and their locations so I wouldn't mess them up when they are glued and screwed together.  One door got numbers, the other got letters.

I used outdoor grade wood glue, and drywall screws.  I screwed them through the back so they would be tight and make a good glue-bond and not show or be exposed to the elements.  Then I used outdoor, paintable caulk to seal all of the nooks and crannies and edges so water wont soak in.


This morning I painted the doors with some left over house paint.  I think there is enough for a second coat, plus paint the entire shed.  Then it will match the house.  It's a darker grey than it looks in the photo.

 
Next I need a good dry day to repair and paint the siding above the door, install the new framing, and install the doors.  That will be a good start at having a usable garden shed.
 
Here is the shed as it stands now.   It looks decrepit and shabby.  I think putting on new trim, scraping, applying new paint, and installing the new doors will help a lot.  As it is now, I just lean the old door against it's opening, which is unsafe and looks like something out of Fargo.


Tuesday, October 06, 2020

Kitchen Curtain for Halloween. Sewing Project. And a Face Mask. 10.6.2020

 I decided to do a little sewing project.  We didn't like the kitchen curtains.  It's just a valence - we don't want to obstruct the view of the back yard and Rufus.  I made these from a Halloween theme cotton fabric.  When Halloween season is done, I'm planning on a set for Thanksgiving.  It's a way to acknowledge and enjoy the holiday and season times, without going all out on buying stuff.

 These were fun to make.  I didn't have a pattern, so I reverse engineered them from an old set.  I don't think I made a lot of mistakes, but there were some learning points.  Next one should go even more smoothly.


I also made some coronavirus face masks using extra from the fabric.  It makes a nice Halloween theme face mask..


Friday, October 02, 2020

Rubinette Apple. 10.2.2020

 This was the first really good crop for Rubinette.  It fruited a little for the past three years, but not much and they were ruined.  I think they had San Jose Scale, which I treated last winter with dormant oil spray.  It worked.  I don't see effects of scale, at least not yet.

Rubinette has a reputation as the best tasting, or one of the best tasting, apples around.  I know, each year there seems to be a new "Best Tasting" apple.  This one really was excellent.  I would at least say it is among the best tasting apples in my orchard.  Truly delicious.  Decent crop this year, too.


Grenadine Apple. 10.2.2020

 These were the first of the Grenadine apples.   They have red flesh, as marketed.  They seem fairly scab susceptible, like Airlie Red Flesh.  Also similar to Airlie Red Flesh, the skin is mostly green, although some redness shows through as a muddy color.  The main difference is Grenadine is round and very tart.  Maybe leaving them on the tree longer will sweeten them up, but Wowza, this one was like a lemon drop!

This first photo compares Grenadine to Fuji Beni Shogun.  The Fugi was much sweeter.  I may have noted a little "Red Hawaiian Punch" flavor in the Grenadine.


Chestnuts. 10.2.2020

 These are the first of the chestnuts this year.  The Marivale and Precose Migoule both bore some nuts.  Marivale drops them in the husk.  Precose Migoule seems to drop the nuts before the husk, meaning that browsing deer or squirrels get them.  I knocked off the ones that I could, to let them finish in a bucket in a shed.

I'm keeping the nuts for a while in the fridge to see if there are more ripening that we can roast.


Tuesday, September 29, 2020

Cross Species Pear Graft Update. 9.29.2020

 Along with the apple grafts, I wanted to try some pear grafts.  Again, this was for making miniature trees.  However, I'm not aware of sources for miniaturizing pear trees. There are some less conventional ways.  Serviceberry, Hawthorn, and Aronia are pear relatives, although different species.  There is some info from the fruit growing hobby community that pear can grow with these as rootstocks.  Also, the apple variety "Winter Banana" will reportedly accept apple scion, so I wanted to try that too.

I grafted European pear onto Winter Banana on a Bud-9 rootstock, and also onto an existing apple tree branch.

I grafted European pear onto two varieties of Serviceberry, and onto a Chinese Hawthorn and onto a Black Hawthorn.

I grafted Asian pear onto Aronia.

Nothing took on the Serviceberry.  

The European pear did very well on Chinese Haw, growing about two feet.  Here is the graft, a little irregular but it looks OK.  That shoot is actually below the graft union, and is Hawthorn.

 The graft on Winter Banana on Bud-9 did not grow.  The graft on Black Hawthorn did not grow.

I lost track of the other two, because of location.  Now, I started Fall cleanup as well as picking apples, and discovered the Asian Pear on Aronia.  It didn't grow much, but then again (a) it took, and grew some and (b) it was buried in snowpeas and volunteer four o'clocks, and (c) it was not watered all summer long.


The European Pear on Winter Banana on an existing apple tree, did take and grew a little.  Again, not a lot.  I'm not sure what to do with this - I don't need a pear on an apple tree.  I might try cutting the graft at the Winter Banana and graft that, with the already healed pear graft, onto Geneva 222 or Bud 9.  Maybe the Pear/Apple graft needed more vigor to heal together, than the Bud-9 can provide but now that it did, it will grow.


Since these were sort of hidden and forgotten, I never got around to removing the graft binder ziplock strips.  That's most likely fine, but I'll do that today.


Apple Grafting Update. 9.29.2020

 During late winter, I did a grafting project to create the mini-trees for what will be my mini-orchard.  This is part of my plan to be able to continue gardening and growing fruit, with lower maintenance and no ladders.  From ground level, I can prune, spray, pick, inspect, putter.  I can also grow multiple varieties in the safety of the deer fence.  But first, I need the mini-dwarf trees.  To create those, I used scion from my existing apple trees and highly dwarfing rootstocks bought via mail order.

I did the grafting March 16th.  Most were whip-and-tongue, done as shown in this vintage woodcut print, noted as by Dr. John A Warter in 1867:


I grafted most onto the highly dwarfing but sturdy rootstock, Bud-9 (short for Budagovsky-9). After grafting them, I wrapped tightly with 1/2 inch wide strips cut from zipper lock freezer bags, potted them in the usual potting medium and they looked like this.

One of the grafts was Co-op 32, generic name for the early bearing, disease resistant hybrid apple "Pristine".  I liked this one a lot, but the mature branch had fallen off of it's multigraft stock about 4 years ago, held on by a tiny bit of cambium and bark.  By the time I removed the branch, there were tiny growths of stem that year.  I kept one, and grafted it onto another multigraft the following year.  It didn't do well but survived and added a few inches.  This time, I removed that and grafted it onto some Geneva 222 rootstock - still very dwarfing but maybe a bit more vigor than the highly dwarfing Bud-9.  There wasn't enough to graft as a whip-and-tongue, so I did a cleft graft, matching up one side's cambium layer and hoping that was enough.


I also did some weird, cross-species grafts that will be described in the next post.

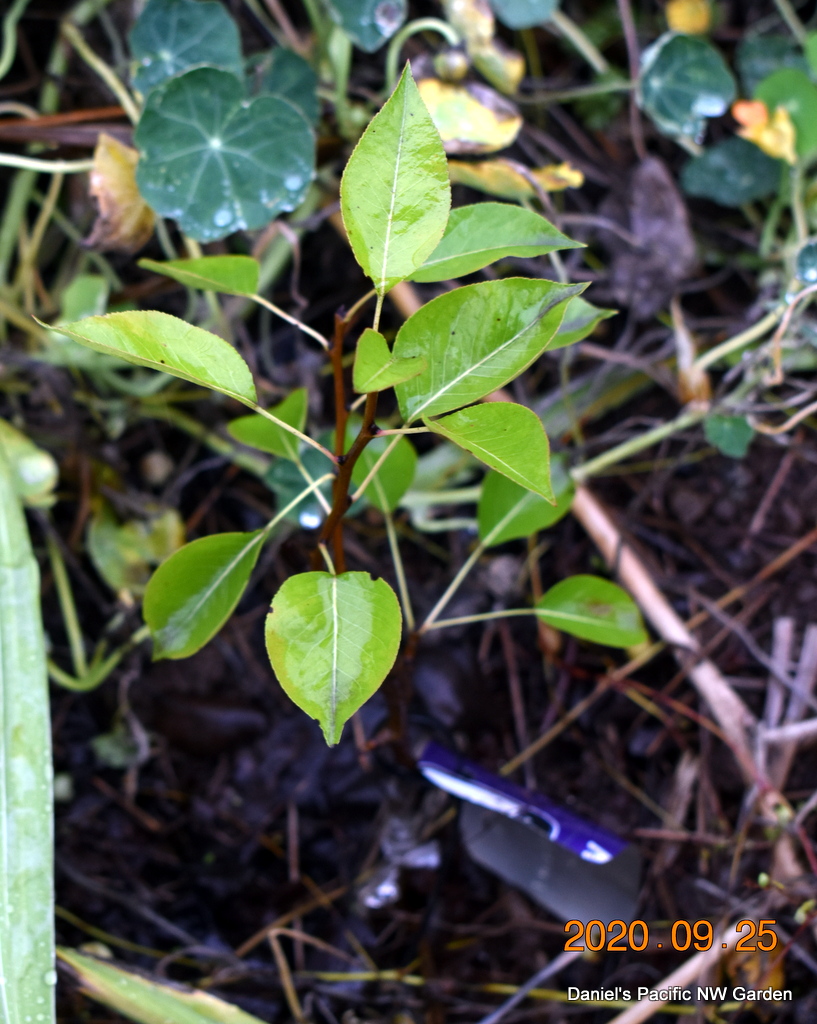
Here is how the mini-trees look now.  All are whips about 2 to 3 to 4 feet tall.  I did keep them in a spot where the pots would be shaded but the tops were in full sun; watered almost every day; gave some Miracle Grow a couple of times.

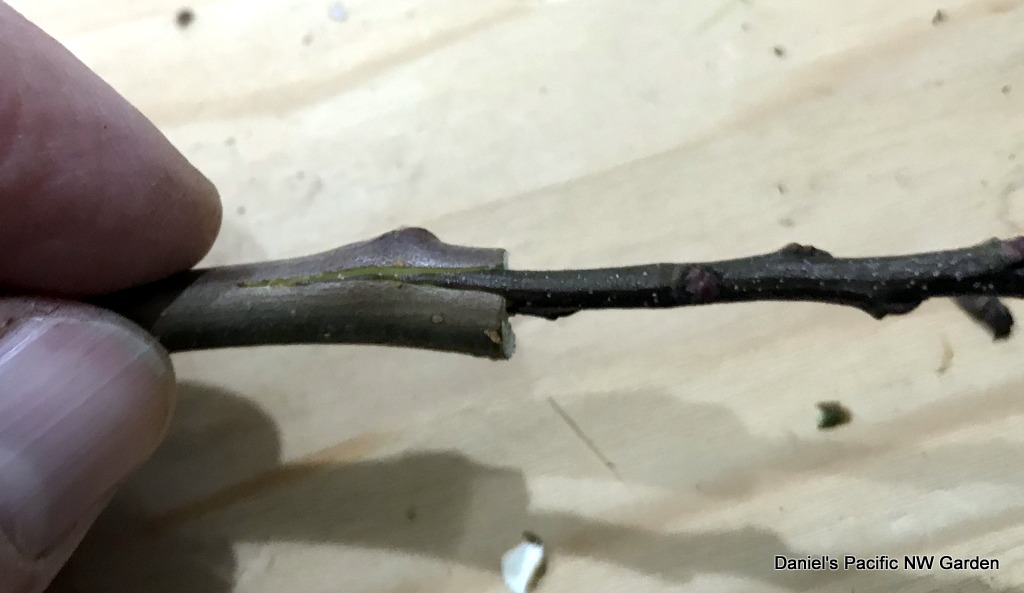
The graft unions healed nicely.  In a few years, this area won't be visible except with looking very closely.

That Co-op 32 apple cleft graft, which I was prepared to write off, did quite well too.  As well as any other.  That tree is also about a 3 foot whip now.  I'm very happy to have rescued that variety.  So I still have the original scion, in a way.  It's just on its own roots now.


 By the way, this is the lineage for Pristine (Co-op 32) apple, developed in 1975 by the PRI consortium and labeled Co-op 32 in 1993.


Next, these will need to be planted in the apple garden.  That can happen as fall and winter proceed.  Two raised beds will need to be removed, which might be after a frost.

I'm not certain yet about spacing.  I have a Liberty apple on M27 highly dwarfing rootstock, which at 20 years old occupies a space about 5 to 6 feet wide.  With closer pruning, it might be ok with the 5 feet spacing.  The wider the spacing, of course, the fewer I can grow and the more room they take, but I want them to have the space they need.

Doing this is inspired by the late Gene Yale from Skokie, Illinois, who had a very nice miniature tree orchard that he created over the years.  This was him in his back yard in 1997.  He used various distances between his trees, and pruned some smaller than others.


Sunday, September 27, 2020

Planting Garlic. 9.27.2020

Garlic is something I like to do on nature's schedule.  It's fall, late Sept.  Sept (preferably) or October is Garlic planting time for me.  That's why I was in a hurry to construct this raised bed, which meant clearing out the mess of snow peas, weeds, and their trellis that occupied that location (needed doing anyway), buying the parts, leveling the ground, putting it together, and filling the bed, including getting some soil.  Getting things is not easy in the time of Coronavirus, especially for someone who is at higher risk for complications.

 Anyway, all of that is done.  I planted Musik (or is it Music?) that I grew last year, the largest and among the best tasting garlic cloves and heads that I've ever grown.  Three reasons:  (1) Musik is a great variety, and very delicious. (2) Growing them in shelter.  All of those people who insist that deer and rabbits don't eat garlic plants are either just quoting someone else, or their deer and rabbits have not read that book.  Repeated munching and torturing of the photosynthetic biomass of growing garlic plants does not make for good production or big bulbs.  And (3) the raised bed situation makes for much easier weeding, hoeing, and other care.

I used a trowel with marked measurements, and planted with the bottom of the trench at about 4 to 5 inches.  I planted the cloves 6 inches apart, and the rows are a foot apart.  I think the raised bed allows for a little closer together planting compared to in-ground, but this is roughly what is done in-ground too.

I also dug up the few remaining bulbs that I had let mature their scapes.  I had planted those in Spring and didn't expect much from them.  Some of the books say they won't develop cloves if planted in the spring, but these made about four, average sized cloves.  I planted those here too, so now one row is from those salvaged garlic cloves, which is good.


 Almost everything else here can be done in the course of time over fall and winter.  It's a nice feeling to have this job, which I like, done.

Planting a Seedling Oak Tree From A Container. 9.27.2020

 Last year I rescue this seedling, squirrel-planted oak tree from somewhere.  From the leaves I'm guessing it is a Northern Red Oak.  It survived a root injury and grew about 8 inches.  This location is near the woodlot.  I stepped it out, the easement extends 30 feet from neighbor's fence, and this is 40 feet, so that should be OK.  There is a ginkgo tree a few feet from here, something killed it.  I don't know what.   I've had three ginkgos die on me, so I think it's the ginkgo tree and not the location per se.

In the container where I've been taking care of this little tree for a year.

I like to bare root my trees before planting them into the native soil.  There are a few reasons.  First, I get to inspect the root system.  Second, I can spread the roots around in the soil so there are no girdling roots.  Third, it's recommended by WA State horticulturalist Linda Chalker Scott, for these and other reasons - for example, roots tend to circle around in a hole that contains an nice potting medium whereas the surrounding soil is native.  Fourth, I think one of the issues with previously planted trees, maybe those ginkgos too, was that moles love the potting medium and dig through it, disturbing the roots and providing a route for voles, which eat the roots.   All of the trees that I planted during my first couple of years here, which I planted including their original potting medium, were severely disturbed by moles.  Since I started bare rooting them, that doesn't seem to happen, or not nearly as much.

This tree's roots look fine.  The damaged root is not 100% better but there is a lot of growth of the rest of that root, surrounding the injury.   There are also some new roots, thick and white, which is a good sign of root growth going into fall.

Planted into the ground.  It's a nice looking little tree.


This is on the deer all-you-can-eat salad bar route through my yard, so this tree needs protection.  I read that oak seedlings are eaten by deer.  I also added a plastic mesh with 1-inch openings.  Deer seem able to pull leaves through this more open, but sturdier wire fencing, so I use both.


Friday, September 25, 2020

Making some sourdough bread. 9.25.2020

 Today I made some sourdough bread.  I made two loaves - one a standard white bread, and the other a 1/2 whole wheat, 1/2 white flour with added sesame seeds, millet, poppy seeds, flax seeds, and sunflower seeds.  It's about a teaspoon of each type, but a tablespoon of the sunflower seeds.

I made buns from the white bread, instead of a bread loaf.  I used a cast iron muffin pan, which makes buns about the size of an English muffin.  There was some dough extra, so I used short, wide canning jars to make some additional buns. 

For sourdough starter, two weeks ago I decided to start a new "mother" batch.  I combined 1 tbsp four (organic, unbleached) with 1 tbsp water (well water, not chlorinated).  I used a 1 pint canning jar, let it sit a day, stirred in another tbsp each of water and flour.  I repeated that process for a week, then removed half of the mixture and mixed in 1/2 cup flour and 1/2 cup water.  After letting that sit overnight, I used 2 tablespoons for a starter, and poured the mixture into a quart jar containing 1 cup of water and 1 cup of flour.  That jar is now the "mother", which I keep in the fridge, use every few days for starter, and replenish with equal parts water and flour about once every two weeks, letting it ferment until frothy before putting back into the fridge.  This starter has a nice buttermilk flavor, and the bread comes out really nice.

These were baked at 375 F.  The items in glass needed 45 minutes.  The buns in cast iron needed 30 minutes.

These were quite good.  I think the white sourdough buns would be nice for a quick garlic bread.  I buttered one, and made a small sandwich with another.

The wheat and seeds bread was also very tasty, especially toasted and buttered.

Planting Garlic Bulbils. 9.25.2020

 This year I let a couple of the garlic scapes make bulbils.  I think these are the variety "Musik" but I'm not certain.  The bulbils were really tiny, like rice  I don't know if they will grow, but it's not a big deal if they don't.  

Here is one of the scape heads with bulbils.  It was raining, so they are wet.

I planted them about 1/2 inch deep, an inch apart.  It's roughly 50 per 4 foot row, so about 100 altogether. 


Now it's just a matter of keeping weeds out and seeing what they do.  I don't expect to see any growth this fall, but you never know.