The sweet cherries and pears are blooming nicely. It's chilly and rainy outside at the moment. I didn't stay outside very long. I have a bad cold.
This is a 5-variety pear tree. I played the honeybee, using a paintbrush, taking pollen from flower to flower. With compact trees, it's easy to pollenate several dozen flowers in 10 minutes. That's plenty. Pears require pollination from a different variety. With a multigraft tree such as this one, I can go from variety to variety without going from tree to tree. The pollen is a bit wet. I don't know if that's good or bad.
I found the label for the Asian pear combo tree. The varieties from bottom to top are Shinseiki, Yonashi, Hamese, and Mishirasu. One is missing, I think Yonashi. Stock is OHxF 97
Thursday, April 21, 2011
Saturday, April 16, 2011
Container gardens, early spring
The potato project was described yesterday. Here are a few others.
The mixed winter greens an vegetables are behind last year. Radishes, mesclun, spinach, lettuce, and some scallions from seed. They are starting to grow faster now. The chicken wire protect from kitty cat and squirrel doing their gardening. It works. I planted seeds more thinly this year. Less need to think them out now. The green onions have all been eaten. I recommend that everyone who likes early vegetables and loves green onions to grow Egyptian Walking onions. One of the stars of the early vegetable garden. I have many more in the ground. Some of those are too big to eat now, which is good. That means more for later.
Another of the barrel planters. "Inch by inch, row by row. Gonna watch my garden grow." Or in this case, "patch by patch." If I get ambitious I'll add tops to the barrels. That will let in light and warm them up more. That's if I get ambitious.
The potato project was described yesterday. Here are some of the other containers.
The strawberries are growing nicely. Each plant has several leaves. These were the bare root plants that I started 2 months ago. They looked near-death. Every plant survived and grew. I see that some have a few roots above the growth medium. I'll add another inch. Enough to cover the roots. Not enough to cover the crowns. The white spots are crush eggshells. I use them to add calcium.
Peaches are still blooming. I usually go out with a paintbrush and play the honeybee, pollinating the flowers. This year I'm not. There are usually way too many pollinated flowers, resulting in way too many fruits. Then they need to be thinned. Good peaches only happen if they are at least a hand width apart. That's a fat hand like mine. Maybe 6 inches.. That's for genetic dwarf peaches. If there is a lot of leaf curl, many if not all of the peaches are lost, and pollination was not worth the effort. The trees are lovely. If they did not have peaches, they would be sold purely as ornamentals. That is, except here in the Maritime Pacific Northwest, where ornamentals that get leaf curl are not needed. It lookes like the infestation could be small. It's on some leaves. Not all tips. Leave curl results in a very pretty appearance at this stage. The leaves have a maroon variegated edge and start to become curly. Evil is sometimes quite pretty. It usually gets worse as the leaves grow. Wait and see. Treatment now is not helpful. Maybe the midwinter copper spray was helpful. I try not to get my hopes up. It would be great if that method worked.
Friday, April 15, 2011
White Cherry, Harbinger of Spring
This white cherry is one of my favorite things about this house. I'm guessing it was planted when the house was new. That would make it 45 years old. The thick trunk suggests it is an old tree. This year it's blooming about 4 weeks later than 2010. I will need to prune dead wood from the top this year. That will be after bloom is over, and after the rains have stopped. Summer trimming reduces risk for rain-borne disease. Meanwhile, I can enjoy the tradition of oohing and ahhing over the double white blossoms. Under the tree, daffodils are blooming, ferns are starting to unfurl, and hostas are beginning to poke through the mulch. I avoid disturbing the soil. Except minor planting and cleanup. Soil disturbance would hurt the tree. I did spread some chicken coop cleanings around the tree this winter, to give the tree s nutritional boost. Not much, just a thin layer. Then mulched with bark nuggets. It's a low maintenance part of the yard.
Potato barrels 2.0
I just finished reading the book, "Potato, A history of the Propitious Esculent", by John Reader. The potato has a fascinating history. They started in the Andes, in Peru, Chile, and Argentina, and were one of the first plants to be domesticated. They fueled the Inca empire, but Spanish invaders destroyed the Inca civilization. I guess throwing potatoes isn't as effective as horses, metal weapons, and smallpox. The potato then used the Spanish to spread itself around Europe, and the world, fueling population explosions and all sorts of history. All of which inspired me to become more ambitious about potato barrels. The starts that I planted in January grew above the soil line, frosted, and looked dead. I gave up looking. Yesterday I saw they have sent out new shoots. About half survived. They have healthy-looking, thick, dark green leaves on stout stems. They are barely above the soil line. There were some remaining spaces. I bought a tiny bag of chitted potatoes, "Satina" variety, and planted the empty spaces with starts. Satina is a small, oval, yellow fleshed, nice looking potato. The bin at the plant store only had a few remaining starts, but that's all I wanted. The starts cost 30 cents. Feeling ambitions about growing potatoes in barrels, and with good experience last year, I wanted to add more. I found this plastic container for $7.99, much, much cheaper than the wooden containers and should last as long or longer. It might over heat, mid summer, but I have a plan for that. Apply shiny foil to the outside when it starts to become hot. That will lower soil temperature by 10 or more degrees, from my measurements a few years ago. Meanwhile, the dark plastic should soak up some heat and might speed early growth. I got out the electric drill and drilled about a dozen 3/4 inch holes in the bottom for drainage. Easy. Then added about 6 inches of potting soil. I planted a different variety, "Carmine." According to the clerk, carmine is red inside and out. I could not find information on this variety on the internet, so we'll see. I covered with about 3 inches of potting soil. When they grow to about a foot tall, I'll add anouther 6 inches, and repeat when they grow another foot. It's hard not to plant too many. These are spaced about 9 inches apart. That might be too close for optimum growth, but is a little further apart than last year, and they did fine. Looking at my blog last year, I'm about 5 weeks behind planting the potatoes. The trees are blooming late too - maybe 3 or 4 weeks late. I think they will still do fine.
Tomato seedling progress report.
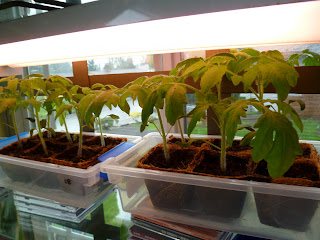
Here are the tomato seedlings now. Amazingly fast. Now I'm concerned they will get too big before planting outside. I'll figure something out. I'm thinking about making some cloches, but I might get out the "wall-o-water" units instead. They are more trouble but they work really well. These are SuperSweet 100, in a south window, with a fluorescent desk lamp for supplemental light. They are more compact and look sturdier than the other plants. That might be due to the lamp, the South window setting (rain rain rain clouds clouds clouds) or the variety. The little seedlings stretching toward the light are the many year old.pepper seeds, I planted thinking they would not germinate. I need to juggle plants around so they get more light.
The roots grow very easily through the coconut coir pots. It's almost like there is nothing there. I've always thought that pressed peat pots were not so root friendly, so did not use plantable pots. The coir pots have changed my mind. Even so, the tomatoes need to be up-potted, so this time I'll use the plastic pots. I'm concerned that roots will dry out when sticking out, and the coir pots become soft and might break easily when wet, especially with the larger size / heavier soil. I up-potted the SuperSweet 100 seedlings into plastic pots. Also one of the slicing tomatoes. It's only 48 outside now. Against the house, I think it's warmer, and not in the rain. I'm setting them outside in a sheltered, south-facing spot. This will start the hardening off process. I will bring them inside at night. Now in the "sun" (if you can call it that, rain rain rain) the differences are more apparent. Supersweet 100 from the South window, desk-lamp are stout, dark green, compact plants. Slicing tomato from east, grow-lamp are lankier, lighter green, a little floppy. Not scientific at all. I think the difference is the laps, with the desk lamp being much brighter.
Sunday, April 03, 2011
More seeds
Getting a little excited about the tomato seedlings, so I started some peppers as well. These were old seeds, no way to know if they'll grow, except to germinate them. Some date back to 2006. The newest are dated 2008. Varieties included "Bulgarian Carrot", "Big Red" and a Cayenne pepper. I planted 3 seeds per pellet, 2 pellets each, so if one of 6 grow, I get a plant. If they don't germinate, it's not a problem. There will be plenty of plants available at the nursery in late May, which is when they go into the ground. I planted the seeds in the same coconut-husk pellets that I used for tomatoes. Better pic here of the cups I up-potted the tomato seedlings in, same manufacturer as the pellets. The pellets are called "Planter's Pride." The cups are called "Fiber Grow" and website is www.saveourpeatbogs.com I like these. The tomato seeds started at least equally well to starting in peat. Compared to peat, the product seems a little less hydrophobic, allowing better hydration. The pots are more porous than peat pots. I don't know in the long run if that's good or bad, but so far they seem no worse and possibly a little better than peat-based products. So far, "like".
Tomato Seedlings
Still struggling with computer programs. The editor that I bought seems to automatically remove pixels, and the photos are less crisp. My review at the momenr of "Phot Explosion" is that it sucks. So, I downloaded Picasa, which is easier to use, and free, but removed all of my cropping. I also worry that, being from google, it might upload onto the internet without my knowing, or collect information. Plus, this program now unedits some of my edits. Damn programmers..... but here we are. Here are the tomato seedlings in their original "pellets". The pellets are coconut-based fiber, much mroe environmentally friendly than peat. They worked really well. The seedlings are 2 weeks from bare seed. Amazingly fast. It's still not too late to start tomato seeds here - about 6 weeks from time to plant outside. I may start some peppers now. They go in even later. These were all old tomato seeds, up to 6 years old. They all sprouted. Roots are sticking out of the sides, as long as an inch outside the pellets. Time to replant them. This is the coconut-fiber based product I'm using for plantable containers. I've placed a couple of spoon-fulls of organic potting soil into the containers, then added the tomato seedlings, still in their pellets. I've added more organic potting soil to fill in around the pellets, then covered them as well, then watered them in. Here is the lighting setup that I'll use for a few weeks. It doesn't seem as bright as last year. Maybe the bulbs need time to warm up. Or need replacing. They are 20-watt bulbs. Gardening blooks usually call for 40-watt, but these are half as long, so half the wattage. I added some foil to reflect light back onto the seedlings. The plnats are only a few inches from the bulbs. The short distance maximizes the impact of the lights. They are cool bulbs, so no concern about burning. They do warm the air a little, which is beneficial. Overall I'm pleased with the seedlings. I did not order new seeds at all this year. Except the coconut-fiber pellets and pots, I did not buy new supplies. The plastic contaners are old. I may size them up one more time, this time into plastic pots, when they outgrow the current containers. The seedlings are all varieties that I like: Lemon Boy (favorite #1), Better Boy (favorite #2), Cherokee Purple (favorite #2), Black Krim (favorite #3), Supersweet 100 (favorite #4), 4th of July (second chance at becoming a favorite, pretty good last year and produced before the others). I have 3 plants of each variety, so 15 plants total. They will go into 3 beds of 5 each, more or less. Last year was a bad tomato year, partly climate and partly I was overworked and could not tend them. This year is already starting out better.
Thursday, March 31, 2011
Mission Impossible: But it will be done.
Eradication of 3 of the worst invasives in my yard. Fortunately, none of them were started by me. Each year, I try pulling them out. Even one or two remaining leads to repopulation with these obnoxious weeds. When I pull them up, the rhizomes break, and new plants grow form the nodes. They re-seed like crazy. OK, I'm tired of this endless futile battle. This year, 2011, I'm declaring war. Lemon Balm. The yard was full of them 9 years ago when I bought this house. I made the mistake of leaving a few plants. Unfortunately, they grew and spread new plants all over the yard. This year, I am using Worry Free, an organic weed killer. Has a nice citrus scent. Every time I see a Lemon Balm plant, I spray again. They are dying off. I will continue to seek and destroy them. By summer, there will be no more. Canada thistle. Not as bad, but pulling them out doesn't kill the parent rhizome. One side border now has lawn, trailing around fruit trees. Repeated mowing will do the job. As it turns out, Worry Free quickly kills the new sprouts. I don't know yet if the plant carries the substance into the rhizome, but I have confidence that repeated killing will remove this pest from my yard for the first time in 9 years. Goutweed. This is the worst. Invasive as hell. The chickens love to eat it, but leaving any for them results in re-infestation. Areas that I have cleared are highly reinfested again. Repeated applications of Worry Free don't seem to kill the parent rhizome. Digging results in spreading of rhizomes. I hate to say it, but if no improvement with repeated applications of Worry Free, I may resort to Roundup. Not my favorite thought, but some organic authors don't have problems with roundup, which is biodegradable, and my use will be very limited. That's if I use it. This damn plant has got to go. In addition, I have ambitions to remove English Ivy, Himalayan Blackberry, and Garlic Mustard Weed. This last was a "gift" "nice groundcover" that I accepted and planted in ignorance. The infested area is relatively small, so I should be able to remove it. Again, digging doesnt work, so more Worry Free. The ivy and blackberry will have to be pulled out.
Intergeneric orchid Stefan Isler
Subscribe to:
Posts (Atom)