Sunday, May 15, 2022

Planting More Squash Seedlings. 5.15.22

 I planted more squash seedlings in their final locations.

This is a Galeux d'Eysines.  The roots quickly start winding around.  Squash seedlings roots are delicate, so you want to get them planted ASAP.


Fortunately they are very early in their winding around, so it just took slight untangling to point the roots outward.


Now planted outside:  All three Galeux, both Costata Romanesca, and one Fordhook zucchini.  Here is a Costata:


I will need to set up deer protection for the ones outside the fenced garden.

I also gave away a zucchini plant "Sure Thing", a summer squash plant "Saffron", and two Red Kuri squash seedlings.  Now remaining for me to plant are three seedlings of Burgess Buttercup, three of Uncle Dave's Dakota Dessert Squash, one Saffron summer squash, and two or three Honeynut.  Not sure where I'll plant them, but if Honeynut has small squashes, it might be a candidate for a trellis.

Saturday, May 14, 2022

Planting Squash Seedlings. 5.14.22

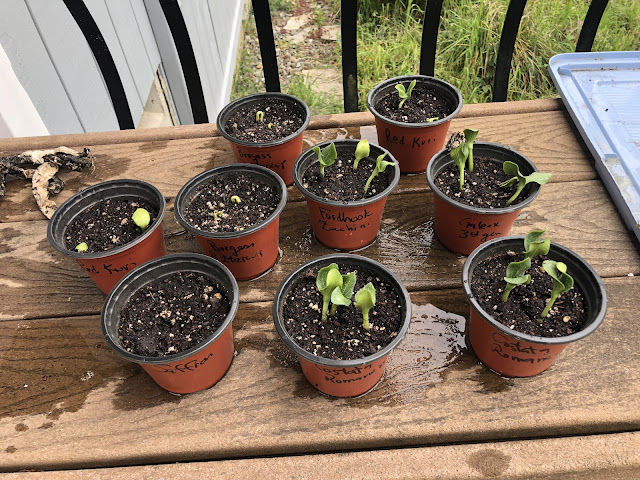
 So far, the squash seeds that are growing are, Costata Romanesca, Fordhook Zucchini, Galeux d'Eysines Pumpkin, Uncle Dave's Dakota Dessert (Buttercup type), Red Kuri, Burgess Buttercup.   I think there are signs of life with the Honeynut, Saffron, and Sure Thing Zucchini.  Two will be given away, and I need to plan where to plant the others so I don't confuse myself.

I decided the two buttercup types will replace the massive Pink Banana and Illinois Squashes this year.

I may plant the smaller bearing Honeynut Squash against a trellis, for space conservation.


Squashes grow fast.  I need to get them into the ground within a week.  Here is the first of the Galeux d'Eysines, which was all I could plant before rains resumed.


Irrigation for Tomatoes,1 gal/hr Emitters. 5.14.22

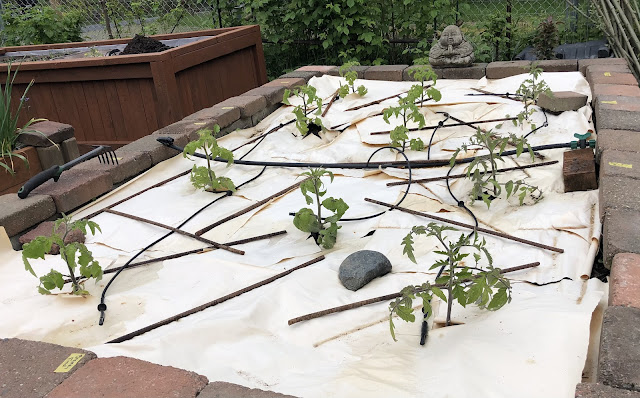
 I set up the irrigation system for the fresh tomato raised bed.  First, I arranged the lines on top of the kraft paper mulch, so I can see if they work.  The 1/4 inch lines are re-used from last year.  I used new emitters because of concern they could clog from a season build-up of minerals.  Plus, some broke when I took apart the lines to build the beds.


Here is a video showing the flow.


Thinking about how much to use.  When I use the watering can, one full can is two gallons.  I use roughly one full can for four plants, at a time.  Depends on how hot and how big they are.  That's about 1/2 gal per plant.  That would mean let the system run for 30 minutes for a similar amount.  The paper mulch will reduce evaporation and soil drying, so I may get away with watering less often.  I can always check soil moisture.

After the test run, I shifted the emitters to be under the paper.  Now the irrigation system is completed for this bed.

I still need to add paper mulch for the onion bed, then plant sauce tomatoes and install emitters and mulch for that bed.  In a couple more weeks, I'll do the same for the chili pepper bed.  Also, I'll install a branch for squashes which will be in ground.  Last year I watered them by hand, which was a major effort.

It seems like a lot, but the advantages are significant.  First, with about 20 tomato plants, at least 1/2 gallon per session, that's about 5 trips with the full watering can per day or every other day.  I think it's actually more.  For the onions and garlic, or beans when those are done, it's another approx 4 trips per bed, and 4 more for the large planter box.  So that's roughly 25 watering can trips per watering session.  Or the hose, which is a lot of difficult lugging the hose around and standing out in the heat (or smoke, if we get a bad fire season.  Hope not.).   It's also a major water savings over using a sprinkler system.

Thursday, May 12, 2022

Potato Bread. 5.12.2022

Today I made bread using a mixer with dough hooks, for the first time.  Part of my drive down the nostalgia highway.  I used the recipe in the old Mixmaster cookbook.  The recipe was for potato bread - Mashed potatoes, water, egg, flour, a little sugar, a little salt.  The mashed potatoes were made with potato flakes, water, milk, butter.

It was very nice using the mixer to knead the dough.   I mistakenly left out the egg and sugar until after kneading, so added them and kneaded a bit longer, adding a little more flour.  Not as easy as if I included them before kneading but the loaf still came out great.


The loaf was delicious!  It had a great rich flavor, nice crust, slightly chewy texture.  Nice old fashioned home made bread.  

I never wanted to use dough hooks - sort of takes the baker a bit away from the dough.  But, I thought the process was kind of empowering.  Kneading by hand is too much work now.  Cleanup was easier too.

I could easily see going another step further, and making the mashed potatoes from home grown spuds from the June harvest.

Making Garden Mineral Supplement Using Chicken Bone & Wood Ash. 5.12.22

 In addition to eggshells, I make garden mineral supplement using wood ash and chicken bone.  I am vegetarian, and all of the bones come from the dog food I make for Rufus, which uses chicken thighs.   My calculations from the few articles that I could find about chicken bone ash, is that Calcium content is about 68% and phosphorus content is about 29%.  Wood ash is more complicated, varies by tree species and probably where it is grown.  From Wikipedia, calcium content can vary from 25% to 45%, less than 10% potassium, and less than 1%phosphorus, with the rest being trace minerals.  

By my tests, my garden soil is deficient in calcium, phosphorus, and potassium.  So I supplement.  Growing crops removes a lot of those elements, which go into the plants and the food products.

I dry the chicken bones same same as I do eggshells.  They are already slow cooked overnight in the process of cooking for Rufus' meals.  I haven't been using the woodstove much, but today was chilly so I made a fire and added a big batch of bones.


After the fire burns out and cools, I collect the ashes and spread on the garden soil.  It's a dusting, not a thick layer. I prefer doing that before planting anything in that area and letting it mellow a week or more.  In the past I tried just burying the bones, but sometimes they don't break down and I find them when  cultivating.  Burnt bones are mostly fine ash, and the ones that are recognizable are brittle and crunchy like potato chips, and disappear when cultivating.