In July, we picked about 6 pounds of pie cherries from the backyard orchard. I made batches of pie filling, which I froze in zipper lock freezer bags. Yesterday I thawed out a package and made a pie. The crust is a standard Butter Flavor Crisco based crust. Can't beat the flakiness and flavor, although I should probably try oil crust again.
Tuesday, September 15, 2020
Quilting Project. 9.15.2020
With unrelenting, health-threatening, wildfire smoke filling the air, the advisories are to stay indoors with air filters running and a/c on. The coolness actually kept the garden from drying out, so I have not had to water. Will wear a filtration mask today and check.
Meanwhile, I worked on the quilt project that I posted 9.6.2020. The first steps are in that post. The method and overall pattern are from Ruby Star Society. My take on that is using batik strips that I bought via Amazon, one roll of muted blues and sandy colors, and one of rainbow colors. For some panels, I arranged the rainbow colors based on the pride and inclusion flag. For other panels, and mixed them with the sandy beach colors, and for some panels, it was all the seashore blue and sandy tan colors. I also added a strip from left over batik fabric I bought to make an Aloha shirt, which I also used for making a mask. That way, more of a part of my life now, is in this quilt top.
I will need to edit this post later. The blogger platform isn't designed to do on I-pad / Firefox browser, what I want to do. (Edited 9.15.2020. The lap top works better than I-pad, although it's still not a perfect process. That may be because I use Firefox browser.)
After deciding which colors went where (and arranging and rearranging, and then arranging and rearranging), I sewed them into panels. I sewed the strips into pairs, then sewed the pairs together, until each panel consisted of 10 strips.
Then I ironed the seams flat, toward the darker patterned fabric side. Then I evened up the squares, and trimmed to make as perfect square as possible. Mine were all 18 3/4 inches on each side. I also measured distance between opposite corners to make sure those were all equal. I think in the linked instruction, they are 20 inches on a side, but mine came to 18 3/4. That may be due to different size of fabric strips.
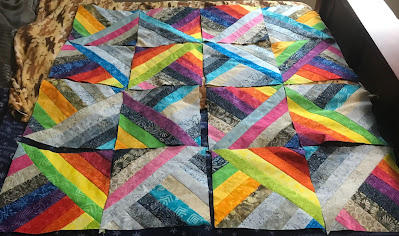
Here they are, all ironed and trimmed. I think the quilt starts to feel like it will really happen, now.
Then I paired up the squares in combinations that I liked, with no two pairs alike. That some thought and arranging and rearranging and more thought and more arranging and more rearranging. In each set of squares, one panel is at 90 degree angle to the other. That arrangement is necessary for the final flying kite or butterfly appearance of this quilt pattern.
After sewing the squares together, there are four sewn panel sets. Then, after more measuring, I cut the sewn squares corner to corner. These triangles open to form new squares.
I opened up the cuts, which are now squares with stripes in two directions. Then I ironed the seams flat. Each square panel is different from the others, because the patterns self-assemble somewhat into new arrangements.
Now I arranged them, and rearranged them, then went away, then returned and rearranged so more, to come up with an arrangement that I liked. I had to use the bed because I don't have a table this large. Each row has at least one rainbow, as does each column. I tried not to have the same pattern or color combination in one panel adjacent to the same pattern in the adjacent panel, although that is difficult to accomplish. The result is a pattern that looks "random" but actually is very much intentional and planned. I think more rainbow would have been too much, and less would have been not enough. So I think equal parts rainbow colors and blues/tans works pretty well.
Next, I will sew these panels together to make the quilt top. I think it will need a batik border too, primarily grey or tan, and a mostly black binding.
Saturday, September 12, 2020
New Face Masks. 9.12.2020
I still use the home made, pleated masks that I have been making. They are not a perfect fit on the sides. Also, the sewing machine has some challenges with the multiple layers of the folded pleats, and sometimes skips stitches. It probably doesn't help that I added a light, nonwoven interfacing as a liner, and the inside fabric is cotton kitchen towel, which some studies showed to be very good as a viral filter.
This pattern is quite different. The fit is much better. I made one that had ripstop pants fabric as the outer layer. The mask looked great, very professional, but it wasn't breathable, which is a problem. I made these new masks with batik cotton quilting fabric outer layer, light interfacing liner, and kitchen towel inner layer. This filters smoke very well, and is breathable but probably the upper limit to how thick I can breath through comfortably. This makes a good mask for both wildfire apocalypse and coronavirus apocalypse. I'm not sure about plagues of locusts, frogs, or zombies.
I'm having a difficult time loading photos. I'm using Ipad. If they don't work out, I'll need to edit later. (Edited 9.15.2020)
I cut to the downloaded pattern from the link above. I ironed the interfacing onto the inside aspect of the batik fabric, before cutting.
I followed the article instructions, pretty much to a T. It was very straight-forward. I used two food bag twist ties to make the metal nose strip, which is sewn inside the mask before final assembly. I also used polyester shoestring for ties, cutting to fit and sealing the cut ends with a butane lighter, so they don't fray.
This mask has an excellent fit. It seals much better at the sides, compared to the pleated masks that I was making. Those mask pleats were also difficult to sew, whereas this mask doesn't have pleats, so no problem.
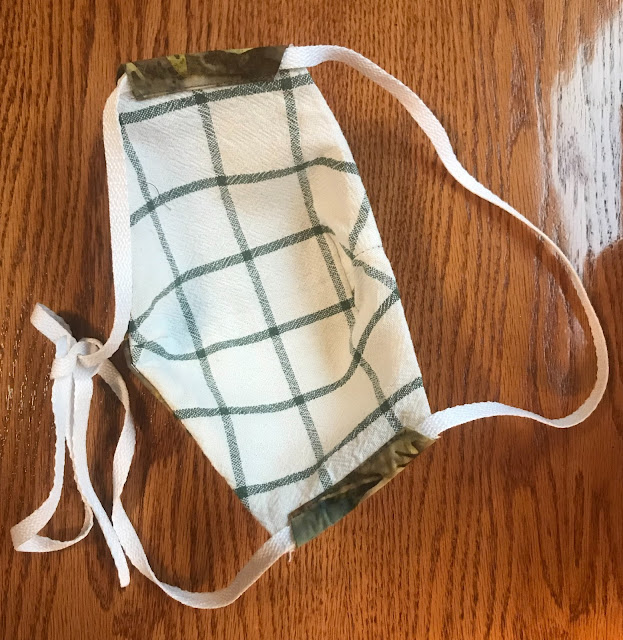
The inside of the mask, showing the tea towel fabric. That is quite comfortable. I think these masks filter out a lot of the smoke particles in the current Pacific NW worst-air-quality-in-the-world situation due to wildfires. I feel much less short of breath and lung tightness when wearing this mask outside, compared to not wearing it.
Fire and Smoke Season. 9.12.2020
The Pacific Northwest is becoming less amenable to the old ways of the temperate, evergreen rainforest, and more inclined to be chaparral. There is probably no sense in denying that, even if we mourn the lush, beautiful forests and humane climate. Just as a person goes through stages of life, that can't be reversed, so is this region and much of the planet. This change should not be news to anyone - as a species, in many cultures, continents, faiths, and economies, humanity has made this choice. The information has been out there for a generation. So we need to adapt to what we have created.
The fir trees, spruces, pines, can't survive this dry climate. They turn into tinder, and burn explosively across the vast forests. This is also not new, although it's much more extensive now and the effects and dangers are much greater.
I'm all for trying to stop the human contribution to climate change. I re-purpose, up-cycle, repair, restore, reduce, and try to be thoughtful about my decisions. I am also realistic regarding the futility of one caring person's effort, like a poppy seed in the cosmos. I still do it, but I know - the corporations, the populists, the teeming developing mega-nations - they won't change.
So we also have to thoughtfully adapt. You really can't intelligently live in a forest fire zone, and have a house nestled among towering fir trees, no matter how pretty and cozy it is. That will become a spreader event for wildfires. You can't have evergreen "landscape cushions" up against the house. Or directly under fir or pine trees (I have a couple like this. They will be cut down soon). When it comes time to plant new trees, it's important to look into whether they are potential torches, or possibly fire retardant. It's also important to evaluate the water needs of what you plant.
There is no perfection. One can only evolve, be thoughtful, and continue trying.
A list of fire resistant landscape plants.
I think, in general, conifers are fire promoting. Some eucalyptus are as will, but I'm not sure about others. Deciduous trees are less so, although if they have died with leaves on the tree, or under the tree, yes, they will burn too.
A list of fire hazard plants. This is from Marin, so a little different climate but with similarities to what we are becoming in the Pacific NW.
A much longer list from Ashland. Fire resistant plants.
I had the most likely to burn trees removed earlier this year, but I can't tell neighbors what to do. Theirs are clearly a wildfire risk. There are a few shrubs to remove if the current wildfires don't come and do it for us.
The view now. I-phone does not pick up all of the yellow color. Everything looks jaundiced. The county health department says, stay inside. Fortunately we have what we need. I have a bug-out bag in the car, with emergency supplies, meds, and very few, small sentimental items.
Sunday, September 06, 2020
Next Quilting Project. 9.6.2020
I made some curtains for the kitchen and did some clothing repairs. I have the fabic to make a shirt - a dark batik. However, now I think I want to start a quilt. It will be raibow colors, mixed with beach colors (blues and sandy browns), in triangles. First, sewing together the stripes that will be cut into triangles once done.
I arranged the strips into the approximate pattern that I want, then rolled them up so they won't get mixed up again.
I'm not sure that I like buying the pre-selected bundles of strips ("jelly rolls"), sight - unseen. You get what they send. You have to make something that will utilize those strips, since they are already cut 2 1/2 inches wide by (I think) 44 inches long. I have not calculated the price per yard, but I have a nagging feeling they cost more than buying by the yard. The advantage is that you get lots of colors and patterns, so maybe don't have to buy as much.
I don't know what this method is called. It starts with sewing together 10 strips, in the desired order, to make larger squares. Then trim the squares, pair them facing together at 90 degree angle, sew them together, then cut at 45 degree angles to make 4 new squares, each consisting of two color combinations. I'll show as I go, which will be slow.


