
Showing posts with label pie. Show all posts
Showing posts with label pie. Show all posts
Sunday, October 30, 2011
Apricot Pie
Friday, October 01, 2010
Peach pie from home grown peaches! Yum!
There were enough peaches remaining on the tree for a pie. So I made one.
I did not hve success with fresh peach pie last year, so I did more research. The techniques that I think made this one work were using a quick boil the chill to remove the skins, and adding lemon juice to the peaches to prevent browning. I prefer that pies not be too sweet, so the amount of sugar is small. Others might want to lat least double the sugar content.
 Some ripe peaches. Home grown organic fresh peaches, right off the tree!
 Quick dip in boiling water. Just one minute.
 Then a quick dip in ice water. One minute, again.
 Then just rub the skin with my thumb, and it slides right off. Who knew it would be so easy!
 Then slice up the peaches, and quickly add 2 teaspoons of lemon juice, and mix to coat the peach slices. The lemon juice prevents browning of the peaches.
 Now I added 1/4 cup sugar, 3 tbsp quick cooking tapioca, 1/8 tsp salt, 1 tsp cinnamon, and 1 tablespoon of olive oil. Most recipes call for butter, but olive oil is healthier and I don't need the extra buttery flavor.
 It's all mixed together. Now let it sit 30 minutes. As it happens, it takes about 15 minutes to make the crust. This is the same as my other olive oil crusts in this blog, including the lemon juice for extra flakiness.
 Forgot to show the mix in the pie shell, but it looks the same as the mix in the bowl. Added the usual foil, baked 40 minutes at 375. This time the edges didn't brown at all, so I took the foil off at 35 minutes.
I liked this pie best cold. A bit more sugar would make it more appealing for people who like a sweet pie. I can't believe I know how to make a peach pie! It was great!
Monday, September 27, 2010
The "Best" vegetable pies ever!
Last week I drove past a sign that proclaimed, "Estate Sale". I am required by forces of nature to stop at estate sales, and did so. The lady whose estate was being sold had a number of nice pyrex glass baking dishes, including some 8 inch pie plates. Thinking that an 8 inch pie must be less fattening than a 9 inch pie, I bought the 2 8-inch pie plates.
It's not allowed to buy a pie plate without baking a pie, so I promptly did so. In fact, I made two. These are variations on a theme, vegetable pies with a cream-of-something based sauce.
This is the pie crust recipe here. I've made a change that I like. I add 2 teaspoons of lemon juice to the mix. I think this makes for a fluffier crust, something to do with the effect of the citric acid on the olive oil while baking. In fact, it starts to rise before it goes into the oven. As it happened, this made enough crust for both 8-inch pies.
 I washed and sliced the cauliflower, placing chunks in the pie crust. Then I added about 1/2 cup of sliced mushrooms, sauteed in olive oil, and 1/2 medium onion, also sauteed in olive oil. That saute really brings out the flavor. Then, placed chunks of sliced garlic throughout the pie, and peppered it with pepper (duh).
 Similar for the broccoli pie, except I didn't saute the mushrooms. Instead of garlic, I placed sun dried tomato slices through-out the pie. This pie also contains sauteed onion, about the same amount as the cauliflower pie. Then I peppered it with pepper, too.
 Now each gets the sauce. No particular reason for which one got which sauce. FOr the cauliflower pie, I mixed one can of condensed cream of mushroom soup (low calorie) with 1/2 cup of water and one egg, then poured into the pie plate. ALMOST too much, but it did fit. For the broccoli pie, I did the same thing, except using cream of potato soup. I did that because that's what I had on hand. This was too much for this pie, so I spooned out enough to keep it from over-flowing, and placed the extra amount in a small covered dish, sprinkling bread crumbs on top. Basically, a mini casserole.
 They both look the same now. I covered the edges with foil, as usual. I keep using the same foil for edges until it crumples. Waste not want not. Then baked 375 degrees for 40 minutes. Did not remove the foil from the edges, I don't think that's needed.
 You can tell it's done because the crust has browned slightly, and there is filling bubbling up through crevices. I let it cool, and ate a slice. These were both really, really good. The sun dried tomatoes added a great flavor to the broccoli pie, and by using sauteed mushrooms and onions, the cauliflower pie had a rich, complex flavor. I ate much of the broccoli pie cold, but I liked the cauliflower pie better hot.
These are like a pot pie, but I like them a lot better. Plus, I can select what goes into them, and I think these are healthier due to the olive oil crust, and the fresh vegetables.
What came from the yard? Just the eggs and onions. If I have enough peaches or apples, maybe a fruit pie is next.
It's not allowed to buy a pie plate without baking a pie, so I promptly did so. In fact, I made two. These are variations on a theme, vegetable pies with a cream-of-something based sauce.
This is the pie crust recipe here. I've made a change that I like. I add 2 teaspoons of lemon juice to the mix. I think this makes for a fluffier crust, something to do with the effect of the citric acid on the olive oil while baking. In fact, it starts to rise before it goes into the oven. As it happened, this made enough crust for both 8-inch pies.
 I washed and sliced the cauliflower, placing chunks in the pie crust. Then I added about 1/2 cup of sliced mushrooms, sauteed in olive oil, and 1/2 medium onion, also sauteed in olive oil. That saute really brings out the flavor. Then, placed chunks of sliced garlic throughout the pie, and peppered it with pepper (duh).
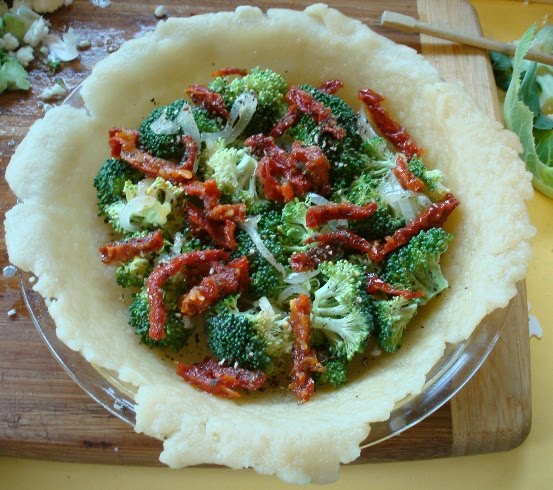 Similar for the broccoli pie, except I didn't saute the mushrooms. Instead of garlic, I placed sun dried tomato slices through-out the pie. This pie also contains sauteed onion, about the same amount as the cauliflower pie. Then I peppered it with pepper, too.
 Now each gets the sauce. No particular reason for which one got which sauce. FOr the cauliflower pie, I mixed one can of condensed cream of mushroom soup (low calorie) with 1/2 cup of water and one egg, then poured into the pie plate. ALMOST too much, but it did fit. For the broccoli pie, I did the same thing, except using cream of potato soup. I did that because that's what I had on hand. This was too much for this pie, so I spooned out enough to keep it from over-flowing, and placed the extra amount in a small covered dish, sprinkling bread crumbs on top. Basically, a mini casserole.
 They both look the same now. I covered the edges with foil, as usual. I keep using the same foil for edges until it crumples. Waste not want not. Then baked 375 degrees for 40 minutes. Did not remove the foil from the edges, I don't think that's needed.
 You can tell it's done because the crust has browned slightly, and there is filling bubbling up through crevices. I let it cool, and ate a slice. These were both really, really good. The sun dried tomatoes added a great flavor to the broccoli pie, and by using sauteed mushrooms and onions, the cauliflower pie had a rich, complex flavor. I ate much of the broccoli pie cold, but I liked the cauliflower pie better hot.
These are like a pot pie, but I like them a lot better. Plus, I can select what goes into them, and I think these are healthier due to the olive oil crust, and the fresh vegetables.
What came from the yard? Just the eggs and onions. If I have enough peaches or apples, maybe a fruit pie is next.
Saturday, February 27, 2010
Here is the rest of the Apple Pie
I've been informed that I did not publish the rest of the apple pie, as I said I would 2 weeks ago:-) here it is.
Crust recipe here.
This was a 9 inch apple pie.
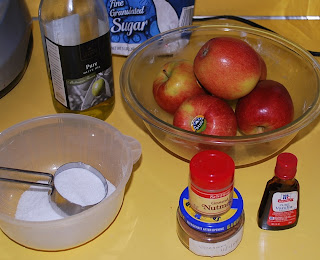 I used 4 large Braeburn apples. I sliced 5, but that was too much, so I ate the 5th.
 Filling is:
3/4 cup sugar (I used 2/3 cup, not as sweet)
1/4 cup flour
1/4 tsp nutmeg
1/2 tsp cinnamon
dash of salt
6 cups thinly sliced baking apples (Braeburn is good, or Jonathan, or MacIntosh.
2 tbsp olive oil (Recipe calls for butter. I don't miss it, olive oil is healthier).
1 tsp vanilla.
I added the vanilla to the sugar, mixed them together, then ran the mixture through a sieve to make it granular again. I like having vanilla in the apple pie.
 I layered the apples into the crust, a layer of apples, then a layer of flour mix, then a layer of apples, then a layer of flour mix, then one more layer. Then dribble the olive oil on top of the mix. Some bakers mix the apples and flour mix, then pour it into the crust. I think either is OK.
 Covered with top crust, a few holes punched with a fork. My mother had a special "pie ventilator" device that cut little designs into the top. I've never been able to find one. Even though a fork does the job just fine, using the device would be more nostalgic. I guess I'll have to settle for using her maple rolling pin.
 Foil to keep the edges from burning. I find this works better than the aluminum guard that I bought. The foil gives better coverage. It can be reused multiple times, and I do.
 I bake 425 X 15 min then turn the oven down to 375 for 40 minutes. The recipe calls for 425 the entire time, but in my oven that's too much.
 The recipe came from my mother's cousin, Pearl's Betty Crocker cookbook, 1969, but I made enough changes that maybe it's my own. I decreased the sugar as noted, added the Vanilla, and decreased the nutmeg because the higher amount in the original recipe gave me heartburn. I might eliminate it altogether. I also changed the butter to olive oil, as noted, and used the olive oil crust.
Today I actually made a rhubarb pie - no photos today, but photos and recipe are here (page down, also not in correct order) except that I used the olive oil crust and forgot the oil (butter). We'll see if that makes a difference. With oil in the crust, it may not. I also left out the lemon juice - forgot to buy some. I also found an error in the recipe - didn't say how much rhubarb - so I corrected it. Wow! Home grown Rhubarb pie and it's not even March yet! It was redder than last time, probably due to the young stems.
Looking at the older photos, the sauce in the pie looks watery. That's because it was sliced when hot. It gels when cool. We like eating ours cool anyway, the flavors seem to blend together better.
Some bakers use tapioca starch in pies. I keep forgetting to buy some. Tapioca starch apparently makes a better gel in the pie filling.
Thursday, February 04, 2010
Olive Oil Piecrust
Last week I dreamed that my Mom made a pie. I don't know why - my Dad was the real pie maker.
Anyway, we do need ways to use the fruits and vegetables that we grow. The pie shell is universal - use your eggs in it when making a quiche or vegetable pie, or use your fruit to make a dessert pie.
Wanting to keep it healthy, I make an olive oil crust. Step by step below.
It's pretty easy. There are only 4 ingredients, and nothing is unusual. It comes out nice and flaky, every time. I suppose if I wanted buttery flavor, I could add a butter flavored extract, but I don't really miss it.
 Measure out:
3 1/4 cups flour
1/2 tsp salt
3/4 cup olive oil
3/8 cup skim milk
 Combine the flour and salt, then add the milk and oil.
 I use chopsticks to 'flake it all' together, then a wooden spatula and my hands to make a ball.
 My Dad would refrigerate it at this stage, or after rolling it out. I went ahead and made the crust.
 Then I divide it into uneven halves, the larger portion for the pie shell, the smaller portion for the top.
 Roll out between 2 layers of wax paper. This is the secret for an oil crust, it's not firm like a shortening bad-for-you crust
 I peel off the top layer of wax paper, then roll it onto the rolling pin, use the rolling pin to lift into the pie plate, then shape it.
Then I roll out the top crust, and set aside to make the filling.
I'll blog on the filling tomorrow.
Sunday, April 22, 2007


steps to rhubarb pie: canola crust

Step 4. This is Lawrence's canola crust (my Dad). No trans fatty acids, no saturated fats. FOr true 'slow food', you have to make your own crust. Also, it's better and better for you.
It's made from:
3 1/4 cups sifted flour (410 grams of flour)
1/2 teaspoon salt (I use 'lo salt')
3/4 cup canola oil (for savory pie such as a vegetable pie, I use olive oil)
3/8 cup skim milk.

Step 5. I like to use chopsticks to mix it up. Today the consistency was perfect.
Step 6. Roll it out between 2 sheets of wax paper. This is best done using a very old rolling pin (no new stuff here), such as Iva May Alcorn's birds-eye maple rolling pin here. It's also best to use an estate sale pie pan, not the disposable aluminum type.


Steps to a rhubarb pie

Step 1. Find a nice big rhubarb plant. Oh - here's one. Victoria, a mostly green variety, so the pie will be green too, like a 'grasshopper pie'. Green, the color of Spring! (I'm protesting attempts to make it red by adding red fruits like strawberries, although there might be a strawberry-rhubarb pie in June).

Step 2. Pull off a bunch of leaves with stems. Cut off the leaf part, just leaving the celery-like stalks. The leaves go to the compost bin.
Step 3. Chop up the rhubarb stems, about 1/2 to 1 inch cubes. One big stalk gives about 1 cup, a smaller stalk about 1/2 cup. This pie requires 4 cups. I froze the other 4 cups for some future treat.

Subscribe to:
Comments (Atom)