Monday, September 27, 2010

The "Best" vegetable pies ever!

Last week I drove past a sign that proclaimed, "Estate Sale". I am required by forces of nature to stop at estate sales, and did so. The lady whose estate was being sold had a number of nice pyrex glass baking dishes, including some 8 inch pie plates. Thinking that an 8 inch pie must be less fattening than a 9 inch pie, I bought the 2 8-inch pie plates.

It's not allowed to buy a pie plate without baking a pie, so I promptly did so. In fact, I made two. These are variations on a theme, vegetable pies with a cream-of-something based sauce.

This is the pie crust recipe here. I've made a change that I like. I add 2 teaspoons of lemon juice to the mix. I think this makes for a fluffier crust, something to do with the effect of the citric acid on the olive oil while baking. In fact, it starts to rise before it goes into the oven. As it happened, this made enough crust for both 8-inch pies.

I washed and sliced the cauliflower, placing chunks in the pie crust. Then I added about 1/2 cup of sliced mushrooms, sauteed in olive oil, and 1/2 medium onion, also sauteed in olive oil. That saute really brings out the flavor. Then, placed chunks of sliced garlic throughout the pie, and peppered it with pepper (duh).

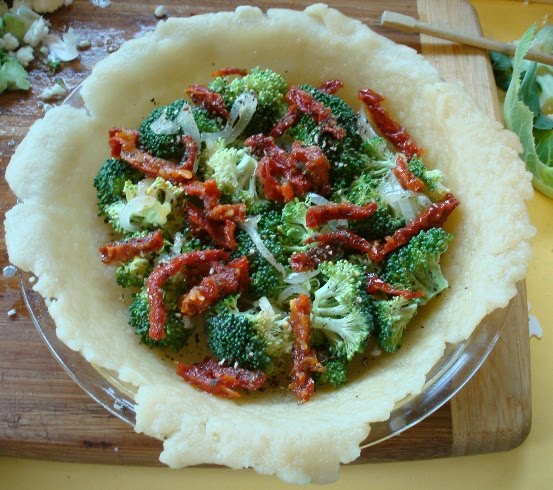
Similar for the broccoli pie, except I didn't saute the mushrooms. Instead of garlic, I placed sun dried tomato slices through-out the pie. This pie also contains sauteed onion, about the same amount as the cauliflower pie. Then I peppered it with pepper, too.

Now each gets the sauce. No particular reason for which one got which sauce. FOr the cauliflower pie, I mixed one can of condensed cream of mushroom soup (low calorie) with 1/2 cup of water and one egg, then poured into the pie plate. ALMOST too much, but it did fit. For the broccoli pie, I did the same thing, except using cream of potato soup. I did that because that's what I had on hand. This was too much for this pie, so I spooned out enough to keep it from over-flowing, and placed the extra amount in a small covered dish, sprinkling bread crumbs on top. Basically, a mini casserole.

They both look the same now. I covered the edges with foil, as usual. I keep using the same foil for edges until it crumples. Waste not want not. Then baked 375 degrees for 40 minutes. Did not remove the foil from the edges, I don't think that's needed.

You can tell it's done because the crust has browned slightly, and there is filling bubbling up through crevices. I let it cool, and ate a slice. These were both really, really good. The sun dried tomatoes added a great flavor to the broccoli pie, and by using sauteed mushrooms and onions, the cauliflower pie had a rich, complex flavor. I ate much of the broccoli pie cold, but I liked the cauliflower pie better hot.

These are like a pot pie, but I like them a lot better. Plus, I can select what goes into them, and I think these are healthier due to the olive oil crust, and the fresh vegetables.

What came from the yard? Just the eggs and onions. If I have enough peaches or apples, maybe a fruit pie is next.

Sunday, September 26, 2010

Dendrobium phaelenopsis hybrid

Yesterday while I was at the local nursery browsing around, I saw this Dendrobium phaelenopsis hybrid. It's small, windowsill size, nice flower. It had a tag from a local grower, which I thought was cool. When I got it home, I realized there was no hybrid name, annoying but not a big deal.


Illustration via Wikimedia commons, 1901. Lindenia Iconographie des Orchidées. Following Dendrobium info is from the Canadian Orchid Congress, summarized. Probably as good a source of info as any, especially in Northern areas. I edited the instructions for brevity and for my specific conditions, but much is directly from the linked site. There are several reasons why it's hard to find culture info specific to a specific Dendrobium: there are many types, and culture requirements vary; there are many many hybrids; and naming is a mess. I still haven't sorted out whether these are really Vappodes phaelenopsis hybrids. Wikipedia routes searches for Dendrobium phaelenopsis to Vappodes phaelenopsis. Plus, did they really have to give these a species name that is identical to that of an unrelated genus (Phaelenopsis)? Confusion is also noted at orchidculture.com "There is a great deal of confusion surrounding these species, and it will probably continue to be with us for some time. Although these two species have been lumped together at times and are still considered to be synonymous by some authorities, the most recent taxonomic work has them listed as separate species. While very similar to each other, the flowers of D. bigibbum tend to be somewhat smaller, have sepals and petals that are more strongly reflexed, and a lip that is broader and more rounded or notched at its apex. In addition, plants known as D. bigibbum are found in areas nearer the equator and, therefore, require much warmer temperatures, especially during winter." Note that Dendrobium biggibum is an earlier name for Dendrobium phalaenopsis. I think.

*Use a coarse medium. Fir bark mixtures are best (note, the specimens that I bought from Missouri botanical garden, and this one, are in small lava chunks. They drain VERY fast)
*Repot when the growth has reached the edge of the pot or if the
medium is beginning to decompose...Repot as new growths are just starting to form.
*These plants like a rapid drying cycle – grow in the smallest
possible pot.
*Roots should be moist at all times when in active growth. Allow to dry out somewhat as the growth matures and when not actively growing.
*When watering, water thoroughly. (I let water run through the medium each time)
*If hard water is used, water very heavily to flush minerals. Rain water is better (I use rain water).
*Fertilize weakly and frequently with a balanced fertilizer. (I use the Schulz orchid food, 1/4 tsp per gallon, weekly, during active growth. For bloom time and when growth is not active, I either don't fertilize or use a low-nitrogen Grow-more bloom food, also weakly.
*Healthy leaves produce more and bigger flowers:
*Light should be medium to high light levels are appropriate. Leaves should be a light green, not yellowish (too much light) or dark green (too little light). They should be somewhat stiff, not long and floppy (more light needed). A reddish edge to the leaves indicates the light is on the upper boundary of a proper level of light.
*Grow in 2-4 four hours of sunshine on an East, West or South window sill.
*Dendrobiums do best with 60-70% humidity but will grow and bloom at somewhat lower humidity levels. Use humidifier to raise humidity – humidity pans and misting minimally effective. Enclosing plant growing areas is effective
but ensure fresh air and air movement to avoid mold and rot.
*Dendrobium phalaenopsis hybrids are warm growing, with night minimum temperatures of 18°C (65 F) and day maximums of 32°C (90 F). (My range is more like 55 at night and 70 during the day, winter; I may need to keep this plant at work which is warmer) The orchid culture site linked above states "TEMPERATURES: Summer days average 85-86F (29-30C), and nights average 72F (22C), with a diurnal range of 13-14F (7-8C). The diurnal range varies only 3F (2C) all year."
*Dendrobium phalaenopsis may bloom at any time during the year and the flowers last for 4 to 8 weeks.
The orchid culture site also states "D. phalaenopsis is often considered difficult to grow and bloom because it requires high light, warm winter temperatures, and a winter dry season, a combination that is sometimes difficult to provide in a general collection. So we'll see. I better hold of on adding any more to this collection, no need for all leaf and no flower with a lot of frustration in the future. As I often state, "We'll see".

Saturday, September 25, 2010

Kitchen Garden. Fall planting for Winter & Spring.

I remember the day the airplanes were diverted into the twin towers. I was post-call an was planting multiplier onions and garlic that day. That's how I remember it's about time to plant them again. It's impossible to forget. Last fall it took a long time to get around to planting them, and I planted in December. About half survived and grew, but not as well as earlier planting. Usually almost all will grow. They can be planted into October, but after that it's getting too cold here to get a good start before the freeze.

This location went to weeds this year. It's a bed on the south side of the house. Closest to the house, I've been trying for many years to get a row of asparagus growing. This year, there actually are multiple, fairly tall (3 to 4 feet) asparagus fronds, and even more smaller ones. I think they will finally be growing. Unfortunately, the bed was let go this year, and full of weeds. I pulled the weeds, added some compost and eggshells, and turned it over with a shovel. This will be the onion and garlic bed for this winter.

Here is the layout. I managed to salvage about 25 medium and large white multiplier onions (also called white potato onions). Planted in the fall, a large one will split into numerous small bulbs. A small one will grow to produce a single large onion the following early summer. They are great for scallions, but I always try to save enough to keep the cycle going.


Not realizing that I actually did manage to salvage some garlic, and had saved the bulbs along with the multiplier onions, I bought 2 garlic bulbs at a local nursery. These were German garlic. This is a great variety, large very strongly flavored cloves. I like it a lot.

The other multiplier is known as "Egyptian Walking Onion". They seem to tolerate any care or neglect. They grow a cluster of small bulbs at the top, where other onions have flowers. That cluster can be planted in the fall or spring. Planted in the fall, they give scallions even before other crops can even be planted. This is the main charm, although the onion bulbs are quite pungent. These were pulled out of the bed that now contains beans, and left to dry out of the sun on the North side of the house, sitting there since mid July. They are starting to shrivel a bit, but still look quite viable. I also have some that are starting to sprout while on the tops of the still-planted bulbs. I separated all of the small starts, and planted about 4 inches apart. They will make great scallions, and I'll save enough for a continuing crop to perpetuate the cycle.

I also planted the large Egyptian Walking Onion bulbs. They will make scallions even sooner than the little sets. This will mean a long season when I can just walk out into the kitchen garden and pull some for a treat.

While digging the onion bed I discovered that we had planted some fingerling potatoes there, and forgot about them. Nice crop.

The 3rd and final bathroom

This is the final bathroom. I needed something "easy" before moving on to the kitchen. It's in the basement, which is the ground level for the front of the house and consists of family room, bonus (ie, junk) room, a tiny bedroom (ie, junk) and this bathroom. The family room was the first project that we tackled 9 years ago, pulling up carpet, putting down laminate flooring (MUCH cleaner, no carpet cleaning needed, and major reduction in allergens) and replacing the wood burning stove with a gas heater, that looks like a fireplace. The bathroom has always been a 'one of these days' project. The shower is large and enclosed, and is the dog-wash station. Part of the family room is the home gym. It would be nice to have a clean bright bathroom with a bright shiny shower, instead of the aged dingy "what were they thinking" ugliest bathroom in the pacific northwest. And of course, because it is so ugly, it has been the neglected step-bathroom, and has become even uglier.

No major wall-moving, no re-framing, no major moving around of fixtures and plumbing. No enlarging. Given the awful condition of the walls, and need to replace tile, there will be re-dry wall work. That's easy.

This is a strange bathroom. I guess the vertical mirror wall was supposed to give the impression of space. This is the only wall that isn't some dark dingy color. The wood is unfinished. I didn't realise it, but the mirror wall actually covers a basement window. It's on the south side of the house, so could be interesting.

"Let's make a small dark space even darker, and tile the shower with dark blue tile with dark grey grout. " At least mildew won't show.

Really kind of pretty tile, but SO dark. This will probably be the most difficult de-construction project. I suspect I will have to just bash through the wall with a sledge hammer, pull of the wallboard and tile, and clean it up. The replace with new cementboard and prep to re-tile.

"Let's be creative and paint a wall dark red! Oh, maybe that's not so good. Let's see if some spare paint will cover the red. Oh, not enough time. I give up." Ugly uglier ugliest.

Another wall is covered with unfinished fir flooring. "Let's go for a sauna look behind the toilet!"

The bare joist ceiling is my fault. When I replaced the bathroom directly above this one, I tore out the subfloor and replaced it. I fell through the absent subfloor, taking the ceiling with me. I've pulled of the unfinished boards between the mirrors. 5 minutes work, barely fastened in. Better for me. Oh look! Upper left aspect, there's a plywood panel. Oh - there's a window! Cool! I went outside. Behind some weeds (bad me) there IS a window down at the ground line. The mirrors are glued to a sheet of panelling - not unusual for the basement rooms in this hours. Once that's pulled off, I'll get a better look at the window, but no reason not to have a real window there. That will let in light, and save energy. We usually just use this bathroom briefly, and now we won't have to turn on the light for every daytime use.

The floor tile. See how square the walls are? I'll fix that, might need to do some minor work on the framing, but not a re-frame job I'm sure. This was a case of "We wont have to clean it if the tiles and grout already look like grime". These are butt-ugly tiles and the grout is a matching shade of butt-ugly.

I kept wondering, "will I be able to pull up the old tile?" Ning suggested just tiling over it. That's the way the other bathrooms were done in the past, with floors that had lasagna-like layers. For those bathrooms, I pulled up all layers, and even replaced subfloor so that all mold and dry-rot were removed and everything was properly water-proofed and sealed. Here, the "subfloor" is concrete, so not an issue. I don't want to raise the floor level, so took a hammer to a couple of tiles. As luck would have it, the floor is sealed, resulting in a poor bond with the tile adhesive. About 15 minutes of work and almost all of the tile is gone.

The sink will be closer to the corner, compared to the current sink. It will be a pedestal sink, to stay clean more easily and give more room. In addition, it will go nicely with the floor and wainscot tile patterns.

The old over-mirror light and plug will be replaced with a GFI outlet next to the sink and a pair of sconces on both sides of the mirror. Almost everything else stays where it is.

Playing with a floor-plan program online. I could not find exact matches for the shower, but this is close.

The window is fairly high on the wall, but that's OK.


I don't want to spent too much time or money on this project, but I also want a nice pleasant bathroom that won't need repair or re-do for many years. I'm planning on a 'retro' white porcelain tile floor with black inserts, and white brick-style glazed tile wainscot. Above that the walls will be painted something light and bright.

Tuesday, September 21, 2010

Handsome self-reliant sedums giving fall bloom

These sedums have been growing here for several years now. The clumps enlarge each year. I have a few in shady spots - not good, they are leggy and fall over. These, in containers or in the yard, grew with minimal (container) or no (in ground) watering this summer. The flowers aren't flashy, but quite handsome and the bees love them.

In a strawberry jar, with smaller sedums and sempervivum in the side pockets. Minimal watering needed, and in full sun.

Same idea as the other strawberry jar. This variety has burgundy leaves.

There was no chance this summer to keep this area clean and watered. The sedum didn't care, and is now quite handsome.

Sedums are great for areas where water conservation is needed, sunny spots, and are also fully freeze tolerant. For the large, bushy types, here aren't a lot of choices when it comes to flower color, but the honeybees enjoy then as they are.

Generous fall harvest, tomatoes, peaches, chives

Also mint, basil, volunteer cilantro, bell peppers, chilis (still green).

A couple dozen fell off with the heavy rains the past few days. They taste very 'peachy' although not super sweet. There are also about 2 dozen left on the tree. Cool!

Tomatoes continue to produce. The heavy rains caused splitting of the cherry tomatoes, and a few big tomatoes. The Better Boys have given us some humongous juicy tomatoey tomatoes, and the others have done well, as well. "Fourth of July", while not producing until mid august, has been quite rewarding with plum-sized juicy fruits.

This is very late for a chive crop. These gave enough for a big batch of chive-filled dumplings.

Monday, September 20, 2010

Spring Bulbs, time to plant.

With so much demanding my time, I'm not planting as many Spring bulbs this year. More than that, I'm not ordering via mail order. I did pick up some packages at a big box store. There was a big bag with 75 daffodil bulbs (standard yellow "Dutch Master" and the ones below. Doubtless I'll add some more this fall. Not wanting to overdo it. Plus, there are hundreds in the ground from previous years, and some have probably multiplied.

The price is lower than last year. These don't seem to make it. I have about 25% or 50% survival, then it takes a couple of years to reach blooming size. Not sure why. They are usually quite dried out by the time I get them, which I think stresses the plant significantly. I planted this one in a slightly raised area, to avoid rot during the rains already happening and soon to increase.

Irises are a challenge even when established. The rhizomes need to be at soil surface. It's difficult to weed under and around them, so the tend to be very weedy. I plan to reduce the number somewhat this winter, keeping groups of each variety but not letting them roam all over the garden beds.

I've given up on bulb planters, and instead use a shovel, dig a hole about 1 foot diameter and 6 inches deep, and plant 5 or 6 at a time. That way there are nice bunches the following spring, instead of one bulb here and one bulb there.

According to my study program, I should take a 5 min break per hour. I'm taking about 10 min, enough to plant a few bulbs.

Friday, September 17, 2010

Orchid Blogging

Still learning about orchids, and watching their progress over the past year. It's been about that long since I started becoming more interested in them.

The way I look at it, the first part is to not-kill them. The second part is to get them to grow. The 3rd part is to get them to bloom. Propagation is optional, but fun. If purchased in-bloom, another aspect of the first part is to keep them blooming as long as possible. That seems to be rather easy.

This unlabeled Paphiopedilum hybrid, Maudiae type, was one of the first that I obtained. I need to check - I think it's a green flowered type. Should be back in the links (labels). I've been treating it as the books instruct, medium light, general orchid plant food weakly weekly. It added a couple of new growths. I count the leaves, thinking that if a growth reaches 5 or 6 leaves, it will be time to bloom. Not certain it that's true, but last week I noted the appearance of a bud. Cool!

Close-up of the bud. Another may be headed there as well, I'll add it if it really is a flower bud. I understand that the process from bud to blossom is gradual, and patience is needed. The upside of that slow process, is that once in bloom, the flowers can last a month or more. Regardless, I'm excited!

The books and the Yamamoto website (see prior posts) promote a season of coolness in bright light to promote Dendrobium nobile hybrid blooming. These are under eaves (out of the rain) south side of house (bright light). One can hardly call the light here in the Pacific Northwest "direct sunlight" so I'm not concerned about sunburn, and anyway these plants were in full unfiltered sun all summer long. This treatment, allowing coolness at night and not soaking them, keeping them in bright light, is considered key to obtaining nice flowers on these hybrids.

Of course, this NOID Dendrobium nobile hybrid continues to cheerfully violate the rules, blooming and blooming and blooming. It is indoors in a south exposure, but spent the summer in the same location as the others.

Dendrobium phaelenopsis "Genting" obtained last month at Missouri Botanical Gardens in St. Louis, after traveling to midwest for my dad's funeral. It continues to bloom cheerfully. I'll hold off any repotting until it finishes blooming.

This Cymbidium has been in a full-sun exposure, all summer. I generally gave it "weekly weakly" feeding, but on occasion provided some higher nitrogen plant food, because most instructions suggest higher nitrogen in summer. I'm keeping it outside for cool nights, per standard instructions for this genus.

Here's the question now - Is this a flower bud? Or another growth spurt. Watchful waiting!

Now we get to "the problem with impulse buying". Last year I bought this plant on impulse at a big box store. It was in a tiny plastic bag. The label is below.

I didn't know anything about Vandas or Ascoscendas at the time. Both are probably inappropriate for this setting and my house, needing more light than I can provide.

Instructions not too helpful either. Can't even tell, is it an Ascocenda or a Vanda? Peobably should throw it away, space is valuable. But, it stays alive, growing slowly, so I'll keep it for now.

Thursday, September 16, 2010

Backyard Orchard: The payoff!

Studying diligently for my recertification, not spending time in the garden. Always some reason to neglect it! That's one of the great things about the backyard orchard - it doesn't need care at the time of harvest, and the harvest is great if the weather permits and prior preparation was good.

Late frost and chilly spring meant a lot of grapes didnt set. Even so, there are plenty odf sweet flavorful grapes to eat now and for the next month or so.

Tomatoes are doing great! The delay just made them all the sweeter in my mind!

Oh man, the pears! Luscious, sweet, a dessert in eveyr bite! Eating one every day.

Still some Asian pears remaining. I think they'll last a little longer on the tree while I eat the European pears. The first of the asian pears were wonderful!

I don't know if I posted on the Trilite peaches, now they are long gone. Very good! Now the genetic dwarf peach is almost ripe, a bit crunchy and slightly tart but very peachy!

Peppers are the best I've ever grown! Container gardening rocks for these warm season plants! THe eggplants are producing as well! Cool!