Tuesday, September 29, 2020

Cross Species Pear Graft Update. 9.29.2020

 Along with the apple grafts, I wanted to try some pear grafts.  Again, this was for making miniature trees.  However, I'm not aware of sources for miniaturizing pear trees. There are some less conventional ways.  Serviceberry, Hawthorn, and Aronia are pear relatives, although different species.  There is some info from the fruit growing hobby community that pear can grow with these as rootstocks.  Also, the apple variety "Winter Banana" will reportedly accept apple scion, so I wanted to try that too.

I grafted European pear onto Winter Banana on a Bud-9 rootstock, and also onto an existing apple tree branch.

I grafted European pear onto two varieties of Serviceberry, and onto a Chinese Hawthorn and onto a Black Hawthorn.

I grafted Asian pear onto Aronia.

Nothing took on the Serviceberry.  

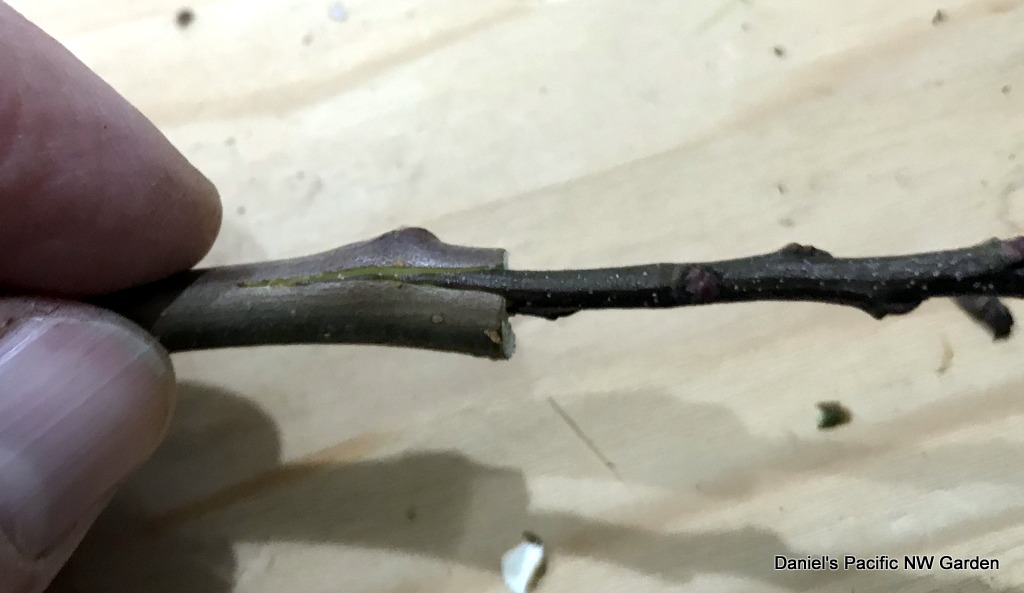
The European pear did very well on Chinese Haw, growing about two feet.  Here is the graft, a little irregular but it looks OK.  That shoot is actually below the graft union, and is Hawthorn.

 The graft on Winter Banana on Bud-9 did not grow.  The graft on Black Hawthorn did not grow.

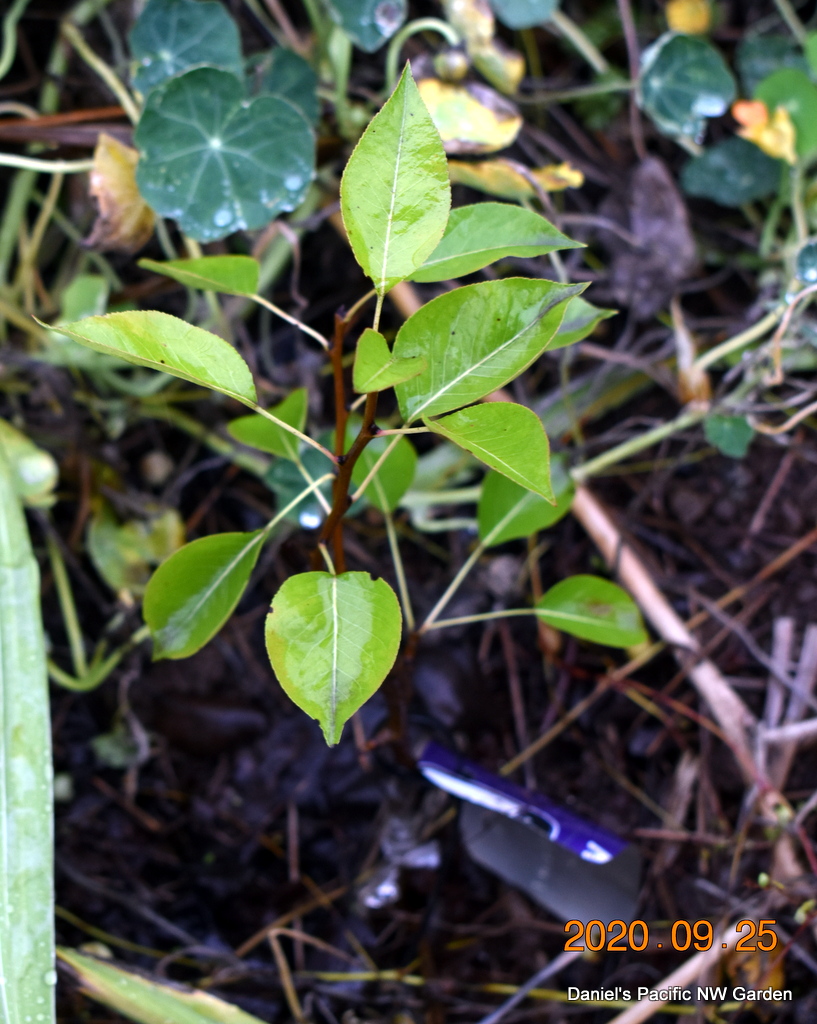
I lost track of the other two, because of location.  Now, I started Fall cleanup as well as picking apples, and discovered the Asian Pear on Aronia.  It didn't grow much, but then again (a) it took, and grew some and (b) it was buried in snowpeas and volunteer four o'clocks, and (c) it was not watered all summer long.


The European Pear on Winter Banana on an existing apple tree, did take and grew a little.  Again, not a lot.  I'm not sure what to do with this - I don't need a pear on an apple tree.  I might try cutting the graft at the Winter Banana and graft that, with the already healed pear graft, onto Geneva 222 or Bud 9.  Maybe the Pear/Apple graft needed more vigor to heal together, than the Bud-9 can provide but now that it did, it will grow.


Since these were sort of hidden and forgotten, I never got around to removing the graft binder ziplock strips.  That's most likely fine, but I'll do that today.


Apple Grafting Update. 9.29.2020

 During late winter, I did a grafting project to create the mini-trees for what will be my mini-orchard.  This is part of my plan to be able to continue gardening and growing fruit, with lower maintenance and no ladders.  From ground level, I can prune, spray, pick, inspect, putter.  I can also grow multiple varieties in the safety of the deer fence.  But first, I need the mini-dwarf trees.  To create those, I used scion from my existing apple trees and highly dwarfing rootstocks bought via mail order.

I did the grafting March 16th.  Most were whip-and-tongue, done as shown in this vintage woodcut print, noted as by Dr. John A Warter in 1867:


I grafted most onto the highly dwarfing but sturdy rootstock, Bud-9 (short for Budagovsky-9). After grafting them, I wrapped tightly with 1/2 inch wide strips cut from zipper lock freezer bags, potted them in the usual potting medium and they looked like this.

One of the grafts was Co-op 32, generic name for the early bearing, disease resistant hybrid apple "Pristine".  I liked this one a lot, but the mature branch had fallen off of it's multigraft stock about 4 years ago, held on by a tiny bit of cambium and bark.  By the time I removed the branch, there were tiny growths of stem that year.  I kept one, and grafted it onto another multigraft the following year.  It didn't do well but survived and added a few inches.  This time, I removed that and grafted it onto some Geneva 222 rootstock - still very dwarfing but maybe a bit more vigor than the highly dwarfing Bud-9.  There wasn't enough to graft as a whip-and-tongue, so I did a cleft graft, matching up one side's cambium layer and hoping that was enough.


I also did some weird, cross-species grafts that will be described in the next post.

Here is how the mini-trees look now.  All are whips about 2 to 3 to 4 feet tall.  I did keep them in a spot where the pots would be shaded but the tops were in full sun; watered almost every day; gave some Miracle Grow a couple of times.

The graft unions healed nicely.  In a few years, this area won't be visible except with looking very closely.

That Co-op 32 apple cleft graft, which I was prepared to write off, did quite well too.  As well as any other.  That tree is also about a 3 foot whip now.  I'm very happy to have rescued that variety.  So I still have the original scion, in a way.  It's just on its own roots now.


 By the way, this is the lineage for Pristine (Co-op 32) apple, developed in 1975 by the PRI consortium and labeled Co-op 32 in 1993.


Next, these will need to be planted in the apple garden.  That can happen as fall and winter proceed.  Two raised beds will need to be removed, which might be after a frost.

I'm not certain yet about spacing.  I have a Liberty apple on M27 highly dwarfing rootstock, which at 20 years old occupies a space about 5 to 6 feet wide.  With closer pruning, it might be ok with the 5 feet spacing.  The wider the spacing, of course, the fewer I can grow and the more room they take, but I want them to have the space they need.

Doing this is inspired by the late Gene Yale from Skokie, Illinois, who had a very nice miniature tree orchard that he created over the years.  This was him in his back yard in 1997.  He used various distances between his trees, and pruned some smaller than others.


Sunday, September 27, 2020

Planting Garlic. 9.27.2020

Garlic is something I like to do on nature's schedule.  It's fall, late Sept.  Sept (preferably) or October is Garlic planting time for me.  That's why I was in a hurry to construct this raised bed, which meant clearing out the mess of snow peas, weeds, and their trellis that occupied that location (needed doing anyway), buying the parts, leveling the ground, putting it together, and filling the bed, including getting some soil.  Getting things is not easy in the time of Coronavirus, especially for someone who is at higher risk for complications.

 Anyway, all of that is done.  I planted Musik (or is it Music?) that I grew last year, the largest and among the best tasting garlic cloves and heads that I've ever grown.  Three reasons:  (1) Musik is a great variety, and very delicious. (2) Growing them in shelter.  All of those people who insist that deer and rabbits don't eat garlic plants are either just quoting someone else, or their deer and rabbits have not read that book.  Repeated munching and torturing of the photosynthetic biomass of growing garlic plants does not make for good production or big bulbs.  And (3) the raised bed situation makes for much easier weeding, hoeing, and other care.

I used a trowel with marked measurements, and planted with the bottom of the trench at about 4 to 5 inches.  I planted the cloves 6 inches apart, and the rows are a foot apart.  I think the raised bed allows for a little closer together planting compared to in-ground, but this is roughly what is done in-ground too.

I also dug up the few remaining bulbs that I had let mature their scapes.  I had planted those in Spring and didn't expect much from them.  Some of the books say they won't develop cloves if planted in the spring, but these made about four, average sized cloves.  I planted those here too, so now one row is from those salvaged garlic cloves, which is good.


 Almost everything else here can be done in the course of time over fall and winter.  It's a nice feeling to have this job, which I like, done.

Planting a Seedling Oak Tree From A Container. 9.27.2020

 Last year I rescue this seedling, squirrel-planted oak tree from somewhere.  From the leaves I'm guessing it is a Northern Red Oak.  It survived a root injury and grew about 8 inches.  This location is near the woodlot.  I stepped it out, the easement extends 30 feet from neighbor's fence, and this is 40 feet, so that should be OK.  There is a ginkgo tree a few feet from here, something killed it.  I don't know what.   I've had three ginkgos die on me, so I think it's the ginkgo tree and not the location per se.

In the container where I've been taking care of this little tree for a year.

I like to bare root my trees before planting them into the native soil.  There are a few reasons.  First, I get to inspect the root system.  Second, I can spread the roots around in the soil so there are no girdling roots.  Third, it's recommended by WA State horticulturalist Linda Chalker Scott, for these and other reasons - for example, roots tend to circle around in a hole that contains an nice potting medium whereas the surrounding soil is native.  Fourth, I think one of the issues with previously planted trees, maybe those ginkgos too, was that moles love the potting medium and dig through it, disturbing the roots and providing a route for voles, which eat the roots.   All of the trees that I planted during my first couple of years here, which I planted including their original potting medium, were severely disturbed by moles.  Since I started bare rooting them, that doesn't seem to happen, or not nearly as much.

This tree's roots look fine.  The damaged root is not 100% better but there is a lot of growth of the rest of that root, surrounding the injury.   There are also some new roots, thick and white, which is a good sign of root growth going into fall.

Planted into the ground.  It's a nice looking little tree.


This is on the deer all-you-can-eat salad bar route through my yard, so this tree needs protection.  I read that oak seedlings are eaten by deer.  I also added a plastic mesh with 1-inch openings.  Deer seem able to pull leaves through this more open, but sturdier wire fencing, so I use both.


Friday, September 25, 2020

Making some sourdough bread. 9.25.2020

 Today I made some sourdough bread.  I made two loaves - one a standard white bread, and the other a 1/2 whole wheat, 1/2 white flour with added sesame seeds, millet, poppy seeds, flax seeds, and sunflower seeds.  It's about a teaspoon of each type, but a tablespoon of the sunflower seeds.

I made buns from the white bread, instead of a bread loaf.  I used a cast iron muffin pan, which makes buns about the size of an English muffin.  There was some dough extra, so I used short, wide canning jars to make some additional buns. 

For sourdough starter, two weeks ago I decided to start a new "mother" batch.  I combined 1 tbsp four (organic, unbleached) with 1 tbsp water (well water, not chlorinated).  I used a 1 pint canning jar, let it sit a day, stirred in another tbsp each of water and flour.  I repeated that process for a week, then removed half of the mixture and mixed in 1/2 cup flour and 1/2 cup water.  After letting that sit overnight, I used 2 tablespoons for a starter, and poured the mixture into a quart jar containing 1 cup of water and 1 cup of flour.  That jar is now the "mother", which I keep in the fridge, use every few days for starter, and replenish with equal parts water and flour about once every two weeks, letting it ferment until frothy before putting back into the fridge.  This starter has a nice buttermilk flavor, and the bread comes out really nice.

These were baked at 375 F.  The items in glass needed 45 minutes.  The buns in cast iron needed 30 minutes.

These were quite good.  I think the white sourdough buns would be nice for a quick garlic bread.  I buttered one, and made a small sandwich with another.

The wheat and seeds bread was also very tasty, especially toasted and buttered.