Wednesday, November 03, 2021

Trying to Start Some Peach Seeds. 11.3.2021

These seeds are from my best peach tree. I grew that tree from seeds I collected from an Oregon Curl Free peach tree. That was pretty free of the dreaded Peach Leaf Curl, but succombed a year later from a terminal case of leaf canker. If it's not one thing, it's another. Meanwhile, this seedling tree grew like gangbusters. I didn't know what to do with it, so I planted it in the chicken yard. For the past two years, that was my best peach crop ever. Especially this year. Nice size, juicy, peach-tasting peaches, and a lot of them. They can very nicely and make great peach pies. No leaf curl at all, and no canker either. I wonder if the rootstock was an issue with the canker. I don't know. Anyway, so far the offspring is canker free. I tried grafting some scion from this tree onto purchased rootstock. Didn't take. I'm not good at grafting peaches. Here's my thought.

 (1). Generally speaking, most peaches are self pollinating and seed grown peach trees are usually similar to their parent. Not always, but often.

 (2). Maybe it's better to have peaches on their own roots anyway. No grafting complications, rootstock borne disease, nursery-borne diseases. 

 (3). My experiences so far are that seed grown peach trees start bearing as fast as grafted peach trees. 

 (4). I think in general, peach trees often die young. 

 So if you have a peach trees that's been bearing well for a number of years, this might be a good time to start a new one. All that said, I collected pits from my "special" home grown peach tree. I planted a bunch of them in a row at the mend of the garlic bed, where if they start growing next Spring, I'll see them. 

 I also cleaned up a dozen peach pits, wrapped in wet newspaper, and placed into a jar. That went into the fridge. Now is about four months, so I took half of them, cracked them open (hammer on concrete garage floor), and washed off the seeds. Those are going into damp paper towel, in a zip lock bag, in my office. I plan to do the same with the others after another month of stratification.
Originally, I designated this peach "Cowlitz" in honor of the people who preceeded us in this area. However, I thought that might be improper, so I renamed it "Sunny Day Peach". As far as ai can find, there is no other fruit with that name. 

 I just looked up peach trees on the Raintree website. $59.99 plus who knows what shipping! And my experience, most (almost all) don't do that great, if they survive at all, in my garden. A free peach pit from a reliable, well producing tree, is a real bargain! 

 Edit 11.3.01 I only had these in my office for a few hours. Further reading, it looks like peach pits need roughly 90 to 110 days to germinate. We are still a week or two from that date. Some people remove the seed from the pit prior to stratifying. So I think we should be OK.

Soil For New Raised Beds. 11.3.2021

I decided to have the soil hauled here instead of doing it myself. I calculated the beds will need three cubic yards each, and Ning also wants a cubic yard. My little pickup, trusty as it is, can only handle 1/3 cubic yard at a time. On a good day - for dry soil mix or wood chips. That would have been about 28 trips. This project is a signifant part of my gardening future, so it's worth it. This soil is recycled from whatever is brought to the yard waste center, mainly sod or yard re-grading. I used recycled topsoil from the same source, last year, for one of the raised beds, amended with home made compost. That was an excellent crop (garlic). Various places sell mixes - sand, compost, perlite, forest humus (that one sounds suspicious). All of the organic fluff will break down in a year or two, resulting in a lot of volume loss. The sand or perlite might help drainage, but I think will dry out too fast. Topsoil is what the garden is anyway, so I bought plain, sifted topsoil. I'm surprised he could back that giant truck through the gate. But he did.
In a sense, that truck was full of next year's tomatoes :-). First, I need to fill the raised bed. The top foot will be fresh compost plus enriched soil,from a raised bed that I have to deconstruct and rebuild due to mole damage. I think the first bed will be completed and ready for winter's mellowing and settling, in about a week.

Tuesday, November 02, 2021

Green Jalapeño Hot Sauce. 11.2.2021

I fermented some green Jalapeño peppers and made hot sauce, so the end of season crop wouldnt go to waste. This has the flavor we expect from Jalapeños, more "green" and not fruity like the red ripend ones. The texture is a little more crunchy, compared to the red. Still, quite tasty. Other than using green peppers instead of red, it's the same recipe - the peppers, garlic, onion, brine, and a bit of life starter from a jar of uncooked sauerkraut.

Garlic Crop for 2022. 12.2.2021

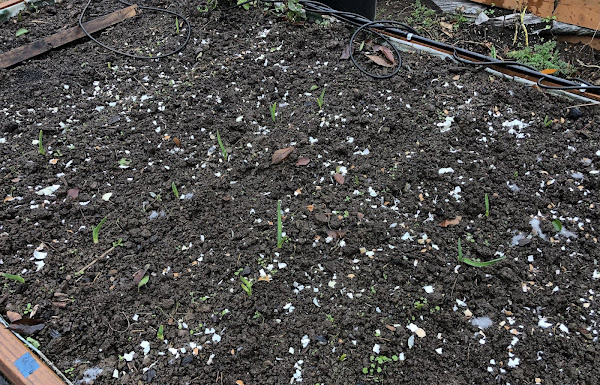
Most of the garlic that I planted last month is growing. There is a row of holdouts, and a few here and there, plus I did add one more row when I cleared out a row of marigolds last week. This is the variety "Music" which I grow year after year, maintaining my own starts. They got a big scattering of coffee grounds and eggshells. Now that they are up, I can cultivate between rows.
These are starts from last year's bulbs grown from top bulbils. I'm glad they are growing. They were a bit behind the others, so I need to cultivate some more. These are in the ground, so I have to get onto my knees to weed them.
The Lorz Italian Softneck garlic isn't up yet. Maybe it's a type that won't emerge until Spring. I don't know, we will see :-)

Work on A Newer, Taller, Bigger Raised Bed. 11.2.2021

I have two big raised beds to build. These are two feet tall, compared to the last ones that were 18 inches. The taller size is much easier for me to work with hand tools, keep cleaner, mulch, thin, harvest. This is all about easier, more accessible gardening so I can continue doing it for more years to come. After pricing various wood and metal options, these cement blocks turned out to be the most economical option, by far. Plus, I think they will last for the rest of my life. I've used this kind of block in the past, and was happy with them. For the base, I'm using two barriers. Some wire fencing, and plastic chicken wire. These are what I had around from old garden fences. I hope they keep moles from digging up into the beds. I'm also adding barrier to the pathways because moles tend to undermine blocks at the sides of raised beds. This will need some touching up, and if I'm lucky the moles will travel further so they don't damage my work so much.
These are longer than my previous garden beds, deeper, and wider. I tried making them even more wider, but could not easily reach the middle. The idea is to make it easier for me, so I narrowed the bed slightly. I can reach the center of this bed, barely. Good enough to use a small hand hoe, and do the various maintenance tasks. The capstones are reused X 3 or X 4 times. In their last life, they were edging. Before that, Capstones. Before that, a large patio and walkway. They give a nice, aged, finished look and not as stark as the bare cement blocks, I think. Plus capping the cement blocks creates an air pocket to insulate the soil a bit, and keeps weeds out of the holes. This construction project is a bit much for me now. I can carry and install about ten blocks in a day. Twenty if I push myself really hard. Then I regret it. The hardest part is getting them level, even, and plumb, which takes multiple tries on the soil base. There's no hurry - They are about 90 blocks, so if I average 15 a day, then it's only 6 days. 

 This one is done until the soil comes. I'm leaving the end open so I can wheel in the soil with a wheelbarrow, then finish the end and add the last amount of soil using a bucket. I do want these done before Winter really sets in, so the soil can settle in and mellow with the compost that I will mix into it.