Tuesday, April 06, 2021

Disapearing Nine Patch Quilt. Update 04.06.2021

 I've tried to match the chambray fat quarters with batik quarters, either as contrasting colors and colors that seem to match.  I expect to continue to move them around until time to actually sew them.

 First, I starched and ironed all of the fabric.  That keeps it shaped nicely for cutting and sewing, not stretched and awkward.  I also cut the black (actually a charcoal grey batik on black) into 5 inch squares.  I wondered if the black was too much contrast with the colors.  I don't think so, and those will be smaller when it's all together.

I started cutting the fat quarters into 5 inch squares too.  These are the first few, with the chambray and batik matched in each pile.  There are 12 squares of each, so with the black centers there will be 3 large quilting blocks per pile.  I've actually cut about 13 piles now.  Some don't match as well as these do.  I may need to rearrange them for better color match.


I took a couple day break from cutting, to do some gardening.  Plus I was changing the razor blade wheel in the fabric cutter, and sliced a piece of my finger.  Fortunately, no blood wound up on the fabric.  So I wanted a break for that to heal.

On a side note, I want a quilt for Rufus's bed, which is actually my bed but he takes it over.  I want something more durable than the usual quilt fabric, and also inexpensive.  I bought three somewhat heavy weight 100% cotton, extra large men's shirts at Goodwill, that matched the 50% off labels so they were very cheap.  My wild guess is each can be cut into about a yard or yard and a half of fabric, so this is much cheaper than buying something at the fabric store.  So far, I have plain grey and blue tones, which I will keep to, maybe with some brown or tan, or off white.  We'll see how many I can find.  I think I need a total of about ten old shirts for this to work.   No hurry, and as the weather warms up and the corona goes away with vaccines, yard and estate sales can be an even more inexpensive source of cotton fabric.  I read somewhere that Goodwill throws away a lot of the clothing that is taken there, so I'm thinking this is a good way to recycle with low cost, and the end result will be more durable than if I bought actual quilting fabric which is not as rugged as these.

Kitchen Garden Seedlings.. 4.6.2021

These are seedlings for the tomatoes that I was overthinking.  There are Roma sauce tomatoes, nonhybrid determinate heritage types that I wanted to grow and save the seeds.  I got them growing before April 15th, which is usually my deadline to start tomato seeds.  The dwarf tomato varieties all germinated as well - Brandy Fred, Tanunda Pink, Dwarf CC McGee, Extreme Bush (not a statement about political families, just a tomato), Dwarf Johnson's Cherry, Dwarf Improved Champion, and Alpatieva 905A all germinated.   I usually plant several seeds for each, and most of the cells have more than one seedling.


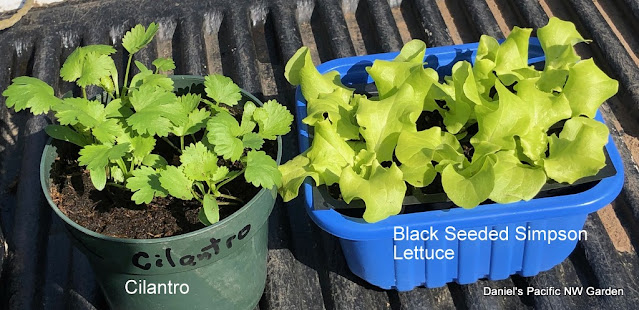
I planted the cilantro and lettuce seedlings in a raised bed.  Both should be OK even if there is a frost.  Also in both cases, there are seedlings germinating in small rows that I direct seeded a few weeks ago.  Those are smaller.  It's interesting that the latest cilantro had very poor germination inside, but the seeds that I planted directly into garden soil are looking better.

The tomato seedlings  that I started earlier are getting too big to keep indoors, but the weather is not warm enough to plant them.   I knew there was a chance of that when I started them.  However, my mental state needed the optimism of starting tomato seeds, so there you are.   I have a few ideas.  First, planting some of the hardier seedlings in the garden will clear up some space on the plant shelves and reduce my trips taking them outside in the am and inside in the pm.  Second, most will go into larger conatiners soon.

 
Third, maybe I can plant a few tomato plants outside with protection.  I've used these "Wall'o'water" covers in previous years.  They do the job.  Awkward to work with but they do work. The sides are plastic that has been bonded so they can be filled with water.  One shelter holds about 4 gallons of water.  The sun shines through the water so the plant grows.  The water absorbs heat during the day, and releases it at night, warming the plant.  It's OK as long as the plant doesn't outgrow the covers.  When the nights are warm enough, I can remove the covers.
 
I set up two, and have a soil thermometer inside so I can see how warm it gets, especially at night.  If the soil is above about 50 inside these in the am, I can plant three of the tomato plants.  I also ordered three more covers, which Amazon states will come in about ten days.


Planting the First of the Seedling Potatoes Outside. 4.6.2021

The "True Botanical Potato Seed" Clancy Potato seedlings are looking large enough to plant outside.   Plus, some of the potatoes that I planted a month or so ago are growing.  Those are tolerating the chilly nights just fine, and have stout stems with dark green leaves.  The Clancy seedlings are more delicate. Maybe by planting them outside, they will toughen up.  I have been leaving the seedlings outside all through the sunny part of the day to acclimate them.

I chose the same trench planting as with using cut up potato tubers.  The difference is those get buried and don't need immediate watering.  For the seedlings, I planted so the leaves are all above ground and then watered them.  I did give them some Osmocote.

Some of these are near where a raised bed was last year.  The edge of that got some Roundup.  I imagine that is all long dissipated and degraded now, but it's something to keep in mind if those don't grow.  Dumb on my part to use that, but there was too much on my plate last year to be as organic as I prefer to be.  Only a few would be expected to be affected, and I think more probably, none.


Wednesday, March 31, 2021

Overthinking My Tomato Plans / Sauce Tomatoes / Dwarf Tomatoes. 3.31.2021

 Last year, the cooking tomato crop was great.  There were lots of tasty excellent tomatoes.  They ripened over a few weeks, so I was able to process them for freezing in a few batches.

The slicing tomatoes did not do so well.  There were only a few, mainly on the variety  'Early Girl".  

The cherry tomatoes were late, and a lot of them split and rotted before we could eat them.  They also tended to come all at once.

This year, I decided on several goals. Unfortunately, those goals have evolved, and I don't have the plants in the ground yet.  

Image:  Vintage image of seed packet, Livingston's Seeds.   100 years old.

With the pandemic, I thought the seed prices went up, shipping and handling went up, and availability went down.  So one thing I wanted to do was see what varieties I can save my old seeds from.

I still want to try some hybrids, which I think have potential for better disease resistance.

I want to try some with potential for growing in our climate, which tends to be cooler than a lot of tomato country.  The midwest, for example, is hotter, hotter nights, longer season, and more humid.  Looking at historic varieties, I thought Russian types might tolerate this climate and have potential for seed saving because they are not hybrids.

So the goals were:

Some Russian historic types, for saving seeds and possible better in this climate.

Some hybrids as a backup.  Especially, my two favorites, Better Boy and Lemon Boy.

Different choices for cherry tomatoes.

Another more than 100 year old seed packet.

For the sauce tomatoes, I also want to try some to see if I can save seeds, but have back up hybrids in case those historic types don't do well.  So I planted seeds for:

la Roma III Hybrid multi disease resistant, 76 days to maturity, determinate.

I didn't think to check for determinate types.  Determinate means they all ripen at once, which I want, and don't grow extremely tall and need tying up to tall posts.  Unfortunately, I got

Amish Paste - which on further reading is not determinate, not even necessarily a paste tomato, so why is it called that?  I planted a six pack but I think I'll just keep one plant to try.  85 days.

Tyren F1 hybrid - a Marzano type, but a hybrid, multi disease resistant, 75 days, indeterminate.  There's that indeterminate again, and I didn't check.  Again, maybe I'll just grow one plant from the 6 pack.  I don't really have room for a lot if they are not what I wanted.

So, I decided to order some of the old type Roma, which is heirloom, so I can save seeds; determinate so I can harvest all in a narrow window of time and they don't grow so tall.  I think I'll just grow a couple, and use the La Roma III as my main past tomato, and grow a couple of Roma and see how they do and save seeds.

OK, now more overthinking.  I started looking into dwarf tomatoes.  Dwarf tomato plants have a mutation in the gene for stem length.  They can be all sizes, colors, and types but grow a lot shorter.  I have never tried them.  Most if not all of the new varieties were developed by amateur tomato growers using a dwarf parent and various heirloom tomato parents.  Dwarf Tomato Project.  Most tomatoes grow very tall, need to be tied to tall posts, and take a lot of maintenance.  The dwarf types might need a post, but apparently do all of their growing on a lot shorter stems.  They are also considered stable, not hybrid, so a home grower can save seeds.  The heights range usually range from 2 to 4 1/2 feet tall.  Much better for me in the future if they work out.   I decided to experiment.  There is still time to start tomato seeds - I usually start them mid April - so I ordered from Victory Seeds.  Victory has a lot of non-corporate type seeds, historic or open pollinated types, and nice descriptions.  The seeds shipped quickly.  I can start them today.

Here are the choices I made, and the available info.  Some are older varieties, not from the Dwarf Tomato Project (DTP).

Alpatieva 905-A.  65 days. An old Soviet Russian variety, about 1950.  Very small plant, 18 to 24 inches tall.  Red 2 to 5 ounce tomatoes.  Might be nice in containers.

Extreme Bush.  50 days.  An old seed catalog (Gleckler, 1958) variety.  12-28 inches tall.  Red.  These might be nice in containers, or raised bed. Plant size more like peppers or eggplants.

Dwarf Johnson Cherry.  65 days.  "Dwarf".  "Very Prolific".  Cherry, pink (look red to my eyes).

Dwarf Champion Improved.  85 Days. Apparently an improvement of Dwarf Champion  which was introduced by Maule's Seed company in 1889 and later carried by Livingston Seeds.  Pink 3-5 oz tomatoes (again to my eyes they look red in the image).

Brandy Fred.  10-16 oz tomatoes, purple.  A hybrid with Brandywine.

Tanuda Red.  75 days.  Red.

Dwarf CC McGee.  "late season".  4-8 oz, "Ivory" (look yellow to my eyes).

Clare Valley Pink.   84 days.  Small to medium size pink tomato (look red to my eyes).

So that's all my overthinking tomatoes.  Most of the dwarf types will be in containers or in small spots in the garden.  I didn't intend to add more tomato plants, but these are a nice experiment for future gardening and for saving my own seeds if they do well for me and are tasty.


Tuesday, March 30, 2021

New Quilt Project. Disappearing Nine Patch, Batik. 3.30.2021

 These are the fabric samples that I will use for the next quilt.  There are two  sets.  One is a subtle pattern in plain colors.  The other set is more vibrant, batiks.  They are "fat quarters", fabric cuts sold to make quilts or other projects.  I bought them on the internet, not wanting to venture out to the local coronavirus fabric store.  With the fabric bundles, you kind of have to make the best guess and take what they package together, so not all of them work.  I think most of these will.  

This should be enough for a queen size bed quilt.  I won't know for sure until I see how it fits together.  The pattern will be what is called a Disappearing Nine Patch, a popular pattern that a relative newcomer to quilting can do.  It's basically, cut / arrange / sew into blocks, cut again, rearrange, sew into blocks, then arrange and make the quilt top from that.

These are the fabric pieces that I want to use.  They are folded, so when I cut them into 5 inch squares, each piece will make about 24 squares (I think).  I tried to pair each batik piece with a semi-plain one that is either lighter or darker, and has a color that contrasts or matches the batik piece.


 For practice, I cut up some mail order nursery catalog photos.  The color one is from Baker Creek Heirloom Seeds,  and the black and white one is from Fedco nursery.  Those are two of my three favorite sources of seeds and plant resources.  The Baker Creek photos are the most beautiful in the catalog business, by far.  Fedco gives the most interesting history and background info of any catalog of its type.  My opinion.  My third favorite source is Victory Seeds, which doesn't have a paper catalog this year due to the pandemic.  More about them, later.

I cut the catalog pieces into 5 X 5 squares.  I used black and white to contrast with the color photos.  

I arranged for the red based images to be at the corners, and the green one in the center.  The black and white are in the middle of each side.  There is no law that says they have to be in this pattern, or any other, but it's easier to follow when one is learning.  The squares can be any color or location.

By having the different color, green, in the center, we can see what happens to that patch.

Then I tape together by threes.  With fabric, I would sew with a 1/4 inch seam allowance.

Then join together the three strips of three.  This is called a "nine patch" block, one of the  main standards of traditional quilts.  I could stop there, and make a pile of these quilting blocks, and it wold be a "Nine Patch Quilt".  That would be fine as is, but I like the added sense of movement and playfulness of what happens next.

Now, cut the nine patch into quarters.  The "nine patch" disappears due to the cut, so now it will become a "disappearing nine patch".  So then, instead of a roughly 14 inch by 14 inch square, you have four roughly 7 inch squares.  

 This image is right after the cuts.  What's nice is, instead of all of the squares being squares, now there are big squares, that will come out about 4 X 4 inches, little squares that will be 2 X 2 inches, and rectangles 2 X 4 inches.  What pattern and color comes out in what shape and size is up to the person making the quilt.  Here, the green flowers are now the smaller squares.

One way to rearrange the squares is to turn two opposite squares so that the small squares are at outer corners.  If you wanted, you could do this using all four from the patch that you just cut, or using patches of different colors from all over the quilt.  I have not decided yet.

Or, turn so that the small squares are at the outside corners.  Then it's like there are four big squares in the center, with a kind of border of black & white rectangles and green small squares in the outside corners.


Or totally random, or any other pattern.  Again, there are no laws about any of this.  Another option is instead of cutting at right angles, those cuts can be corner to corner, but I'm not doing that this time.

I have black batik that will be the center, so it will be a kind of accent like bow ties all over the quilt.  I'm not sure if I will do a random arrangement or try to make a more planned pattern yet.