Sunday, May 17, 2015

Vegetable Seed Planting and Germination. 5.17.15

Image via vintageprintable.com
Sweet corn seeds are germinating.   Almost all of the containers have at least one sprout.  I still need to prep the garden bed for the sweet corn.

About half of the squash and pumpkin seeds have germinated.  I moved them from peat pots into slightly larger containers for root room.  Same as sweet corn, I need to prep the garden bed.

Today I planted melon seeds:

Petite Yellow  Watermelon 65-80 days

Blacktail Mountain  Watermelon 65-75 days

Minnesota Midget Cantaloupe - 60 - 75 days

Sakata Sweet Asian Melon - 85-95 days

Edens Gem Cantaloupe - 65-80 days

So far only one outdoor bush bean has germinated.

It's still early to on-time for all of the squashes, beans, and corn.  Corn was planted 5.12.15, beans 5.11.15, and squashes/pumpkins 5.11.15

Tuesday, May 12, 2015

More Seeds Planted. 5.12.15

Seed starting stand, sunroom.  5.12.15
This weekend and today I planted more seeds.  Now into the more warm-requiring types.

I'm not accustomed to planting squashes and corn indoors in containers.  That may be needed here due to cool spring season soil and temps.  Yesterday and today are cool and rainy.

I have planted most of the winter squash seeds, the summer squashes, green and yellow zucchinis.

Today I planted sweet corn, Trinity Hybrid, sold as a cool tolerant, early bearing variety that may work here.

LaCrosse Seed lists Trinity as "Trinity is a homozygous sugary enhancer bicolor with a clean compact plant, refined ear and good husk protection."  Purdue states, Sugar enhancer sweet corn "has a higher sugar content and is more tender than standard sweet corn" also "Isolation Requirements All sweet corn types should be isolated from field corn pollen by a distance of 250 ft. or by a tasseling date of 14 days. Supersweet (sh2 ) varieties must be isolated from standard (su) and sugar-enhanced (se) types by a distance of 250 ft. or by a tasseling date of 14 days. If not isolated, kernels of both varieties will be starchy instead of sweet.".  There is no nearby field corn.  I also have seed for Early Sunglow Hybrid which is an su type.  Continuing, "It is not essential to isolate sugar-enhanced (se) sweet corn from standard sweet corn: cross-pollination will not result in starchy kernels. However, isolation will permit the full expression of the sugar-enhanced traits. To maintain purity of color, white corn should be isolated from yellow or bi-color corn. Pollen from yellow or bi-color corn will cause some yellow kernels in white varieties. Pollen from yellow corn will lead to extra yellow kernels in bi-color varieties. Pollen from white corn will not affect yellow or bi-color varieties"  So I may decide to either plant the Early Sunglow 2 weeks later, or distant from the Trinity.  Complicated.


Sunday, May 10, 2015

Mushroom box. 5.11.15

 Last week I bought a mushroom growing box at Home Depot.  Impulse.  Followed the directions.  Simple.


Today I noted the mushrooms are starting to grow.  The label states ready to harvest in 10 days.

Vegetable Gardening in Raised Beds. 5.11.15

Raised bed planted with bean seeds and protected with fencing.  5.11.15
 The former strawberry bed was weedy and the soil level sunken lower than I wanted.  I pulled what weeds I could, turned the rest over, and moved a few wheelbarrows of soil from a pile we keep for that purpose.  The pile consists especially of sod removed for other planting around the 2 acres.   Decomposition of the sod makes the soil a little better than it was.

In this bed, I planted Roma and Yellow Wax beans.  Also a small row of cilantro and some onion sets that were laying around already sprouted.

The cover is meant to deter deer and rabbits.
Tomato plants ready to set outside.  5.11.15
The fencing is not perfectly sealed and  birds may also get in.  Better than nothing.

Tomato plants in the sunroom were ready for planting.  That meant removing weeds from a second raised bed.  I had prepped it during winter but failed to cover to prevent weed growth.  The grasses were over 3 feet tall.  I pulled, then used weed eater, turned the soil over and raked somewhat smooth.  Planted tomatoes.  Mulched with thin cardboard food packaging.  Not pretty.  that gets covered with straw or grass clippings later and will no longer show.
Tomatoes started in raised bed, cardboard mulch.  5.11.15

Saturday, May 09, 2015

Set up Warré beehive. 5.9.15

Warré beehive set up 5.9.15
Earlier I set up this Warré beehive see if it would attract a swarm.  It did not.  Today I picked up a shipment of honeybees and installed them into the Warré hive.

The Warre hive was developed by Gustave Emile Warre (1857-1951) which he referred to  as "Ruche Populaire " or  "The People's Hive".  

These hives look very easy to build from scratch.  The only part I can't easily do at the moment is the rabbet.  Maybe I can give myself a router as a retirement present next year, with a rabbet bit.

I lost the info, but I think these new bees are Russian:Carniolan hybrids.  That was on the Beethinking website last year.

Strawberry Bed. 5.8.15

Start of Strawberry bed.  5.8.15
I renovated 1/2 of a vegetable raised bed, and planted strawberries.  Three of the plants were "Pine-berries", a small white strawberry advertised as having a pineapple flavor.  The rest, I forget the varieties.

The prior strawberry bed developed too many weeds.  Most of the strawberry plants died.  I had not been able to maintain it.

This is in an area not visible from the street or neighbor.  For the moment, I mulched with newspaper.  The boards are there to prevent wind from blowing the newspaper away.  The cage is there for deer.

I added a couple of wheelbarrows of yard soil to the previous strawberry bed.  The soil is from a pile we make from planting and removing sod.   I mixed it into the compost amended soil and planted Roma and Yellow Wax bush beans, and a row of cilantro.  I did not plant strawberries, not knowing if the strawberry plants died due to viral disease.  Viral disease has been described as an issue with older strawberries, best to start a new bed.

Monday, May 04, 2015

Pollinating Pawpaw flowers. 5.4.15

3-year-old NC-1 Pawpaw.  5.4.15

3-year-old Sunflower Pawpaw.  5.4.15

NC-1 Pawpaw flower shedding pollen.  5.4.15

Collecting pawpaw pollen.  5.4.15
 Today I pollenated pawpaw flowers.  I've been watching closely for flowers at the pollen shedding stage. 

The NC-1 is the largest of the 3 pawpaw plants that I planted summer 2012.  My goal has been to transfer pollen from Sunflower, which is smaller, to NC-1 stigmas.  However, each has only a few flowers, and what I do depends on the stage of each flower.

As it happened, 2, of the NC-1 pawpaw flowers were shedding pollen today.  When the entire flower is a dark burgundy, that's when it starts to shed pollen.  When the flower is almost all dark burgundy, it is not shedding pollen yet.  That is when I'm hoping the stigmas are receptive

The pawpaw flower makes a lot of pollen.  Much more than most of my other fruits

I pollinated 2 flowers of Sunflower with pollen from NC-1.  I also pollinated a flower of NC-1 with pollen from a different NC-1 flower.   That is not considered an option, but maybe this tree has not read that book.  If the flowers on Sunflower start producing pollen when flowers on NC-1 appear receptive, I will transfer pollen in that direction. 
Pawpaw flower prior to shedding pollen.  5.4.15

Sunday, May 03, 2015

Plum Grafting. Progress Report. 5.3.15

Ember Plum.  Whip Tongue Graft at 43 days.  5.3.15
Ember grafted onto Hollywood at 41 days.   Growing rapidly.  The rootstock was bent, so this tree will need staking to grow more vertically.  Not a problem.

I have not removed the wrapping yet.  Probably could.  I the growth is this advanced, I'm convinced the graft has fully merged and healed.  Leaving the wrapping in place for strength.   Remove at about 6 inches of growth.  We are close to that.

All I read about the need to bud graft plums was wrong.   I did 6 whip / tongue, using 3 varieties, and all took.  This is good.  Many of the bud grafts need more than 1/2 year to start growing.  The whip / tongue grafts are growing fast, a few weeks after grafting.

Apple Grafting Progress Report. 5.3.15

Whip / Tongue with Parafilm.  Columnar Apple.   Two months after grafting.   5.3.15

Whip / Tongue Graft on Columnar Apple.  Two months after grafting.   4.3.15
I grafted a 2nd columnar apple onto 1-year-old growth of another variety of columnar apple, at end of February. 

Not being familiar with Parafilm, I have tried a couple of methods.  For this graft, I used Parafilm and no other material, to wrap the graft.  It was a good fit, and I did not need a tighter material.

Now, 2 months later, the graft has taken, and the join has expanded to the point where the Parafilm wrapping is torn wide open.

At the lower end, a stock bud grew through the parafilm.  That also happened at the terminal aspect of the wrapping.

Since the graft has taken, is strong, and the wrap is no longer holding anything together, I removed the rest of the Parafilm.  That is probably not necessary, since it looks like the tree can stretch it to breakage, by itself.

This graft took very well.  The scion is growing nicely.  There is no open wound.


Apply Tanglefoot to Fruit Tree Trunks for Ant and Crawling Insect Control. 5.3.15

Tanglefoot and polyethylene strips.  5.3.15
 This is a good time of year to apply Tanglefoot to fruit tree trunks.  It's  well in advance of fruit ripening, but after most of the Spring rains.

For figs, the Tanglefoot prevents ants from climbing the trunk and entering ripe figs.  Without the Tanglefoot, my figs invariably have some added crunch, that seems to move around on the tongue.  In addition to being odd, infection by ants also seems to cause mold spoilage of the figs before they fully ripen.  I suspect the ants carry mold spores.

For cherries, Tanglefoot prevents black aphids.  My theory there is ants farm the aphids.  Either that or, the black aphids climb the trunk themselves.  Whatever the case, the Tanglefoot prevents them.

I also apply to apples, pears, and peaches.  The treatment does not stop problems caused by flying insects, but does stop problems caused by tree-climbing insects.

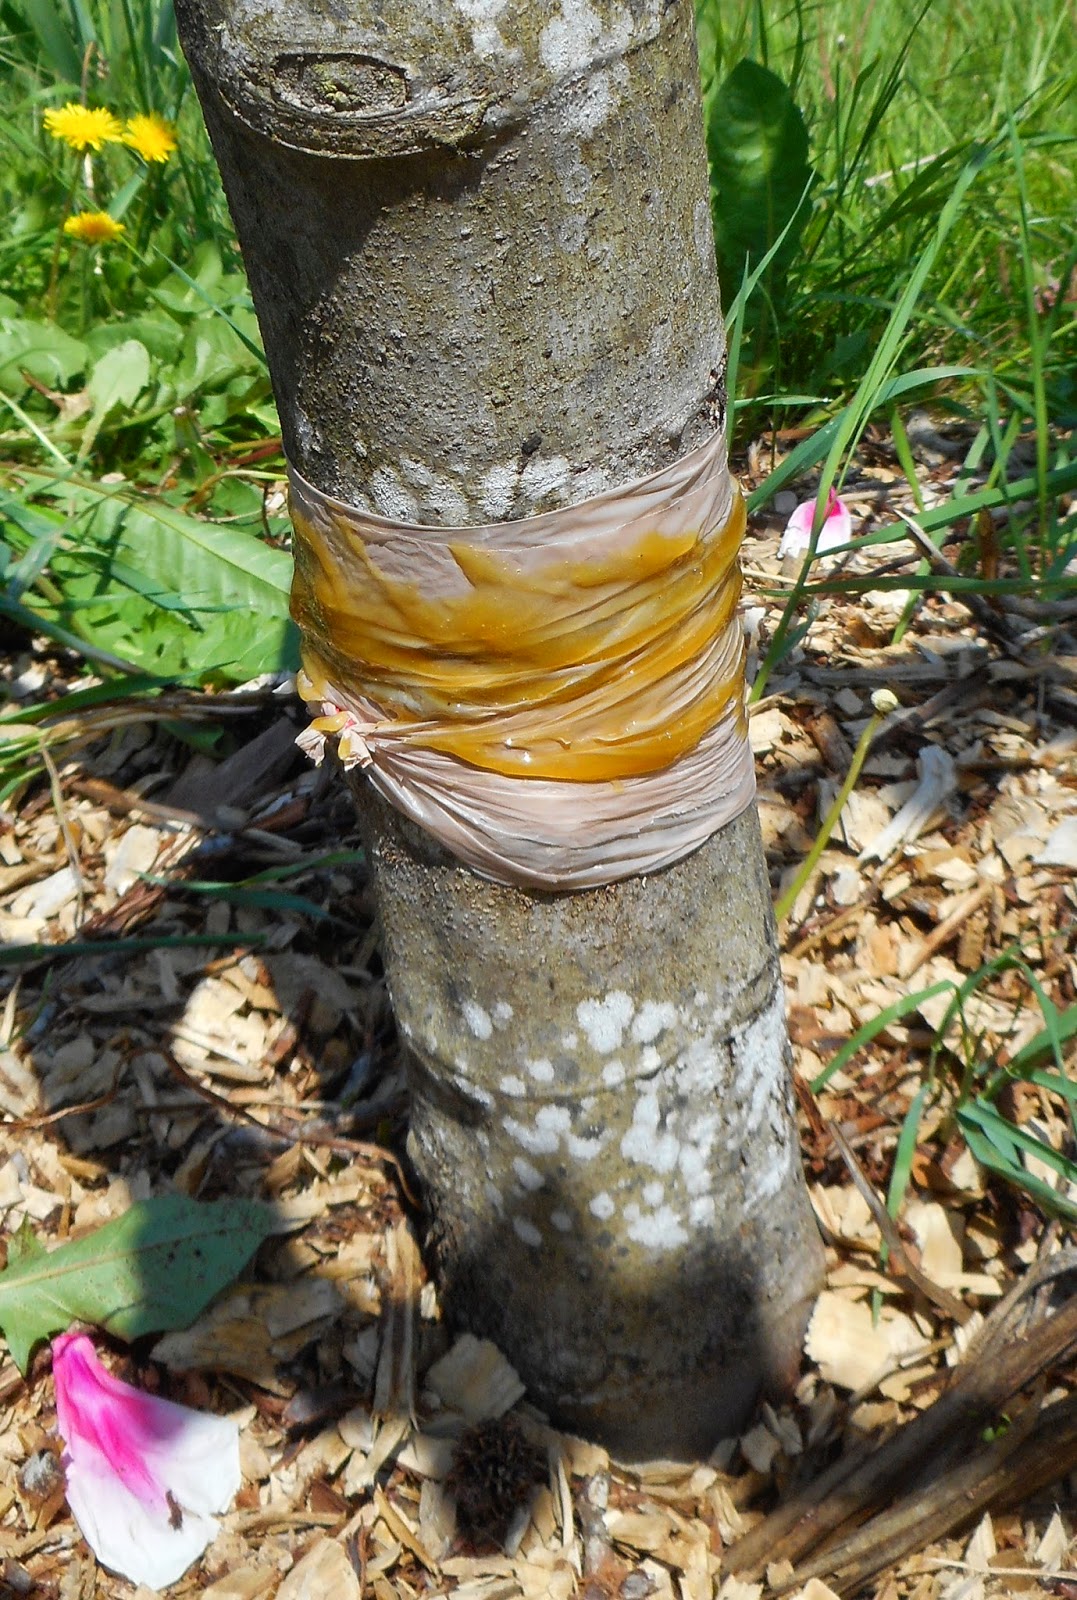
I don't know that tanglefoot applied directly to the trunk is harmful.  It is messy, sticky, and next to impossible to remove.  I wrap tightly with 6-inch-wide strips of light-weight polyethylene.  The strips are cut from disposable grocery store bags.  They are too flimsy to girdle the trunk.  I wrap twice, then tie with a square knot.  Then apply Tanglefoot, squeezing a strip from the tube like toothpaste, and spread on the plastic wrapping using a disposable plastic spoon. 

Being very cheap, I save the plastic spoons from my work place lunch.  I usually take my own flatware, but sometimes forget.
Wrapping fig tree trunk.  5.3.15

During the winter, I remove the Tanglefoot.   By then, it is covered with dust, dirt, plant material, and ineffective at stopping insects.   The polyethylene bags are flimsy enough, to simply pull off the tree trunks.

Alternatively, one could apply sticky plastic tape, sticky-side out.  I would not use duct-tape, which is too tough and might girdle the tree.


Tree protected with Tanglefoot.  5.3.15