Sunday, March 30, 2008

Tomatoes are starting to sprout


Actually, these were visible 2 days ago.

First to sprout: Lemon Boy, Better Boy, Supersweet 100, Black Krim.

Some dried out. None are on a heated mat, just room temp on window sill.

Burnt Bridge Creek Trail

Ning and Baigou. And a glimpse of Charlie.
Trillium are blooming all along the trail.

Dogs in Spring

It looks vicious but it's all in play. They had a great time.
Practically in flight. I wish that I had that energy!

Saturday, March 29, 2008

Snow


According to the news, yesterday was the latest that is has EVER snowed here in the Portland area.
All day, snow, sleet, heavy rain


It's difficult to photograph snow. It moves.


Clivia

First flower. Grown from seed taken from a "Belgian Hybrid" clivia. It took 6 years to first flower. In person, the color has more red tones.

I played honey bee and applied pollen from the Yellow Sahin's to these flowers. And vice versa - pollen from these flowers was added to the Yellow Sahin's. We'll have our own hybrids now, in about 7 years!

Compost and earthworms


Stirred up the compost. This is probably 1/3 chicken droppings + straw bedding, with generous amounts of poodle wool, yard trimmings, kitchen scraps, and coffee grounds.

This compost will need a couple more months before it is ready. Right now it's not 'done' enough.

No worms were added - these find their way up from the soil.

When I remember, I've been bringing home coffee grounds from work. I weighed them, it's about 1 pound 7 ounces daiy. Over a month, that's a lot of garden supplement.

Sunday, March 23, 2008

New Bee House (Orchard mason bees)

Yesterday a few Orchard Mason Bees(Osmia lignaria)were out flying around, and a couple looked like they were in need of new houses. The choice is to spend about 20 bucks for a new house, or use scraps and make one for free. So I used scraps and made one for free.

It's not rocket science. The best book that I have seen on the topic is "The Orchard Mason Bee" (clever title, huh?) by Brian L. Griffin. This book details their interesting life cycle, and ecological role, as well as rationale for promoting them (decreased viability of honey bees, so can't take fruit pollination for granted). Washington State University also has this site and the extension service has this site, about Orchard Mason Bees. North Carolina State has this site, for an East Coast perspective. This site has more information than I can digest so I'll mark it here to refer back to it.

The main issue is how big the holes need to be. The answer is 5/16th of an inch. Mine were made from 2 2X4 scraps nailed together to create a 4X4, then a little sloping roof added to keep rain from soaking into the wood. The roof is probably not needed since it's under the eaves, but not much trouble.

Here is the result.

Just finished

Date added, so that I know which ones are the oldest and need to be disposed of.

Next to an older bee nest.

I need to set out a dish with some mud for them. I better go out and do that now.

Master Bathroom Project (Bathroom 2.0)

There hasn't been time or energy to do much work on the master bathroom rehab. I did pull down some insulation and the small amount of remaining drywall today. This is also a form of meditation, even if it seems like work to others.

What is done so far:
1. Removal of sink, counter, and toilet.
2. Removal of shower.
3. Removal of wall dividing bathroom from empty space on northwest corner, to enlarge bathroom.
4. Removal of closet wall on east side, also to enlarge bathroom.
5. Seal closet doors to reduce dust mess in house.
6. Removal of ceiling drywall.
7. Removal of remaining walls' drywall.
8. Punch holes through wall into hallway. OK, that was a mistake.
9. Repair holes noted in #7.
10. Tear down crappy, inadequate insulation from ceiling and outside wall.
11. Dispose of all of that demolition trash (2 trips to dump, one to go).

What remains of deconstruction:
12. Construct temporary wall in bedroom so that I can tear out the closet doors and re-frame for pocket door.
13. Remove solid oak flooring from former closet to save for bedroom floor patch.
14. Seal off shower pipe and sink pipe.
15. Remove remaining flooring.

Then it's just a big box, deconstruction is done, and construction can begin.


Northwest corner. You can see the nice mold-proof paperless drywall that I used for the adjoining guest bath.
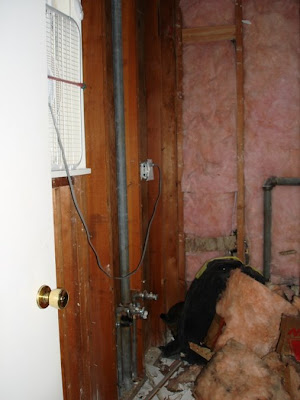
Southwest corner. The insulation is for the tub surround of the adjoining guest bath.

The floor. Actually demolition trash, none of which is reusable. Unlike all of the framing that was removed - it is almost all reusable, and is better than the new stuff. The 2X4s are all stored in the basement, waiting for their new role.

Ceiling. You might say, why tear out all of the fiberglass insulation. Answer: It's inadequate, only being 3 inches thick. It's filled with dust and dirt, reducing the R value even more. The paper backing is brittle and probably can't be reinstalled even if I want to. There is no vapor barrier. All in all, it's better to remove it all and start over with the right stuff, installed correctly and to code.

Thursday, March 20, 2008

Seed starting.

Yesterday I had to leave work due to an amazingly painful back spasm. I couldn't believe how bad it was. I literally couldn't move from my chair - not even a couple of inches. Today it's about 80% better. Since it's my 'day off' anyway, instead of doing homework I mostly rested, but also planted a few seeds. You can't lay in bed all day (it's not recommended, even), and starting seeds in 3 oz. paper cups is not exactly heavy lifting.

Tomates and peppers. I planted the new seeds that I bought by mail order in december (Hybrid tomatoes including Supersweet 100, Lemon Boy, Better Boy, and Heirloom tomatoes including Ponderosa Red, Black Krim. Also some older seeds, Supersweet-100 about 1-year old, and 1-year old seeds of Black from Tula and Cherokee Purple. There were also peppers, including mail order Bulgarian Carrot and Portugal Hot, and older seeds including some old peppers that Ning had in the kitchen. Ning's peppers were brought from China about 8 years ago, and I grew some about 2 years ago but did not save seeds from those. So this is starting over again. The peppers were in a kitchen cabinet in an old zip-lock bag. Will they grow? Also a 3-year old packet of Tabasco peppers.

The paper cups were left over from last year, as was the seed starting medium (looks like about 3/4 peat moss and 1/4 perlite). The cups have holes drilled in the bottoms.

Here they are planted in the windowsill, south window. These little paper cups last about long enough for the plants to outgrow them, then basically fall apart. That's fine, they can be composted.

I thought that I was showing some self-discipline by waiting until today to plant them. Then I looked at last year's entry - they were planted March 25th. So about the same time.

Here is a gardenweb thread on old seeds. Some writers had seeds much older than these, in worse storage conditions, and they apparently germinated and grew. Here is someone who used 5-year old tomato seeds, with 35 of 40 varieties germinating. Here are some 120 year old seeds at Michigan State - fine, if you want Verbascum (but also hopeful for other types of seeds). They were placed in sand in bottles and buried - not exactly optimum storage for seeds, but who would have known, 120 years ago? Of course, there is the famous Judean Date that was sprouted after 2000 years in desert-dry storage. I did a search on the resultant palm, and 3 years later, it is still growing, and is 14 inches tall. According to the article, if it is female and if its DNA hasnt been damaged in it's 2000 year storage, it is expected to bear in about 2010. Maybe. Oh - here's another article about the Methusaleh palm. according to National Geographic, it was 3 feet tall in 05. I'm not sure about the discrepancy. Then there are these 500-year old canna seeds that germinated. They had been used to make a rattle, by native peoples of Argentina in about 1420. Here is the wikipedia artical on the oldest viable seed.

Sunday, March 16, 2008

Brugmansia, getting ready for Spring.

This brugmansia was also stored in the garage. I did give it water 2 or 3 times during the winter - about a couple of pints each time. Some branches died, but most remained greenish and appeared plump and viable.


Bruggie looking crispy, but most of the stems look healthy. It has more dehydration damage than it did in storage last year (see photo link via labels) so maybe i needed to water it more.

This year it will be in a larger container, a wooden container that last held a fig tree. The root mass isn't overly tangled. I think that bruggies don't make the mass of roots that would be seen for a fig of the same size.

Now it's pruned, with only the dead material removed. I don't think that it needs additional shaping at this time.


Now repotted, and thoroughly watered. Like the cannas, it's now on the south facing sun deck. It's a cloudy day, with more to come, so I don't think that there is much risk of sunburn.